| |
 11-21-2014, 07:52 PM
| #21 |
| Rock Crawler Join Date: Feb 2007 Location: Crawling Around
Posts: 871
|
Somehow I forgot to take a picture of the main dash finishing.. where I covered the whole dash top, face, and lower section with a 0.015 sculpted sheet of styrene, and added under-dash ribs to hold the form.. like an airplane wing construction with the 0.015 sheet as the 'skin' over the structure. It really smoothed everything out well, and I'm very pleased, but anyway.... here's the finished bezel:   I went for the full monty on this one, trying to write in the PRNDL, hot/colt/off/heat/def on the control panel, and doing a bit of a glaze in the left 4 holes, where there's really no gauges anyway, but some sort of idiot light in the top 2 holes. On the top of the dash, I went for the sun burnt worn out look so it's not too flashy, and it's not.. so that's good HAHA  What really made my gulliver chuff was that it looks even better through the window! Yay! This whole thing was an experiment for me, as I suck at styrene anything, so I'm quite pleased it even sortof resembles the original.  BUT.... after putting it in the truck, I realized there's a giant hole under the dash, so I have to make up some sort of firewall for this. I'm not sure how I forgot to do that....  |

|  |
| Sponsored Links | |
| | |
|
11-21-2014, 08:34 PM
| #22 |
| RCC Addict Join Date: Mar 2013 Location: Commerce Township
Posts: 1,594
|
Nice work on the dash and interior bits. Door panels look cool.
|
|
| |
|
11-21-2014, 10:43 PM
| #23 |
| Newbie Join Date: Feb 2014 Location: Livermore
Posts: 38
|
That thing is awesome! And I'd say your dash turned out tits for sure. Were you thinking of running buckets? If so maybe you could pop a center console in there to help cover the hole. Just an idea. Subscribed
|
|
| |
|
11-22-2014, 04:28 AM
| #24 |
| Rock Stacker Join Date: Mar 2011 Location: The Netherlands
Posts: 91
|
Scale Jedi....  |
|
| |
|
11-22-2014, 01:09 PM
| #25 |
| Rock Crawler Join Date: Feb 2007 Location: Crawling Around
Posts: 871
|
Thanks guys. I'm having fun! I realized there were some details missing on the dash, like the light switch, ash tray, and glove box. So I added those. I actually carved the outline of the ash tray and glove box and then filled the carved line with a black pen. The knob on the glove box door is a round base, and added flat thingy with key slot, all glued to the door. Same with the light switch and the other 2 over there.. maybe outdoor lights, or something?  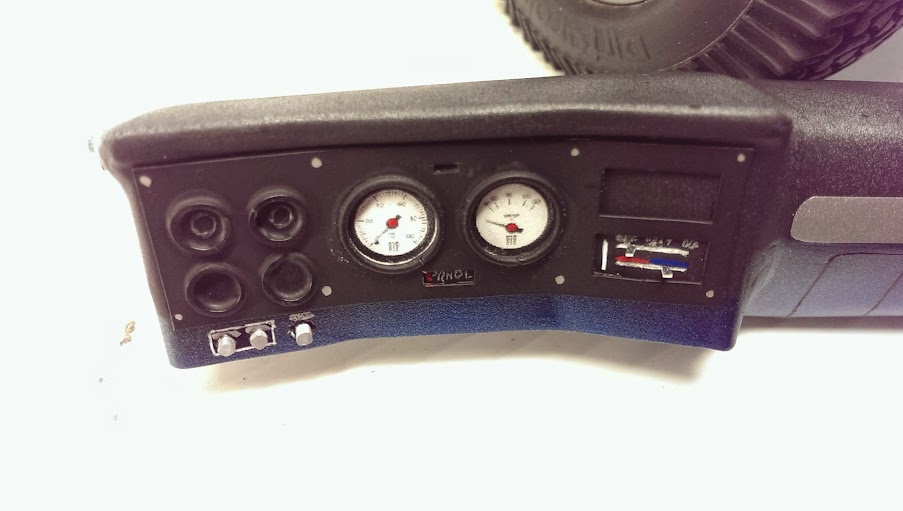  This shot sort of shows you the dash profile also. They tend to be curved way under like this on the 1:1 size. It's hard to hold the material for the skin like this, so I made up these ribs out back for them to hang from. It works great, and surprisingly this dash is very light.. I like.  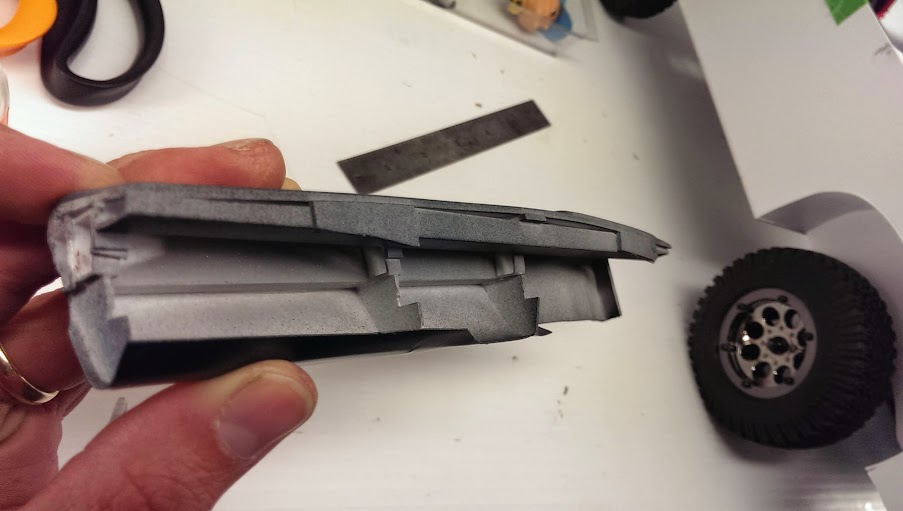 |
|
| |
|
11-22-2014, 01:10 PM
| #26 |
| Rock Crawler Join Date: Feb 2007 Location: Crawling Around
Posts: 871
|
By the way, I purposely didn't add the steering shaft/post or wheel until the seats are in with a driver to locate stuff. It should have a fitting wheel by the time it's done though. In the back again, I added the ribs and top rail to the rear of the truck, at the side panels. It's close enough to say I am happy with it. I also added the spare tire in the stock location, but the real one didn't use the Axial Yeti tire adapter... I did though. It made sense to re-use this chunk of plastic instead of re-inventing something that would likely be less strong anyway. The rear fender tube brace was an after thought from me, but seems to make sense in the real world also. I'll store some scale stuff back there behind the tire anyway. I did also add the fuel filler pipe tunnel. It's on the back right side, so that's the place for the tunnel also. Duh. I'm smrt todaye.   |
|
| |
|
11-22-2014, 02:04 PM
| #27 |
| I wanna be Dave Join Date: Apr 2012 Location: Merrill, WI
Posts: 2,328
|
very nice interior work so far! Some day I will attempt such things.
|
|
| |
|
11-23-2014, 08:27 AM
| #28 |
| Rock Stacker Join Date: Oct 2012 Location: Fremont, California.
Posts: 85
|
Glad your over the styrene fobia. Excellent work, it is coming along nicely ! Scott |
|
| |
|
11-23-2014, 08:38 AM
| #29 |
| Rock Crawler Join Date: Feb 2007 Location: Crawling Around
Posts: 871
|
Thanks, Scott! It seemed to take forever to get this worked out, but I decided the rear gate had to be functional. It's at a very solid part of the truck, so it won't compromise much on strength, and with the interior panel being done like this, I can attach the outside lexan easy enough and be off and running. I think it's going to be a cool addition to the truck! More interior details went in also, just stuff like the side panel bumps, and some other minor stuff added. I did put a motor cover/firewall on the truck also.  |
|
| |
|
11-23-2014, 12:45 PM
| #30 |
| Newbie Join Date: Oct 2014 Location: Wateringen, Netherlands
Posts: 2
|
What an excellent build and thread! Really inspiring! Thank you so much for taking the time to do this!
|
|
| |
|
11-23-2014, 12:46 PM
| #31 | |
| Rock Crawler Join Date: Feb 2007 Location: Crawling Around
Posts: 871
| Quote:
| |
|
| |
|
11-23-2014, 09:40 PM
| #32 |
| Rock Crawler Join Date: Feb 2007 Location: Crawling Around
Posts: 871
|
I am using the Dinky R/C Blazer rear light kit for this next step. It's a black 3d wire printed unit that fits the body very well. I trimmed off the little mounting tab he has over the tailgate area (because my gate will come down) and the rest is a nice fit for my interior setup. Yay!  I think I may do some 'adjustment' on the position of the LED's on the kit, because although it will work perfectly for a stock body, I've got some sidepanels in the way on this build..  I started notching stuff for the light bucket, and then added the inside brace/corner to cover the stuff. It's also the tailgate stop, so this worked out perfectly for my setup. The corner was going to be added anyway, and in this case, the LED bucket just fits inside the corner as if it was made to be! Yah!  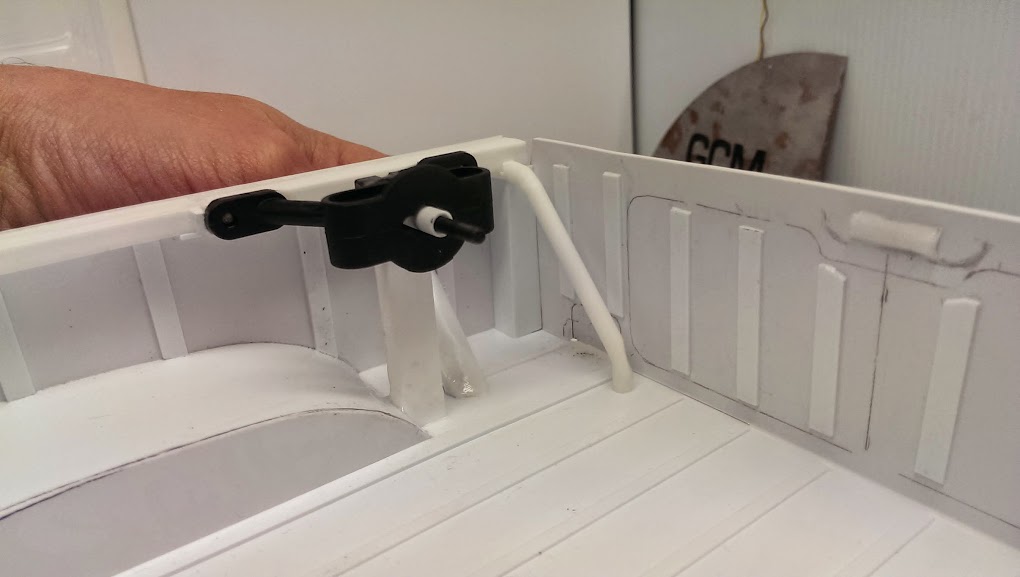 |
|
| |
|
11-24-2014, 04:24 AM
| #33 |
| Quarry Creeper Join Date: Jul 2011 Location: westchester,il
Posts: 279
|
Jeeze bud!!!!!! That looks phenomenal!!!!!!! I wish my interiors came out like that.looks great,cant wait to see the finished product |
|
| |
|
11-24-2014, 12:59 PM
| #34 | |
| Rock Crawler Join Date: Feb 2007 Location: Crawling Around
Posts: 871
| Quote:
I did some paint and weathering on the rear end, and door panels. The first step was to seal all the seams and corners though. I used shoe-Goo with my complex finger applicator to gusset the seams inside, and overlay the outside corners with a small bead also. This really REALLY makes the welding bonded seams very strong. It's amazing how well this works. The shoe-Goo is really good for this! You can see some of that corner work in the following pictures if you look closely. More importantly, I sprayed the rear of the truck with underbody guard first, which is sort of a textured thickish paint, and then with a dust of color before rag rubbing on some colors to weather it out.   I did hand paint flat black onto the tire carrier brackets and supports. Seems better than just all the same colors.   | |
|
| |
|
11-24-2014, 12:59 PM
| #35 |
| Rock Crawler Join Date: Feb 2007 Location: Crawling Around
Posts: 871
|
The door panels got some work also, including window cranks and some detail work. They're a bit worn out though, and I'm betting if the doors opened, the hinges would be shot also. hahah  To do the paint work on the wheel wells and underbody, etc, I UN-married the interior/fender build from the frame and running gear. This was a total of 9 bolts, and it all peels off in one giant 350 gram chunk. Interesting. The entire frame is still a fully functional running truck even with all that taken off. I love that part! haha  I tried a new trick on this frame, since it was completely running as shown. I plugged in the battery, and trimmed the throttle to the end so it was 'driving' and had the tires off. THen I started to lightly spray it with flat black and dust it with red primer. This was cool because all the driveshafts etc got painted as well, and look naturally as aged as the rest of the frame and links and diffs. It was fun to do this! haha    |
|
| |
|
11-24-2014, 06:51 PM
| #36 |
| RCC Addict Join Date: Mar 2013 Location: Commerce Township
Posts: 1,594
|
Great detail, can't say enough....been fun to follow!
|
|
| |
|
11-25-2014, 07:55 AM
| #37 |
| Rock Stacker Join Date: Nov 2014 Location: SoCal
Posts: 78
|
Nice build. I like the details your doing. My only concern is the front wheel wells. I had made some up for mine but had issues at full lock and full articulation with rubbing on the front side of them. I know you've gone a different route with suspension/shocks/tires so was just wondering if you have any issues. I'm thinking of copying some of your design for wheel wells for mine.
|
|
| |
|
11-25-2014, 01:44 PM
| #38 | |
| Rock Crawler Join Date: Feb 2007 Location: Crawling Around
Posts: 871
| Quote:
Great observation! | |
|
| |
|
11-25-2014, 02:08 PM
| #39 |
| Rock Stacker Join Date: Nov 2014 Location: SoCal
Posts: 78
|
Not so much a good eye, just bad experience trying to do mine. I used a cheap dollar store tupperware like container to test fit and such. Tore one of them up doing a little crawling. So that's why the questions. I'm running all stock on mine. Rears are not as much of a problem as the fronts. I'm wondering if shortening the axle a little to tuck the tire in more may also help. Maybe I need to readdress it and run them a little different. Like you said, got to maybe go all the way up to the grill. |
|
| |
|
11-26-2014, 07:08 PM
| #40 |
| Rock Crawler Join Date: Feb 2007 Location: Crawling Around
Posts: 871
|
When I got the sides and fenders back on the frame, it takes on a cool look. With the center cover off, you can really see the weathered and old frame and components and then the inside floorboards in contrast. Neat! haha  Of course, from the bottom it all looks the same, then. Old and dirty. I think it really cleaned up the front look also, and looks way more natural under the truck now. No more shiny bits etc. I did also paint the underside of the center tunnel cover, but it didn't make it into this picture.   |
|
| |
 |
 GCM's 1986 M1009 Blazer Build - Similar Threads
 | ||||
| Thread | Thread Starter | Forum | Replies | Last Post |
| RCBuzz - Vaterra Ascender (1986 Chevrolet K5 Blazer) | RCBuzz | Vaterra Ascender | 2 | 11-12-2014 09:15 AM |
| Badger's 1986 Chevrolet K-5 Blazer Ascender | badger | Vaterra Ascender | 3 | 09-30-2014 12:16 PM |
| River Ridge #9 - Dana's Blazer and GCM's Hilux Vid | Generis | Scale Videos! | 0 | 09-27-2013 10:06 AM |
| 1986 suzuki samurai build | neightfrog | 1.9 Scale Rigs | 32 | 06-12-2009 02:16 PM |
| |


 Linear Mode


