| |
 06-18-2018, 07:23 AM
| #1 |
| I wanna be Dave Join Date: Sep 2011 Location: Douglassville, PA
Posts: 4,225
|
Third time's a charm, right? This is my 3rd Ascender, I put one on back order the day they were announced with Horizon, built it up, drove it a while, was pretty impressed though eventually traded it off. I picked up a second roller along the way, never really did anything with it, and ended up stealing the axles and links for my Junkyard Yota build. When I saw they were discounting them down to $249, I couldn't resist and snagged one up. Not sure what I'm going to do with it yet, basically building it stock (ish) with a few tricks I've learned along the way. Do plan to use it as a loaner rig as well as for my daughter to cut her teeth with. So let's get started...as always a box in all it's glory! Reveling the new kit smell. (Photos flikckr'd out) A box of parts from the first 2, as well as a Ford body/cage setup. Not sure which body I'll be using yet - I've never driven it stock per-se, having sold the body on the first kit right after I got it. I'm a Ford guy, not sure I want that Shebby body up top....But it does look good. (Photos flikckr'd out) Noticed quite a few differences from my first kit. Nice to see Vaterra did a few running changes along the way. I'm a nerd, and this kind of stuff excites me in a strange way. I'll be pointing them out for others to revel in the nerdery. So here's the new red gas tank...very nice. Found a bunch of build parts tucked inside. Like a little surprise present in the box. (Photos flikckr'd out) Hmm...shock towers don't match the directions. A goof? Running change? I don't remember. But they match the old towers I have so guess the directions are off. (Photos flikckr'd out) The links are a bit different color - new ones on the right. They have more of a pinkish tone to them. More food for my nerdness. (Photos flikckr'd out) Chassis built to a 290mmWB. Leaning towards the Ford body, so set up the chassis to match. I think...pretty easy to change if needed. (Photos flikckr'd out) Last edited by OSRC; 03-13-2019 at 07:02 AM. |

|  |
| Sponsored Links | |
| | |
|
06-18-2018, 07:41 AM
| #2 |
| I wanna be Dave Join Date: Sep 2011 Location: Douglassville, PA
Posts: 4,225
|
Hopping all over the place with the build. The kids are home for the summer, so build time is a lot less for now. Can sneak in an hour here and there...last night I snuck in the shocks. Quite a few changes from the original kit, and almost all for the better. Pistons are now notched and come with smaller e-clips. (Photos flikckr'd out) The old design is still shown in the directions. Anyone who's built an older Ascender kit will remember the e-clips covered the piston holes, making for a very stiff shock. These are very welcome changes! (Photos flikckr'd out) Added 10mm spacers on the shafts to limit downtravel. I remember my first kit having a bit too much travel and adding spacers after the build. This way, it's far less messy! (Photos flikckr'd out) Inside is far better, but not sure what happened outside. The rings that support the small and long spring rubbed horribly on the threads of the shock bodies. I tried a few others I has laying around, but they all rubbed making for a very notchy shock movement. Maybe the diameter of the shock bodies is a bit wider? Don't know. Since I had internal limiters, I could get by with cranking down the preload ring and using a single spring. I'm sure I have longer ones somewhere, but this will do for now. Built with lots of green slime on the shaft and rings, and teflon tape on the threads to prevent leaks. Nice and smooth with the single spring. (Photos flikckr'd out) Last edited by OSRC; 03-13-2019 at 07:03 AM. |
|
| |
|
06-18-2018, 07:44 AM
| #3 |
| I wanna be Dave Join Date: Apr 2012 Location: Merrill, WI
Posts: 2,328
|
Fords the way to go. Everyone knows they are the best!  Sent from my ZTE A2017U using Tapatalk |
|
| |
|
06-18-2018, 07:53 AM
| #4 |
| I wanna be Dave Join Date: Sep 2011 Location: Douglassville, PA
Posts: 4,225
|
Moved onto the rear axle... Not much to see here, built pretty much per the directions. I was going to narrow them right out of the box like I did with the first 2 sets, but I've never run them in the stock configuration, so left it stock for now. I do have a set of VP outputs to convert the axle to a pin through design, but went with the stock shafts for now. HD pinion gears and shafts. My first kit had the original design, and though I never munched them, nice to know the extra beef is there. (Photos flikckr'd out) Not shown in the directions at all, but Vaterra now includes some shims for the RP gears. Nice touch. It came with two, but only needed one to take out any play in the gears. Brushed on some red and tacky and everything is nice and precise. I do like Ascender axles. Simple and strong design. (Photos flikckr'd out) The first kit i stuggled like hell to get these little nuts into the axles. Found they slip right over a 1.5mm driver...so pushed them onto the driver, then used the driver to place them in the axle case. Brilliant!! Guess an old dog can learn some new tricks! (Photos flikckr'd out) Last edited by OSRC; 03-13-2019 at 07:03 AM. |
|
| |
|
06-18-2018, 07:59 AM
| #5 |
| I wanna be Dave Join Date: Jan 2005 Location: Raleigh-ish vicinity
Posts: 3,846
|
I do like the stock center shafts, they hold up very well for a plastic shaft. You can use them with the Vanquish driveshaft adapters if you pick up a pair of driveshaft yokes from the Twin Hammers (VTR232013). |
|
| |
|
06-18-2018, 08:04 AM
| #6 |
| I wanna be Dave Join Date: Sep 2011 Location: Douglassville, PA
Posts: 4,225
|
Agreed. Even the old thinner non HD ones held up fine for me. I think these are a little thick looks-wise, but since A) They came with the kit and B) I don't have any other shafts laying around - these get the nod.
|
|
| |
|
06-18-2018, 08:40 AM
| #7 |
| Quarry Creeper Join Date: Jul 2015 Location: Moncton
Posts: 279
|
I look forward to the build, just got mine up and running last week - very neat chassis and i'm happy I snagged two when I had the chance @ 329.00$ Canadian.
|
|
| |
|
06-18-2018, 10:10 AM
| #8 |
| Moderator   Join Date: Sep 2008 Location: PA
Posts: 13,935
|
Build a Chevy. It won't hurt you. I promise. |
|
| |
|
06-18-2018, 10:27 AM
| #9 |
| I wanna be Dave Join Date: Aug 2016 Location: Orange County, CA
Posts: 3,643
|
I've got the Ford body/Cage setup waiting to go on mine too! Undecided if I will sell the Chevy body.
|
|
| |
|
06-20-2018, 08:49 AM
| #10 |
| Rock Stacker Join Date: Mar 2016 Location: Santa Rosa
Posts: 99
|
Hit me up if you want to sell the K5 body.
|
|
| |
|
06-23-2018, 08:56 PM
| #11 |
| I wanna be Dave Join Date: Sep 2011 Location: Douglassville, PA
Posts: 4,225
|
Slowly making some progress...got most of the chassis together. Looks like...well, just another Ascender! (Photos flikckr'd out) Installed the 2 speed I had from my magic box-o-parts. Not sure if I want to use it yet or not. Dropped in a Tamiya 27t motor with the smallest pinion I could find. It's all I have on hand at the moment. (Photos flikckr'd out) Front axle still has the stock positive caster - that's not going to fly...I'll have to redrill them before mounting. (Photos flikckr'd out) Really the only hop up I've added so far - just an SSD diff cover on the front diff. Went with the sliver flavor ilo black like I did on my last 2 sets. (Photos flikckr'd out) Last edited by OSRC; 03-13-2019 at 07:03 AM. |
|
| |
|
06-26-2018, 12:52 PM
| #12 | |
| I wanna be Dave  Join Date: Jan 2006 Location: Corruptifornia
Posts: 12,107
| Quote:
Sweet! Front upper link is too long, should be 61mm aluminum rod, not the 66mm. Best Ascender diff covers ever!  | |
|
| |
|
06-26-2018, 05:32 PM
| #13 |
| I wanna be Dave Join Date: Sep 2011 Location: Douglassville, PA
Posts: 4,225
|
Always good when the expert chimes in! I would think the 61mm link would give a funky pinion angle... no? Angle looks perfect right where it is IM humble O. |
|
| |
|
06-26-2018, 07:38 PM
| #14 |
| I wanna be Dave Join Date: Sep 2011 Location: Douglassville, PA
Posts: 4,225
|
Couldn't help myself - narrowed the axles. I know I would anyway...I'm liking smaller tire trucks lately, and 4.19's just looked too spaced out there on the stock axles. Measure, mark, trim, drill, and done. (Photos flikckr'd out) Once narrowed, you have to be careful where to re-drill the front c-hubs. The panhard mount comes close to the shock. On my V1 axles, I had some rubbing here. I apparently learn from mistakes (sometimes) and clocked this one just so. I used a 3mm spacer in front to keep the panhard parallel (ish) to the steering and a super thin locknut in back. Just clears.. (Photos flikckr'd out) ...and gives me a good caster angle and keeps the pinion rotated up nicely. Win-win! (Photos flikckr'd out) Got a little funky here. Didn't have any steel here to braze with (I really need to practice!!) but I did have some thick aluminum L bracket laying around, so with a few cuts here and a whack whack there I made some boat side mounts with an integrated upper rear link. (Photos flikckr'd out) Rear upper links spaced out...They hit the shifter for the 2 speed...I thought about all kinds of crazy ideas, then said screw it and dropped the single speed trans in instead. Problem solved!! (Photos flikckr'd out) Hacked off the little radio mount thingie..the links hit it under compression and I didn't need it anyway.. (Photos flikckr'd out) Completed boatsides. Plenty of room for electronics, and a battery too, though I have different plans for that. (Photos flikckr'd out) RC4WD front bumper installed...same kind of bumper and same body I used on V1 Ascender. (Photos flikckr'd out) Speaking of...couldn't do it with the Chevy body, and the Ford with the cage found a new home in the meantime. Still had the Bronco and interior here in the pile, and it was already drilled and trimmed, so on it went. Love this body - it's a little off proportion-wise, but fits this chassis very well. Narrowed axles tuck perfectly. This time around, sporting some 1.9 MTR's. I'll need to do something for a rear bumper - what I had on there before looked terrible. (Photos flikckr'd out) As for the kit wheels, I sprayed them with matte clear to dull them down a bit and they got a new home. I think they look much better with a satin finish. Not sure why the front wheel looks way out there - it tucks right in. Must be the angle. (Photos flikckr'd out) Last edited by OSRC; 03-13-2019 at 07:05 AM. |
|
| |
|
06-27-2018, 10:42 AM
| #15 |
| I wanna be Dave Join Date: Apr 2012 Location: Merrill, WI
Posts: 2,328
|
I really like the body. I might be blind but I didn't see which it was. JC Concepts? Sent from my ZTE A2017U using Tapatalk |
|
| |
|
06-27-2018, 01:37 PM
| #16 | |
| Quarry Creeper Join Date: Jul 2015 Location: Moncton
Posts: 279
| Quote:
| |
|
| |
|
06-27-2018, 04:42 PM
| #17 | ||
| I wanna be Dave Join Date: Jan 2006 Location: Corruptifornia
Posts: 12,107
| Quote:
Thanks, mine have been ok with 61mm uppers, nothiing beats cut and turn knuckles where you really want them though. Quote:
Agreed on smaller tire trucks lately! Looks great! Nice solution with clocked knuckles and thin spacer under panhard. You may be able to flip panhard mount screw around for more clearance, but I've got so much steering gotta watch the knuckle doesn't hit against the nut then. Those thin Axial Wraith locknuts are useful sometimes or if really tight I use a flatnut with blue Loctite. I cut those ESC mounts off all my Ascenders too. | ||
|
| |
|
06-28-2018, 06:32 AM
| #18 |
| Quarry Creeper Join Date: Jul 2015 Location: Moncton
Posts: 279
|
OSRC - that Mu looks great with those wheels and MST tires.
|
|
| |
|
06-28-2018, 09:55 AM
| #19 |
| I wanna be Dave Join Date: Aug 2016 Location: Orange County, CA
Posts: 3,643
|
Build is looking good!
|
|
| |
|
10-06-2018, 08:15 AM
| #20 |
| I wanna be Dave Join Date: Sep 2011 Location: Douglassville, PA
Posts: 4,225
|
This is the longest Ascender build ever. Ditched the Bronco body (Been there, done that) and went with a PL Cherokee I had laying around. Fits perfect with the narrowed axles. Stretched the chassis out to fit the body, and then set the links for the wheelbase. Love how easily adjustable the Ascender is. Modded the front bumper a bit - gave it more of a tubular look and added a servo protector skid underneath. Wertymade 7.5" bumper out back is the perfect width. I got a little excited and trimmed too much off the back. Not sure I'm happy with how that looks. Ran the body mounts out the back so I can put in the interior. The shock mounts no longer matched the axle location and angled the shocks backwards. Didn't like that, so I made some new ones that put the shocks back upright. I made a battery tray up front, but didn't like ow high it was. I went the easy route and ordered the Vaterra chassis tray. Got a nice size hole ready and waiting! (3 days later) Ditched the sliders I was working on and tried to make some out of steel. Came out pretty decent. I incorporated link risers out back while I was at it. I can't braze at all, but managed to get them together fairly tightly. (2 days later) Stock shocks had way too much drop out, even with 10mm internal limiters. Looked way too goofy with the shorter WB and narrower track. Subbed in some Icons out back which are significantly shorter. Flex is much more in line now. 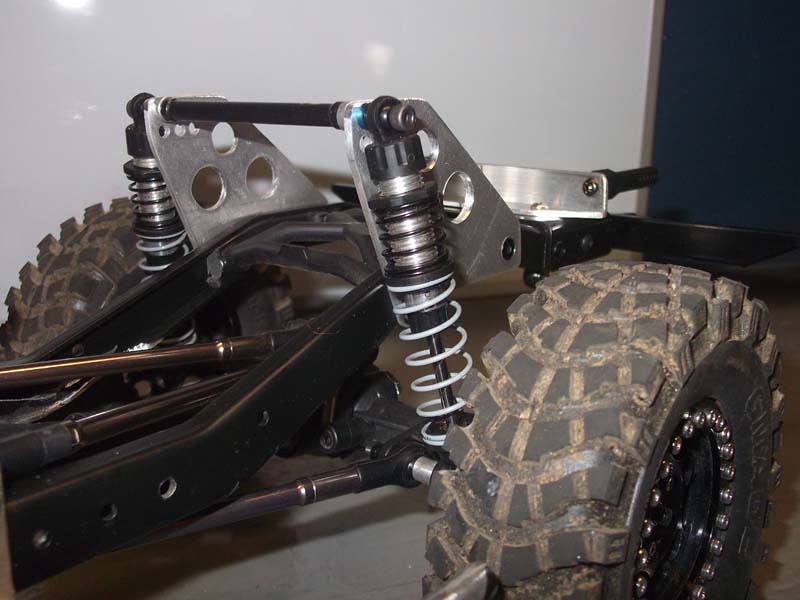 Painted all the aluminum bits. Looks a lot less Home Depot now! 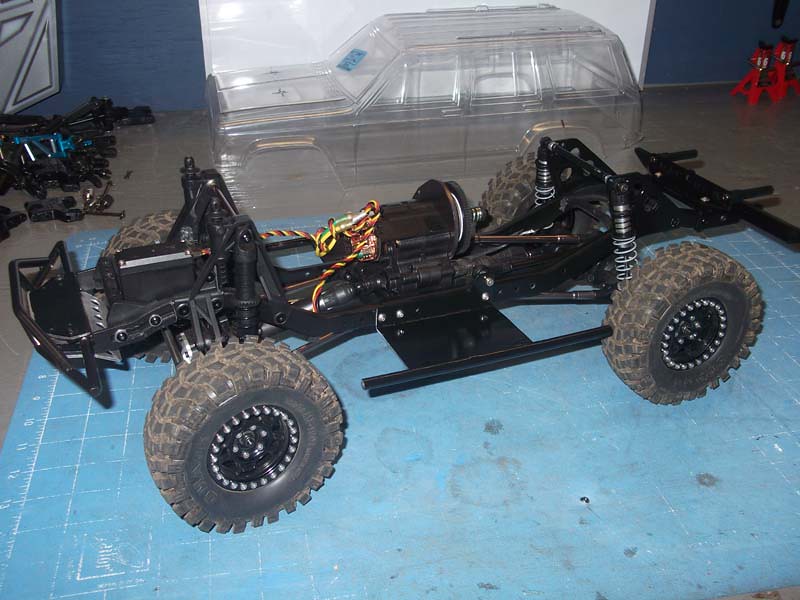 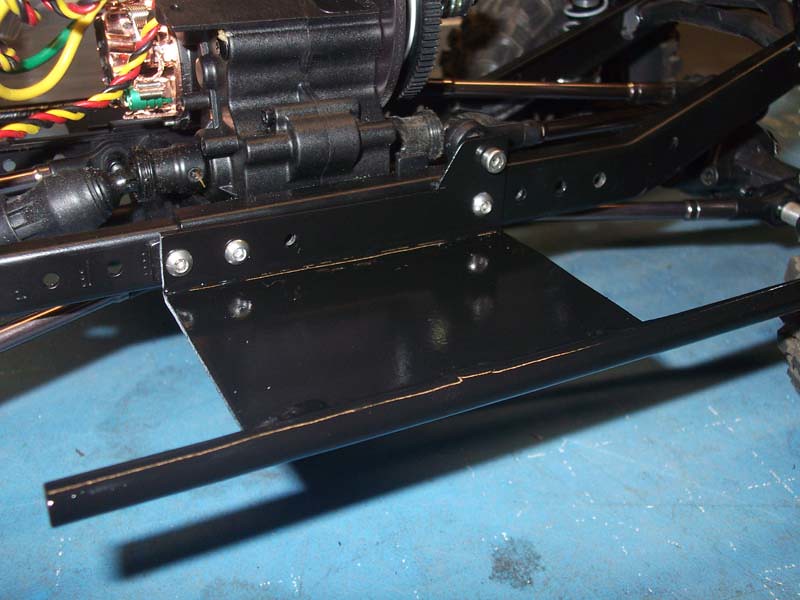 Still not done, but much closer now!! Last edited by OSRC; 03-13-2019 at 07:00 AM. |
|
| |
 |
 OS's Ascender #3 - Similar Threads
 | ||||
| Thread | Thread Starter | Forum | Replies | Last Post |
| OS's Junkyard NB JK | OSRC | 1.9 Scale Rigs | 31 | 11-06-2017 01:36 PM |
| OS's Junkyard C3 | OSRC | 2.2 Scale Rigs | 10 | 10-16-2017 02:07 PM |
| OS's Crawl Hammer | OSRC | Vaterra Twin Hammers | 8 | 05-06-2014 12:12 PM |
| OS's XR | OSRC | Axial XR10 | 21 | 11-09-2011 08:39 PM |
| OS's Creeper | OSRC | Venom Creeper | 8 | 11-07-2011 10:06 PM |
| |


 Linear Mode


