-
Welcome to RCCrawler Forums.
It looks like you're enjoying RCCrawler's Forums but haven't created an account yet. Why not take a minute to register for your own free account now? As a member you get free access to all of our forums and posts plus the ability to post your own messages, communicate directly with other members, and much more. Register now!
Already a member? Login at the top of this page to stop seeing this message.
You are using an out of date browser. It may not display this or other websites correctly.
You should upgrade or use an alternative browser.
You should upgrade or use an alternative browser.
e's ExMT
- Thread starter ekd
- Start date

Abavuso
RCC Addict
The plastic is cut. You'll like the fit, I think.
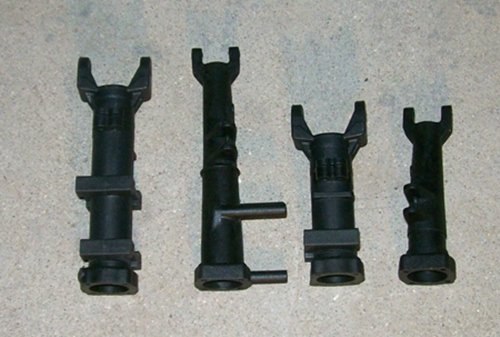
Can you snap a shop of those sitting next to a stock tube for comparison. Those are looking great.
ekd
Quarry Creeper
ekd
Quarry Creeper
Guys, a camera can lie, while exposing the truth. The above is a perfect example. In reality, both M/M tubes (complete) are shorter than the Mad's... to keep the same assembled length (overall, with knuckles mounted). In the pic it looks otherwise. However...
The Mad parts are mirrored. Take a look at the angles of the flanges on them. :shock:
This is the best shot yet of the gross inaccuracy of those moldings. I got a real taste of this while making their turning mandrel (it's tight... for good reason). This pic says it all.
I'm looking forward to getting these into your hands. This mod is worth every second/$ spent on it. A couple spins after assembly, and I suspect you'll agree. :mrgreen: The stouter Cs (at <1/3 the price of the Venom) are great, but the last bonus... steering angle... is gonna be the frosting on this cake.
I decided to dump the CV joints, and go with the UJs, too. I kept 1 next to my KB, and just turned it in my hands, often, while pondering them. Their performance will depend on the precision and rigidity of the setup (can't stress this enough), but, at these low shaft speeds... we are going to get some damn good angles out of them.
As I said before... Gold. Thanks, M.
monkeyracer
I wanna be Dave
I can't wait to get this thing going and get it to a comp!
ekd
Quarry Creeper
And, I can't wait to see it!
I've said it before, and I'll say it here: I'm proud to have you guys running EKD parts.
Even though the very first run has to be the last... :lmao:
M, I'll drop all things R/C, in a sec, for as long as it takes to shake these things down. The first time one of you takes a bite out of a Big Dog (B or B, I don't care), there's gonna be a little party in the shop. You don't have to win, just come back with a bloody grin. :mrgreen:
We can't hope until we can turn with them... but, I've seen what you soon will. There's reason for the guardedly festive mood around this project.
Abavuso
RCC Addict
I have an idea, will one of the stock MT knuckles fit on the inside of the C while leaving room for the U's and bearings? I was just curious because I have 4 of the aluminum knuckles for the MT and it would be awesome if it worked. I miagine if it did work I would have to make the outer bearing hole much bigger to fit the 8MM stub though it.
ekd
Quarry Creeper
Nope. The two have nearly identical heights. Also, the UJs need a few more mm from the pivot point in to the bearing face.
Modding the Max knuckles will be easy and stout. And, when it comes time for custom knuckles, there is room for a lot of options.
Any more, when I look at stock tubes, all I see are convenient stubs.
Modding the Max knuckles will be easy and stout. And, when it comes time for custom knuckles, there is room for a lot of options.
Any more, when I look at stock tubes, all I see are convenient stubs.
Abavuso
RCC Addict
I think I found the lower link and shock mounts. The wraith as some that would be easy to mod for a perfect fit.
Sent from my PC36100 using Tapatalk
Sent from my PC36100 using Tapatalk
monkeyracer
I wanna be Dave
Why not just the stock max stone mounts?
ekd
Quarry Creeper
Thanks! We're having fun with these things.cool truck!"thumbsup"
Yup. I have a set, and they will work well. The locating tabs are handy, but if we need to go in a bit, a screw can pin them as well. The full length stubs give us a lot of meat to mount stuff.Why not just the stock max stone mounts?
I'm also considering making something that mounts with the C's tabs. If it is tapped, and mounted on the inboard tabs... it will re-enforce them nicely, at no extra weight.
Lotta options here. Tie the tubes in line, and the rest is all easy choices.
Abavuso
RCC Addict
Why not just the stock max stone mounts?
I'm not confident they will do the job. That and it will give me the option of mounting them where I want and not just at the available location.
The other reason is that I plan on using the posts for the mounts to mount the servo if I can't make what I'm wanting to make.
Sent from my PC36100 using Tapatalk
Abavuso
RCC Addict
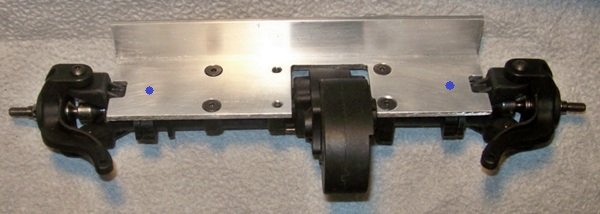
This is what I'm planning and would prefer. I'm going to remove the bottom half of the sqyare parts, so that they don't get in the way and I ca use them to mount the vervo's and brackets. I was looking more into the stock mounts, I didn't notive where they mounted at first. I think they'll do just fine so i'll have to roder some of them now. that will get us moving any how. I think using the wraith mounts would be a little better though because there's not part that hangs down below the bottom of the axl to hang up on a rock. This might not be an issue though. We shall see. I'll be able to finish designing the rest of the parts I need for this axle once i have them in hand with my calipers ")
Attachments

ekd
Quarry Creeper
A, that's the best way. You'll get real accuracy and strength from it. You'll be holding parts soon.
M, the trade parts are here. Precisely as you described, and worth every penny you claimed they were. I'm not the least bit surprised by that.... and I'm quite happy. Thanks.
I'm really glad I ended up with the Grizzly. Turns out the extra 2" of bed was helpful already. The rotating tailstock chuck takes a lot of room, but with it at the end of the bed, there is room to cut the axle blanks as matched pairs. More time for actually cutting, and a lot less swapping stuff around.
This is what I'm planning and would prefer. I'm going to remove the bottom half of the sqyare parts, so that they don't get in the way and I ca use them to mount the vervo's and brackets. I was looking more into the stock mounts, I didn't notive where they mounted at first. I think they'll do just fine so i'll have to roder some of them now. that will get us moving any how. I think using the wraith mounts would be a little better though because there's not part that hangs down below the bottom of the axl to hang up on a rock. This might not be an issue though. We shall see. I'll be able to finish designing the rest of the parts I need for this axle once i have them in hand with my calipers
ekd
Quarry Creeper
It occurred to me that there was an easy way to make this thing even more rigid. As only the inboard 15mm of stub is needed to accomplish the infinite/repeatable clock feature (if your brace is rigid enough), the rest of the stub could be cut off and glued into the tubes.
If another screw was then placed through it all at each mark... this could be used as a hammer head without mis-aligning anything.
If another screw was then placed through it all at each mark... this could be used as a hammer head without mis-aligning anything.
Attachments
Last edited:
ekd
Quarry Creeper
The Mads are back in stock at NRCX. The Max parts are still out, though.
Looks like we'll be playing with these for a while... :mrgreen:
Looks like we'll be playing with these for a while... :mrgreen:
Abavuso
RCC Addict
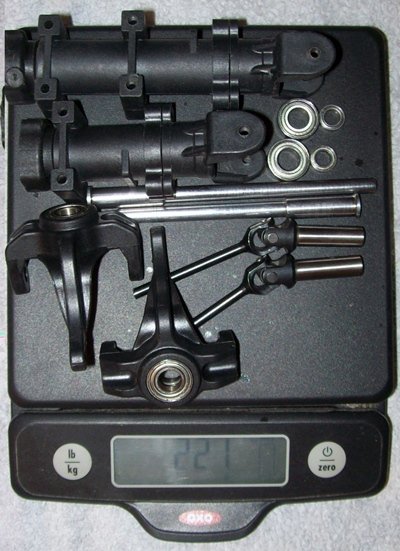
I got my lower links in the mail today!!! I ordered two sets of 2 and they sent me 2 sets of 4 that look like they were removed from an RTR kit. Not a big deal!!! I can say, I didn't realize how stoute these axles are going to end up!!!! I'm really stoked!!! Can't hardly wait!!!
I'm realy curious as to how heavy these are going to end up. compaired to the stock axle.
I'm realy curious as to how heavy these are going to end up. compaired to the stock axle.
ekd
Quarry Creeper
You know, as long as they remain generous with the included peripherals, or up the parts count... I'm perfectly happy with pulled parts. The thing I like most is that I have never been stuck with a surprise back-order. If they sell something to me, I get it... even if they have to pull it from a rig.
Last night, the Barometric Demons apparently found some other poor slob (who also didn't plan to live this long) to torture for a while... and I took that time to finish cutting your blanks. They were pissed when they got back here, but... 'em. Too late now. :lmao:
I'll gather a set of M/M parts, and 1 of the stockers, and weigh them for you as soon as I can.
The odd lengths are a result of my Harmonics vs. Finish experiments. Carbide inserts are a whole different world from HSS... the timid get junk with them. The Grizzly tries to sing at the speeds/feeds they require, but there is a sweet spot to be had. I'm close enough to finding it that the resulting finish is at least tolerable.
Back, when I have hard #s for ya.
Edit: wrong pic. As you can see from the heat discoloration (bands), I am damn close to getting the things hot enough to cut like butter. I have to feed the insert in quickly, and proceed immediately before anything starts to cool, to get even close to a good cut... but, Damn... if you can dance, she's ready for ya. HSS is in the future, but I'm going to find out what this lathe can do with Carbide. It's F'in FAST.
Any thoughts from any of you guys would be more than welcome here. This Grizzly and I are forming a long term relationship... and I'm thinking about a damped tailstock.
Last night, the Barometric Demons apparently found some other poor slob (who also didn't plan to live this long) to torture for a while... and I took that time to finish cutting your blanks. They were pissed when they got back here, but...
I'll gather a set of M/M parts, and 1 of the stockers, and weigh them for you as soon as I can.
The odd lengths are a result of my Harmonics vs. Finish experiments. Carbide inserts are a whole different world from HSS... the timid get junk with them. The Grizzly tries to sing at the speeds/feeds they require, but there is a sweet spot to be had. I'm close enough to finding it that the resulting finish is at least tolerable.
Back, when I have hard #s for ya.
Edit: wrong pic. As you can see from the heat discoloration (bands), I am damn close to getting the things hot enough to cut like butter. I have to feed the insert in quickly, and proceed immediately before anything starts to cool, to get even close to a good cut... but, Damn... if you can dance, she's ready for ya. HSS is in the future, but I'm going to find out what this lathe can do with Carbide. It's F'in FAST.
Any thoughts from any of you guys would be more than welcome here. This Grizzly and I are forming a long term relationship... and I'm thinking about a damped tailstock.
Attachments

Last edited:
ekd
Quarry Creeper

Similar threads
- Replies
- 48
- Views
- 1K