| |
 04-15-2013, 06:52 PM
| #41 | |
| RCC Addict Join Date: Jan 2008 Location: Lake Michigan
Posts: 1,898
| Quote:
BTW, does anyone know if the hole in the ball is 4mm on this: 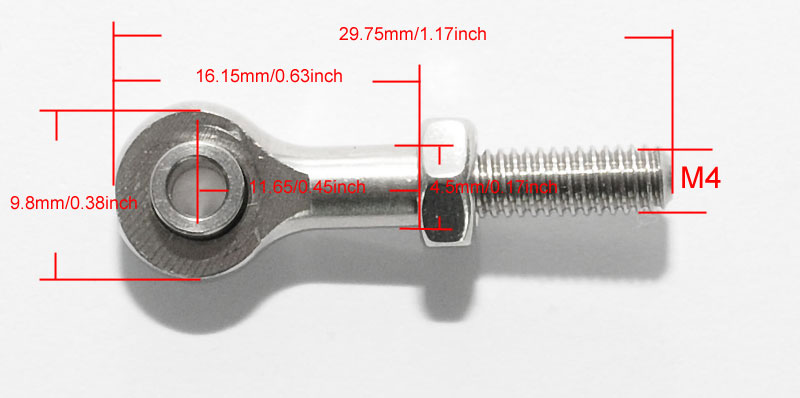 Steely M4 Rod End (Heim Joint) | |

|  |
| Sponsored Links | |
| | |
|
04-16-2013, 06:47 AM
| #42 |
| RCC Addict Join Date: Jan 2008 Location: Lake Michigan
Posts: 1,898
|
Found this 1:1 build on Pirate - WOW! : Jeepster Commando Build - Pirate4x4.Com : 4x4 and Off-Road Forum |
|
| |
|
04-16-2013, 08:46 AM
| #43 | |
| Pebble Pounder  Join Date: Apr 2011 Location: MN
Posts: 164
| Quote:
| |
|
| |
|
04-16-2013, 09:38 AM
| #44 |
| RCC Addict Join Date: Jan 2008 Location: Lake Michigan
Posts: 1,898
|
Started thinking on the upper cage. Main roll, following the door and almost the windshield angles. 4-5mm stainless rod. Trans is mocked up in the pic. Going to mount the steering servo next to it. In the last pic you can see the servo arm position.    |
|
| |
|
04-16-2013, 01:08 PM
| #45 |
| RCC Addict Join Date: Jan 2008 Location: Lake Michigan
Posts: 1,898
|
Limited space under the Tonka hood with the R2D2, servo, ESC. To keep the ESC and motor small, I am going with an brushless outrunner. (yeah I know, many believe they do not work well in crawlers) This is a trail truck and an outrunner will give the torque needed but let me downsize the ESC and still be efficient. I have a Hacker in another trail truck and picked one up for this. But it is more out of the norm. Hacker A20-6XL. 28x32mm 2500KV 10pole! 35amps 83g I was hoping to run this on 3s and wake it up, but it will prove too fast. I also picked up a revolver to use just in case. Some calc's:  Last edited by sweli; 04-16-2013 at 01:24 PM. |
|
| |
|
04-17-2013, 07:59 PM
| #46 |
| RCC Addict Join Date: Jan 2008 Location: Lake Michigan
Posts: 1,898
|
OK, not. It's cage work  Three SS coupling nuts added to the main bar.........  For this.....................  |
|
| |
|
04-17-2013, 08:01 PM
| #47 |
| RCC Addict Join Date: Jan 2008 Location: Lake Michigan
Posts: 1,898
|
C pillars for support.    |
|
| |
|
04-19-2013, 04:02 PM
| #48 |
| Newbie Join Date: Dec 2011 Location: stafford
Posts: 45
|
I love this build. Have you thought of pinching the front a bit?
|
|
| |
|
04-19-2013, 04:32 PM
| #49 |
| RCC Addict Join Date: Jan 2008 Location: Lake Michigan
Posts: 1,898
|
Pinching the front would be very cool !! I would have to deal with cutting, welding, and filling the hood though. |
|
| |
|
04-20-2013, 09:26 AM
| #50 |
| RCC Addict Join Date: Jan 2008 Location: Lake Michigan
Posts: 1,898
|
Some more upper cage work. The Tonka body has a stepped edge around the back. It steps in, but then ends up pointing upward. The toy had a back molded back seat and fake soft top that looked like it was folded up and covered this sheet metal edge. With the dovetail I had to come up with something to hide the sheet metal. So I have some SS flat stock covering the top. With an SS wire inset to the step in the sheet metal. This hides the edge, and the wire captures the body and holds in in place at the B-pillar (last pic below)      |
|
| |
|
04-21-2013, 10:14 AM
| #51 |
| Pebble Pounder Join Date: Apr 2012 Location: Bellingham
Posts: 134
|
Amazing work!
|
|
| |
|
04-21-2013, 05:58 PM
| #52 | |
| RCC Addict Join Date: Jan 2008 Location: Lake Michigan
Posts: 1,898
| Quote:
| |
|
| |
|
04-23-2013, 07:22 PM
| #53 |
| RCC Addict Join Date: Jan 2008 Location: Lake Michigan
Posts: 1,898
|
Fabbed up front cage bar. Hides inside of the cut door jam and follows the windshield angle up and across the top. Roof panel screws to it in two places.  Installed:     Thin curved crossovers in the back. Hoping the lower one follows the curve of a spare tire. They need cleaned up and maybe reflowed again. Silver solder got a little 'goopy'.  |
|
| |
|
04-23-2013, 10:00 PM
| #54 |
| Rock Crawler Join Date: Sep 2011 Location: Sandusky, Ohio
Posts: 655
|
I like it , turned out nice man. Just not much of a fan of the roof though. Can't wait to see more, keep it coming.
|
|
| |
|
04-24-2013, 04:23 AM
| #55 | |
| RCC Addict Join Date: Jan 2008 Location: Lake Michigan
Posts: 1,898
| Quote:
Roof was an 'in progress' thought. It's bolted on, so I can always fab up a panel from rods to fit in it's place. The front bar I just finished, behind the windshield, had to be a separate pc from the main rear bars, to be able to install and remove again from the finished (painted) body. The angle to install the front and rear sections is different. I figured this way if I had to get under the interior pcs that will eventually be in there (access to hidden electronics), without scratching too much paint. | |
|
| |
|
04-25-2013, 07:04 AM
| #56 | |
| RCC Addict Join Date: Jan 2008 Location: Lake Michigan
Posts: 1,898
|
Well I was going to save up some mad money and splurg on a set of RC4WD Ultimate Scale driveshafts for this build. I love the looks, but had my doubts on material quality. Posted up on this thread: RC4WD Ultra Scale Hardened Steel Driveshaft (Various Sizes) ...............and the feedback speaks for itself: Quote:
This is simular to what happened to two sets of the SS Punisher Shafts I had. MIPS it is! | |
|
| |
|
04-29-2013, 04:26 AM
| #57 |
| RCC Addict Join Date: Jan 2008 Location: Lake Michigan
Posts: 1,898
|
Wow, as it gets warm, I am finding less time to get in the shop and work in this thing A while back, my wife got me a MadDogRC 4" Light Bar for this build, for my Bday. The way the wedge mount sits on it, matches the angle of the windshield frame. So I can mount it lower on the frame, rather than up and over it. Mocked up (held in place by a block of Delrin):    |
|
| |
|
04-29-2013, 04:30 AM
| #58 |
| RCC Addict Join Date: Jan 2008 Location: Lake Michigan
Posts: 1,898
|
It came out a bit crooked, but oh well. Rod up and around on roof panel:   Thin section of flat in place:   Blasted and cleaned up:  |
|
| |
|
04-30-2013, 11:28 AM
| #59 |
| RCC Addict Join Date: Jan 2008 Location: Lake Michigan
Posts: 1,898
|
I need to start thinking about paint. Traditional or something new??? Underside is going to be flat black. Should I do single color or 2-tone?? High or Low 2-tone??(look at some of the pics) First page here are a few traditional colors I like, along with some numbered paint chips I also am considering. If I go with one of the newer chips, it will prob be a deep metallic. thoughts  Here are some others, but not my first choice........  |
|
| |
|
04-30-2013, 01:39 PM
| #60 |
| Quarry Creeper Join Date: Jan 2013 Location: Vancouver, B.C.
Posts: 321
|
I kinda dig the 2 tone, especially since you kept the Jeepster full retro front end look.
|
|
| |
 |
 Heavy Metal KOH Jeepster Commando (C-101) - Similar Threads
 | ||||
| Thread | Thread Starter | Forum | Replies | Last Post |
| Aluminum Jeepster Commando | jeepster72 | Axial Wraith | 1 | 01-25-2013 08:20 PM |
| Jeepster Commando needs some refresher help | DaveFL | General Scale Talk | 9 | 04-03-2010 10:36 AM |
| 1/10th jeepster commando body? | dirtman | Paint and Body | 2 | 02-18-2009 05:30 PM |
| Jeep Jeepster/Commando Bodies? | DaveFL | General Scale Talk | 2 | 05-10-2007 10:32 AM |
| |


 Linear Mode


