| |
| |||||||
 |
| | LinkBack | Thread Tools | Display Modes |
 09-10-2010, 10:10 PM
| #1 |
| Tossin' Salad Join Date: Jun 2010 Location: Petaluma
Posts: 1,826
|
As many have requested to have these toobs predrilled and tapped, the install has changed slightly. I will give a brief overview with pics on how I am doing these installs for prefit and testing. First, let us get our tools ready. I am using 2 drill bits, 3mm and 3.2mm. I have some fine cutters, and a grinding bit to fit my drill.  So, you have already broken down your axle housing and removed the bearings and diff gears. We need to remove the bearing seat. I start with the cutters.   Next up, we need to finish off it off with a grinding bit to clean it up smooth.   Next, we need to open up the holes at the end of the housing. I use the 3.2mm bit for this. 3.5mm would be fine as well.  Now, lets move on to your Cs. If you are running the Axial clockable Cs, these are tapped, and they need to be opened up a bit. I use a 3mm bit for this.  Now, we are ready for assembly. As you can see from this next pic, I like to use longer screws first to get the toob lined up. I place both toobs into one half of the housing, and insert long screws to get them started. This will guarantee that the holes line up when you place the other half of the housing.   Once the two halves are together, you can remove the screws, and press your Cs into place. Then insert your screws.  Now that you have finished the toob assembly, you can take it apart, clean it well, and reinsert your bearings and diff gears. I recommend doing your tubes with all other hardware out of the housings. Casey Last edited by KC_JoNeS; 09-14-2010 at 09:09 PM. |

|  |
| Sponsored Links | |
| | |
|
09-10-2010, 11:38 PM
| #2 |
| RCC Addict Join Date: Oct 2009 Location: San Francisco
Posts: 1,927
|
Looks good, just a spelling note: Its TUBE not TOOB |
|
| |
|
09-11-2010, 01:33 AM
| #3 | |
| Tossin' Salad Join Date: Jun 2010 Location: Petaluma
Posts: 1,826
| Quote:
 Thanks for the tip. | |
|
| |
|
09-11-2010, 02:44 AM
| #4 |
| RCC Addict Join Date: Apr 2009 Location: United States of the Offended
Posts: 1,184
|
Thanks for the write up, can't wait to get mine.  |
|
| |
|
09-11-2010, 08:24 AM
| #5 | |
| RCC Addict Join Date: Oct 2009 Location: San Francisco
Posts: 1,927
| Quote:
| |
|
| |
|
09-11-2010, 10:10 AM
| #6 |
| Quarry Creeper  Join Date: Jun 2010 Location: 801 El Capital
Posts: 434
|
You guys are silly KC ,Gunnar you guys are the sh1t thanks for all you do for our wonderful world Jason |
|
| |
|
09-11-2010, 07:49 PM
| #7 | |
| Tossin' Salad Join Date: Jun 2010 Location: Petaluma
Posts: 1,826
| Quote:
| |
|
| |
|
09-11-2010, 09:55 PM
| #8 | |
| Quarry Creeper Join Date: Jun 2010 Location: 801 El Capital
Posts: 434
| Quote:
Jason | |
|
| |
|
11-02-2010, 07:55 AM
| #9 |
| Tossin' Salad Join Date: Jun 2010 Location: Petaluma
Posts: 1,826
|
It is time to raise this to the top. This is the proper install procedure for the toobs at this time. Casey |
|
| |
|
11-03-2010, 11:02 AM
| #10 |
| RCC Addict Join Date: Mar 2009 Location: Interior BC
Posts: 1,786
|
yea i was confused at the first DIY. lol but at that note: Im UbeR stoked for mine to arrive!! |
|
| |
|
11-03-2010, 11:08 AM
| #11 |
| cherry bomb   Join Date: Jul 2006 Location: Nanaimo, BC, Canada
Posts: 1,598
|
Good post. But. I have yet to install mine for one reason. What length screws are those. I don't have a ton of screws at my disposal so getting the right ones first try would be awesome. Thanks |
|
| |
|
11-03-2010, 12:23 PM
| #12 | |
| Ex Nor-CalRCRC slave  Join Date: Dec 2008 Location: San Mateo, CA.
Posts: 2,242
| Quote:
| |
|
| |
|
11-06-2010, 12:21 PM
| #13 |
| Rock Crawler Join Date: Oct 2010 Location: Abbotsford BC
Posts: 522
|
Bump for one of the top items on my christmas list |
|
| |
|
11-15-2010, 07:35 PM
| #14 |
| Rock Stacker Join Date: Aug 2010 Location: Winnipeg
Posts: 52
|
Got mine today and had them installed in a few minutes! Great product......
|
|
| |
|
11-27-2010, 11:31 AM
| #15 |
| I wanna be Dave Join Date: Mar 2008 Location: Wayne county. PA
Posts: 2,507
|
so those are 3mm screws you guys are making them to fit....isn't axial clockible C's 3mm grub/set screws if i'm not mistaken.......bob .... |
|
| |
|
11-27-2010, 04:14 PM
| #16 | |
| Tossin' Salad Join Date: Jun 2010 Location: Petaluma
Posts: 1,826
| Quote:
| |
|
| |
|
03-31-2011, 02:34 PM
| #17 |
| Quarry Creeper Join Date: Jan 2011 Location: armstrong
Posts: 260
|
when you remove the bearing seat will the toob hold the bearing at the right spot?
|
|
| |
|
03-31-2011, 02:49 PM
| #18 |
| Croakin' across the pond!  Join Date: Jan 2011 Location: Nottingham, UK
Posts: 272
|
Casey, can you supply the toobs and the Gunnars Pins too - if I'm going to do this - and I can feel it coming on - then it makes sence to change the pins at the same time. I run the 3Racing cvds and they will almost certainly fall apart when I split the "c"s and knuckles (These the Hot racing ones). Re: the earlier question on the bearing face - is it possible to move the toobs out towards the hub, seat the bearing on it, and take up some of the play? I was surprised when I took mine apart for the first time, as the bearing seems to act more like a guide than a bearing. |
|
| |
|
03-31-2011, 08:47 PM
| #19 | ||
| Tossin' Salad Join Date: Jun 2010 Location: Petaluma
Posts: 1,826
| Quote:
Quote:
As for play, there is no play when the toobs are in there. The bearings will seat directly against the toobs, and there is no play. Casey | ||
|
| |
|
03-31-2011, 09:23 PM
| #20 |
| Rock Crawler Join Date: Oct 2010 Location: Ontario
Posts: 579
|
Just thought i would add something to the install thread, i drilled and tapped an extra hole, elongated the c-hub holes and got some extra clocking out of the front. 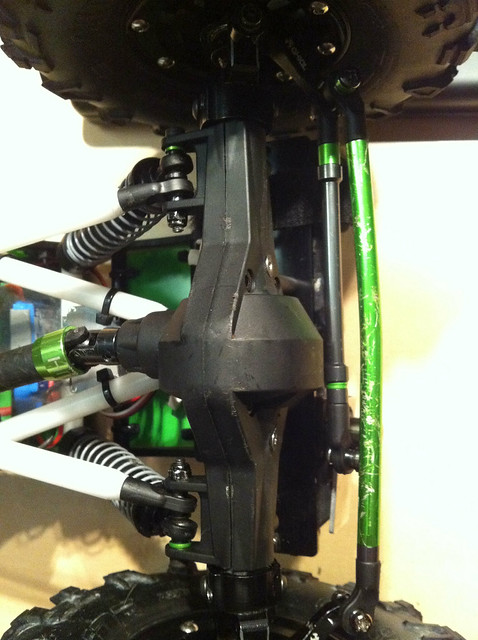 you can see the extra screws at the front of the axle that hold the tubes in place now that the c-hub holes are elongated. |
|
| |
|
| |


 Linear Mode


