| |
 01-08-2014, 12:11 PM
| #241 |
| What could go wrong?   Join Date: Oct 2013 Location: Southern Ontario
Posts: 474
|
I don't have a pic right now, but I found out that a curved price of meccano is the prefect cheap replacement for the stock plastic steering linkage. The holes are in he exact right place etc. Edit: pic.  Last edited by Noll11; 01-08-2014 at 01:38 PM. |

|  |
| Sponsored Links | |
| | |
|
01-09-2014, 07:22 PM
| #243 |
| Pebble Pounder Join Date: Jan 2008 Location: high point
Posts: 177
|
I tryed the diy cms......couldnt do it.not that I couldnt but didnt want to hak at it.just ordered the level 3.
|
|
| |
|
01-09-2014, 09:07 PM
| #244 | |
| RCC Addict Join Date: May 2008 Location: Southern,WV
Posts: 1,136
| Quote:
| |
|
| |
|
01-09-2014, 09:24 PM
| #245 | |
| RCC Addict Join Date: May 2008 Location: Southern,WV
Posts: 1,136
| Quote:
| |
|
| |
|
01-10-2014, 05:38 AM
| #246 |
| Pebble Pounder Join Date: Jan 2008 Location: high point
Posts: 177
|
Im not knocking it.im just a little peticulure over angles and could get the angles I was looking for.its a great trick,and im sure there several people done it.when I sit and looked at the angles I started messing with differant positions and then just said.f it...I was already looking at that Kit anyway.like I said great trick just not for me thats all.
|
|
| |
|
01-10-2014, 09:08 AM
| #247 | |
| Rock Stacker Join Date: Apr 2013 Location: Auburn, Ca
Posts: 53
| Quote:
Tinkering is half the fun with this hobby. | |
|
| |
|
01-10-2014, 01:26 PM
| #248 |
| Pebble Pounder Join Date: Jan 2008 Location: high point
Posts: 177
|
Oh yea im fabing up all kinds of mess for my rig,links all hand made,lights and buckets all old flashlights and Sharpy tops.but in my case this was the first 20.00 I spent on parts since buying it.some things(if cheap enough)ill spend money on.hell my shocks are losi,traxxas,assotiated all mix together.I know how to make something out of nothing.
|
|
| |
|
02-06-2014, 10:50 AM
| #249 | |
| Newbie Join Date: Feb 2014 Location: Logan
Posts: 1
| Quote:
| |
|
| |
|
02-06-2014, 11:25 AM
| #250 | |
| I wanna be Dave Join Date: Sep 2006 Location: Anchorage, Alaska
Posts: 3,099
| Quote:
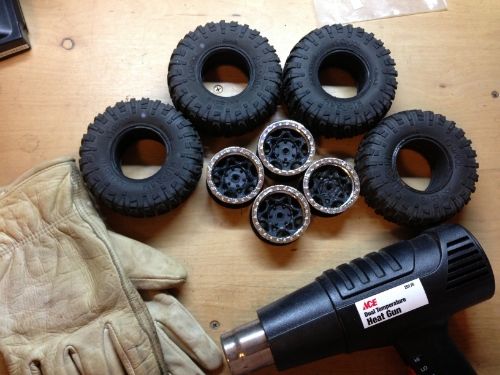
I boil mine to separate the tire from the wheel. No damage occurs to the tires or wheels... ever. Even my stock axial foam inserts survived. The boiling process takes 15 minutes or so to allow the tire's bead to be pulled off the wheel. I laid the tire in the sink after it was boiled for 15 min. then used some tongs to push down on the sidewalls to separate the tire from the wheel. Patience is a virtue here... and if they don't separate initially (after the first attempt). boil them some more. You don't want to force the issue and tear the tire's bead. Boiling hurts nothing... 'cept... if the foam insert is already crap. Boiling the foam inserts (along with the tire/wheel) is not an assured death to those but, they could possibly become damaged during the process... requiring replacements. Most other used methods of removal could cause damage to the wheel and/or tire. btw... boiling rubber tends to stink up the house when boiled. but not too terrible. Boiling them outside would reduce the stink inside I have used this boiling method for separating tires from nylon wheels since the early 80's Was necessary back in my RC competition days. I did this to my son's RTR ripsaws glued to the stock wheels just the other day... separated nice and clean. He's a happy camper having seen the results  | |
|
| |
|
02-07-2014, 01:33 PM
| #251 | |
| Rock Crawler Join Date: Aug 2012 Location: Los Angeles, CA
Posts: 864
| Quote:
This is a proven method. | |
|
| |
|
02-10-2014, 04:46 AM
| #252 |
| Newbie Join Date: Feb 2014 Location: Nova Scotia, Canada
Posts: 1
|
Wow, so much information. I was seriously sad to realize i was on the last page. Thanks folks!
|
|
| |
|
02-11-2014, 11:11 PM
| #253 |
| Quarry Creeper Join Date: Nov 2007 Location: Orygun
Posts: 448
|
I've only owned an SXC10 for a couple months, but here are a couple things I did: I bought the 1"x2"x3" project box from Radio Shack for $3.00. It comes with the aluminum plate as well. I mounted my receiver to the under side of the lid for easy in/out with the plugs. I used double sided tape to stick the box to the rear cross members. I notched the edge of the lid for wiring to pass thru. The alum. plate that came with it was bent, and dbl sided taped as well as a couple zip ties, to the frame rails. Esc is mounted to the plate. This takes care of a majority of my electronic pieces. BEC is on the gear box, 3s lipo over front axle.   You guys mentioned using nitro fuel tubing for body posts. I used 1/16" thick closed cell foam with a peel and stick backing. I then used leather punches (You can use scissors too) to create the doughnut shapes. It makes for a nice, rattle free body install.  |
|
| |
|
03-01-2014, 06:46 PM
| #254 |
| Pebble Pounder Join Date: Feb 2014 Location: Tracy
Posts: 192
|
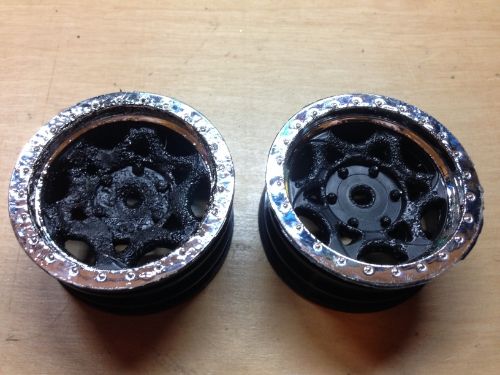
Goof off removes tire glue with no physical affects to tire bead, compound, or wheel...just astetics..it removed some "chrome" from wheel Sent from my SGH-T989 using Tapatalk |
|
| |
|
03-08-2014, 11:13 PM
| #255 |
| Rock Stacker Join Date: Jul 2013 Location: Northern 801
Posts: 72
|
If you buy the RC4WD CMS Panhard kit for your scx10 and it happens to be for the JK Rubi series it says you need to buy their front bumper mount, no.. Simply cut off 1/4" of the front bumpers mounting post that interferes with the cms mount and she will go right together! Sent From My Notso Smart Phone |
|
| |
|
03-09-2014, 01:36 PM
| #256 |
| Newbie Join Date: Mar 2014 Location: uk
Posts: 12
|  Here I painted the axial logo on my scx10 gear cover and transmission housing in White for a pretty snazzy look!  Then I painted the axial logo led cover in white for an even more snazzy look!  andddddddd painted the wheel nuts white and hub covers to make a scale appearance!!  Then finally for a real trick and tip, I turned the screw thing over on the stock scx10 rock sliders so that it wouldn't get bashed up from rocks etc.. To add on I would also remove all grease then change with highly water resistant grease! I used b'twin bicycle grease with Teflon that I had lying around. It works like a dream with no signs of corrosion anymore!!!! Last edited by THX_138; 03-30-2014 at 07:57 AM. |
|
| |
|
03-17-2014, 06:25 PM
| #257 |
| Newbie Join Date: Feb 2014 Location: Phoenix
Posts: 42
|
If you have a winch, you can replace the stock string with bead working wire. About $4 for 30 feet. 20 pound breaking strain. Literally is scale tow cable if you ask me. Sent from my iPhone using Tapatalk |
|
| |
|
03-19-2014, 09:28 AM
| #258 | |
| Quarry Creeper Join Date: Jan 2012 Location: My house
Posts: 237
| Quote:
I found at Lowes a 50lb cable used for framing that works good and it's the 1:1 style looking cable very scale as well. Just chipping in I think it's only $3 for about a foot or two | |
|
| |
|
03-19-2014, 09:32 AM
| #259 |
| Quarry Creeper Join Date: Jan 2012 Location: My house
Posts: 237
|
Not really a mod but a cheaper way I did my battery tray I purchased a sheet of thin aluminum and cut out the design and made my own battery tray more for a small 3s pack but can also be made for a larger battery  Also made a slot for the servo to keep it off the axle  It straps on to the chassis with small m3 screws and locknuts. |
|
| |
|
03-19-2014, 01:14 PM
| #260 |
| Quarry Creeper Join Date: Nov 2007 Location: Orygun
Posts: 448
|
Have a picture if the actual product??
|
|
| |
 |
| |


 Linear Mode


