| |
 10-31-2013, 08:43 PM
| #221 |
| I wanna be Dave Join Date: Sep 2006 Location: Anchorage, Alaska
Posts: 3,099
|
didn't see it previously noted... free ('cept paint) Asin locking hubs. these are simply the original axial plastic thread on hub/nut covers. the front set does have a defining molded surface. I used Tamiya water base paints. they're going to need a touch up on occasion prolly won't survive a run but I think they look better then nothing  good from far = far from good wuz free to do tho' Here's another... Dingo front bumper mounted to the Honcho     * ^ These were purdy booger'd even before the paint... So I thought I try it out on a fresh pair of hub/nut covers. I'm not too steady, nor real meticulous about my paint work... needs another coat of silver ( Tamiya chrome But I think they're somewhat better looking then the beat up covers.   Last edited by TacoCrawler; 11-05-2013 at 01:08 PM. |

|  |
| Sponsored Links | |
| | |
|
11-11-2013, 05:59 PM
| #222 |
| Newbie Join Date: Nov 2013 Location: Olive Branch
Posts: 34
|
^ those look awesome! Not sure if was mentioned.. saw bent body clips.. My honcho is a pita to get to the rear body clips.. just use smaller zip ties if you don't wanna bend your clips up. Put it in the big ring and leave it long enough to grab onto.
|
|
| |
|
11-13-2013, 02:03 PM
| #223 |
| Newbie Join Date: Sep 2013 Location: santa fe springs
Posts: 29
|
this is a neat trick i think i saw a 1:1 truck rolling around town with 2 giant hex nuts hanging from the rear and i figured id do the same for my rig. just took 2 5/8 hex nuts and used tie wraps to secure them to the rig.  |
|
| |
|
11-17-2013, 11:27 PM
| #224 | |
| I wanna be Dave Join Date: Sep 2006 Location: Anchorage, Alaska
Posts: 3,099
| Quote:
For those with thick fumble fingers... You may find that rotating the rear cage's top "X" brace 180* will give you slightly more finger room for inserting those clips. ^ bending the body clips to a 90* makes it easier. Additionally... installing clip fobs, that attach to the large eye of the clips, help with getting a grip on those and pulling them out more quickly/easily. The rotated "X" member screws together... as it does when in it's original position. To visualize this... Imagine the "U" side of the cross tube facing towards the cab. Last edited by TacoCrawler; 11-17-2013 at 11:30 PM. | |
|
| |
|
11-19-2013, 01:34 PM
| #225 |
| Newbie Join Date: May 2013 Location: Placer County
Posts: 36
|
I didnt see this yet, so i thought I would share. Swap the crap servo bushing for a metal ball bearing. Axial themselves go over the subject in full detail, and they know their rtr servos are going to fail, yet the dont fix the problem, they make us do it!  - Heres the link to their step by step instructions - Axial Racing - Axials AS-3 Servo Upgrade |
|
| |
|
11-19-2013, 06:03 PM
| #226 | |
| RCC Addict Join Date: Dec 2007 Location: Moncton, NB, Canada
Posts: 1,962
| Quote:
You can use the bearing out of that kit. A lot easier since they carry Traxxas stuff at Futureshop here (Canada) and I have no LHS. | |
|
| |
|
11-20-2013, 01:30 PM
| #227 |
| I wanna be Dave Join Date: Sep 2006 Location: Anchorage, Alaska
Posts: 3,099
|
There are two bushings on that output gear... both need replacing. (upper and lower) replacing only the upper one... will only defend the servo's gear mesh integrity for a little longer. These servo's are also a pita to waterproof. as they use multiple plates stacked for the body. I did the bushing - bearing(s) swap... only to fry the pos when splashing around in some water. grrr If one insists on using the original servo... I'd recommend coating the entire case well with plastic dip... as well... using an O-ring (W/grease seating that) on the output shaft. |
|
| |
|
12-01-2013, 09:36 PM
| #228 |
| Newbie Join Date: Jun 2009 Location: San Diego
Posts: 45
|
Didnt know where to post this but I have a quick question im sure you guys can help me with. Just got my honcho yesterday and i want to switch the front to the 4 link it comes with. When i pull the 3 link off there, is it going to be directly bolt on with all the same bolts or will i need bolts to finish it? I know once i pull it apart I will figure it out but I just wanted to make sure before I do so I don't have to put it back together because I didn't have a long enough bolt haha.
|
|
| |
|
12-01-2013, 09:53 PM
| #229 |
| Newbie Join Date: Oct 2013 Location: Sunny Coast - Australia
Posts: 19
|
On my Wrangler, I needed to get 1 long bolt to do the 4 link On the Wrangler, Wraith front and rear lower and rear upper links can be fitted to give an extended wheel base by about 10mm as well as it rotates the axles by about 10degrees which improves the drive shaft angles 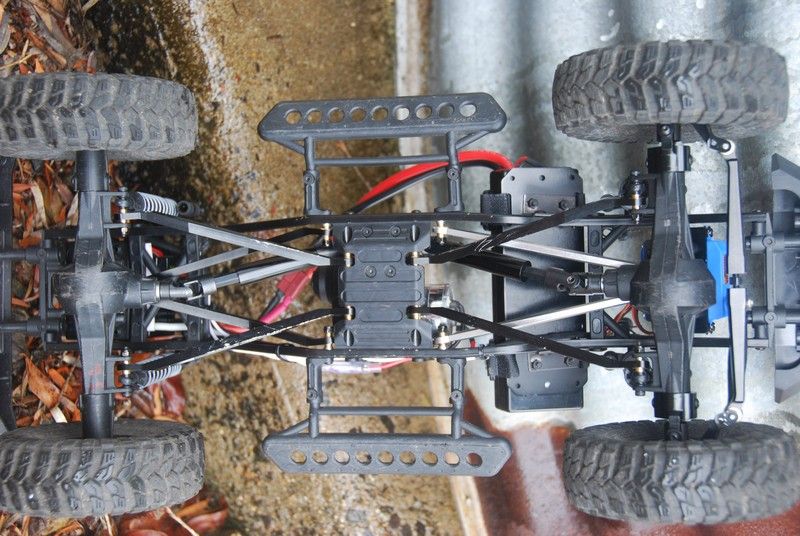 Also sticking wih the Wrangler, if you extend the steering servo cables, the receiver and ESC can sit very nicely in the original battery position allowing a bit more flexibility with the battery mounts. You can also see the o-rings on the body mounts as described by previous posters 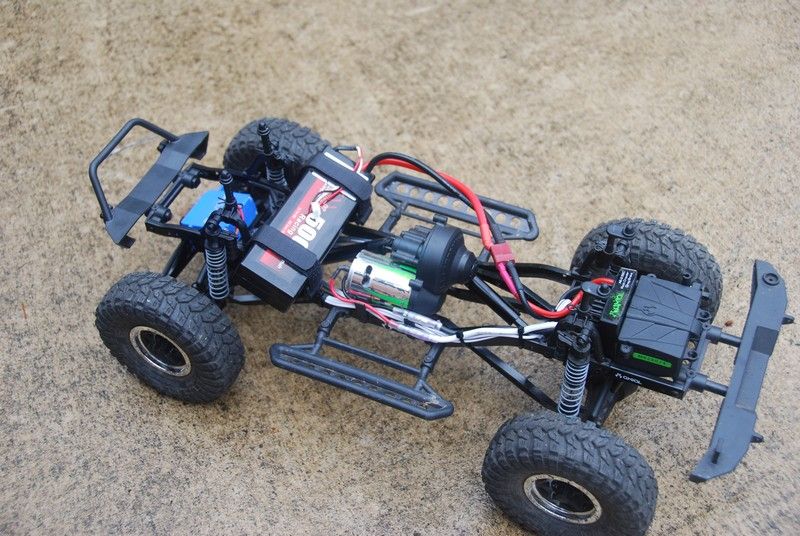 Last edited by THX_138; 12-03-2013 at 08:07 AM. |
|
| |
|
12-02-2013, 07:12 PM
| #230 |
| Newbie Join Date: Jun 2009 Location: San Diego
Posts: 45
|
One more question. Im putting the 4 link on the front, and on the motor side the nut doesnt seem to want to get onto the bolt. Seems like I need to drop the motor to get the nut on. Anyone else have this problem? EDIT: You cant even get the nut on even if you drop the motor to put it on. What are you guys doing for that nut and bolt for the upper right hand link? (Looking at the car upside down) Last edited by christianewing; 12-02-2013 at 07:21 PM. |
|
| |
|
12-02-2013, 07:47 PM
| #231 | |
| Newbie Join Date: Oct 2013 Location: Sunny Coast - Australia
Posts: 19
| Quote:
Flip the car upside down, loosen the bolts that go through the skid plate onto the motor mount. You do not need to take them all the way out, just back them all off 3-4 turns. This will drop the motor enough to get the nut on. You can then tighten up the bolt/nut then tighten up all the motor mount screws and it will all pull up nicely | |
|
| |
|
12-20-2013, 08:58 PM
| #232 |
| RCC Addict Join Date: May 2008 Location: Southern,WV
Posts: 1,136
|
Here's a VERY cheap if not free DIY chassis mounted servo.Two screws a screwdriver and an X-acto knife is all you'll need. Take the servo mounting plate off the axle and remove the servo mounts.  Then remove the cross member that if the battery were up front.The front of the battery would screw to.(It's the first cross member after the bumper mount). Then measure the servo and mark on the cross member where the servo mounts would go and drill holes then thread in screws that are long enough to go through the cross member and the servo mounts.(see pic)Screw the servo mounts to the cross member and mount the servo to the mounts.When you go to mount the servo you'll need to trim the small braces between the mounting holes.(see pic)   Remove the front bumper and it's mount.There is a "TAB" on the sides of the mount.It's for indexing the mount on the frame. You need to cut that tab off.When you bolt the cross member with the servo on it you'll put the screws through the indexing holes.You'll also need to cut the back parts of the bumper posts off and trim the mount where the post goes through.This way when you bolt it back on you can now move the other cross member with the servo on it forward.(see pics)  Here you can see the cutting and trimming of the back of the bumper mount.   Here's two from the bottom.   There is a tad bit of bump steer. But hey! It's a free CMS. Last edited by T I N Y; 12-20-2013 at 09:10 PM. |
|
| |
|
12-21-2013, 07:25 AM
| #233 | |
| Rock Stacker Join Date: Jan 2012 Location: Winston-Salem
Posts: 50
| Quote:
| |
|
| |
|
12-23-2013, 03:41 AM
| #234 |
| Rock Stacker Join Date: Oct 2013 Location: Nampa
Posts: 95
|
I've been working on something similar but simpler. I reversed the shock tower brace and mounted the servo plate to that. The only problem so far is clearance for the servo case which is going to require shaving down the servo plate posts on the top of the pumpkin. Sent from my SGH-M919 using Tapatalk |
|
| |
|
12-23-2013, 02:02 PM
| #235 | |
| RCC Addict Join Date: May 2008 Location: Southern,WV
Posts: 1,136
| Quote:
| |
|
| |
|
12-23-2013, 02:04 PM
| #236 |
| RCC Addict Join Date: Jun 2013 Location: Port Saint Lucie, Florida
Posts: 1,050
|
If you're doing a CMS for scale realism, why would you leave the servo mounts tubes on the axle?
|
|
| |
|
12-23-2013, 02:29 PM
| #237 | |
| RCC Addict Join Date: May 2008 Location: Southern,WV
Posts: 1,136
| Quote:
| |
|
| |
|
01-06-2014, 10:37 PM
| #238 |
| Newbie Join Date: Jan 2014 Location: USA
Posts: 15
|
It helps to remove the nerf bars on the scx10. They get stuck on rocks and bottom out your crawler. Hey TINY how did you get the motocon truck a the bottom of your Post? . Last edited by THX_138; 01-16-2014 at 12:03 AM. |
|
| |
|
01-07-2014, 04:08 PM
| #239 |
| Rock Stacker Join Date: Apr 2013 Location: Auburn, Ca
Posts: 53
|
Very clever on the CMS from pre-existing parts. Is there any benefit to mounting on the chassis other than the scale front end look?
|
|
| |
|
01-07-2014, 04:21 PM
| #240 | |
| RCC Addict Join Date: May 2008 Location: Southern,WV
Posts: 1,136
| Quote:
| |
|
| |
 |
| |


 Linear Mode


