• Welcome to RCCrawler Forums.

    It looks like you're enjoying RCCrawler's Forums but haven't created an account yet. Why not take a minute to register for your own free account now? As a member you get free access to all of our forums and posts plus the ability to post your own messages, communicate directly with other members, and much more. Register now!

    Already a member? Login at the top of this page to stop seeing this message.

Dasher's Frogger build "Boris"

Dasher

Croakin' across the pond!
Joined
Jan 29, 2011
Messages
272
Location
Nottingham, UK
Hi Everyone I thought that I'd put together a short build thread as "Boris" ha now reached a decent state of tune. Like most who've gone the upgrade route I've got very little of the original AX10 left. I've also used may tips and tricks that can be found elsewhere so this is not a change by change build thread.
I've not attempted a build thread before so I hope that it goes OK.


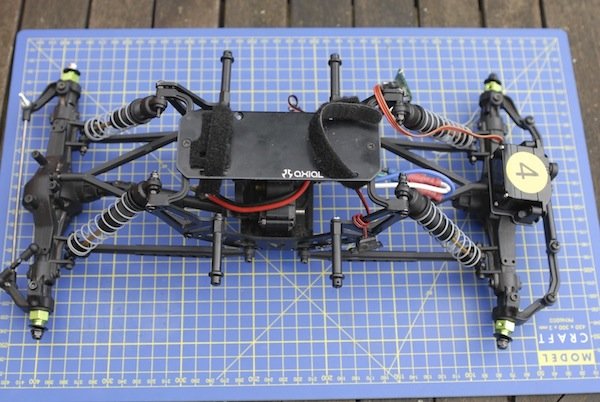
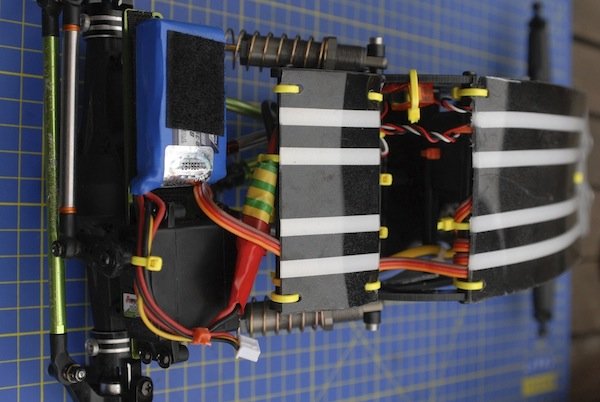
Boris started as a stock RTC AX10, he ran OK first time out but decided to leave his drive shaft set screws out on the rock somewhere. Consequently, on returning home I completely stripped the rig and did the chinese builder's job for him (properly). At the same time I acquired another AX10 off ebay - Kit built so had all the shiny bits - and started a transplant operation.

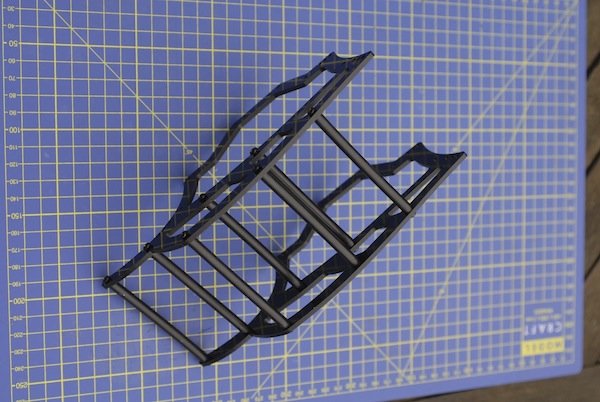
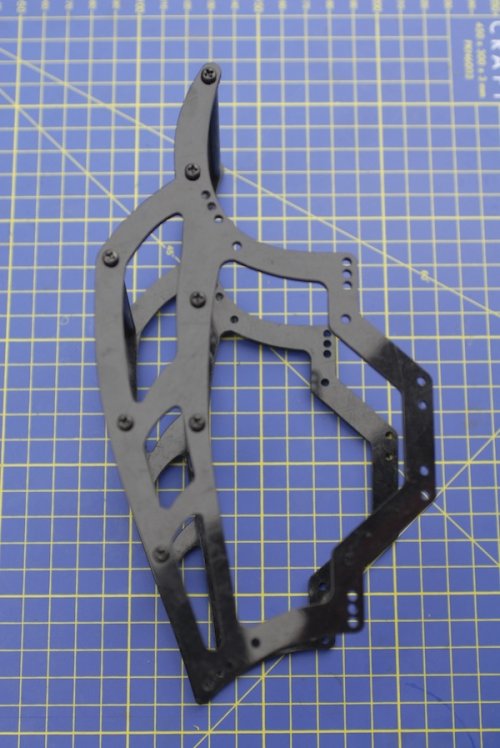
Once that I'd found RCCrawler - I realised that shiny bits didn't help much and that a start from scratch approach was needed. I'd read Casey's build thread, recognised the similarity and decided to build a Frogger.
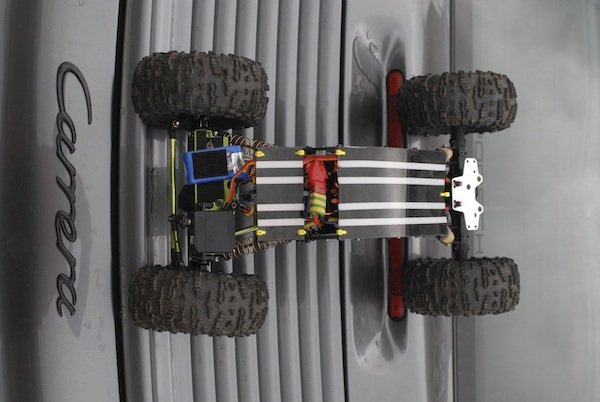
In early Feb 2011 the chassis arrived,

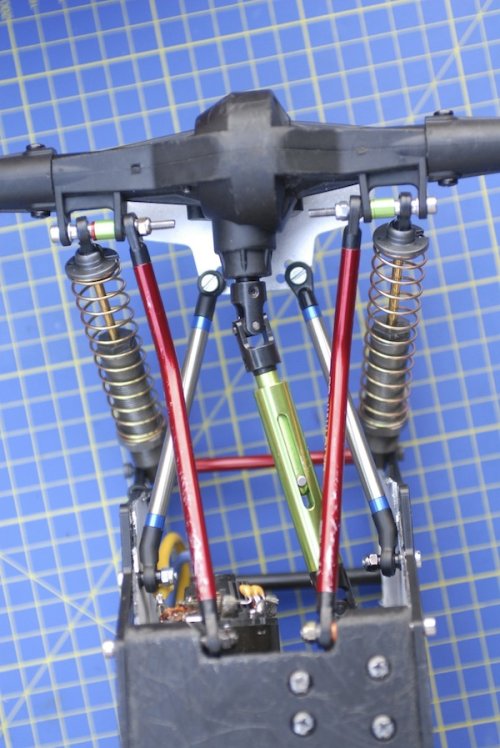
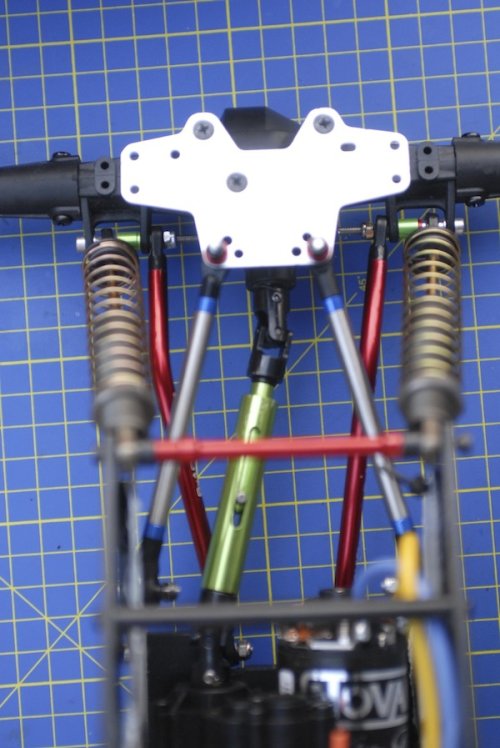
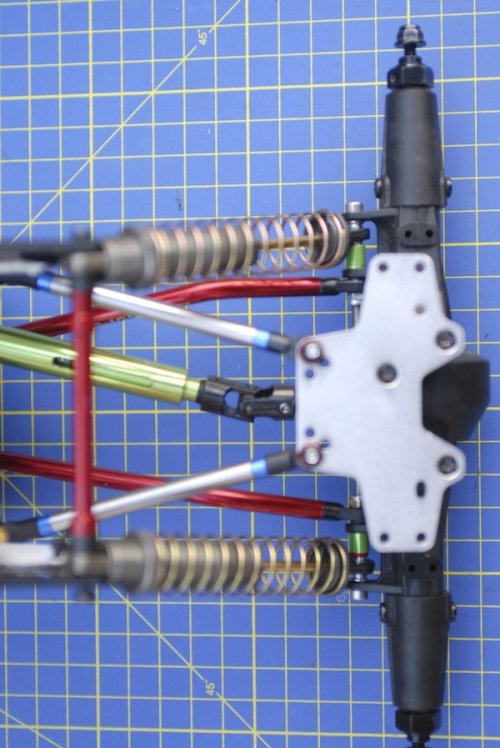
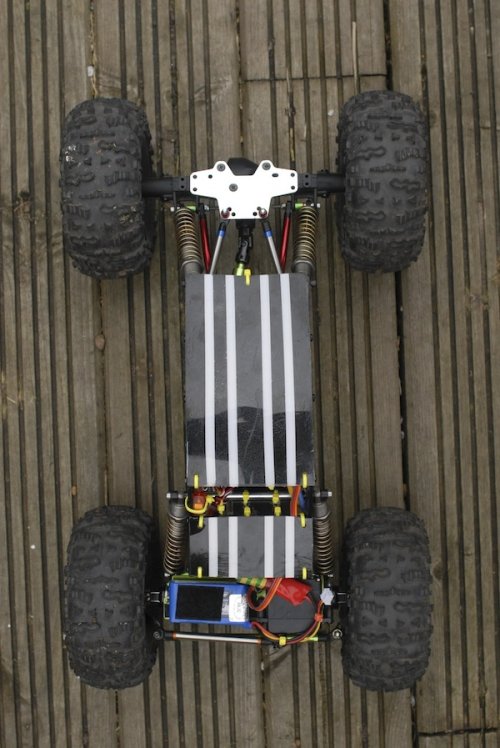
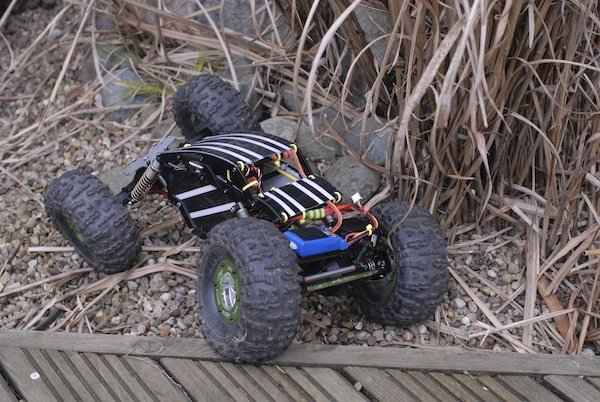
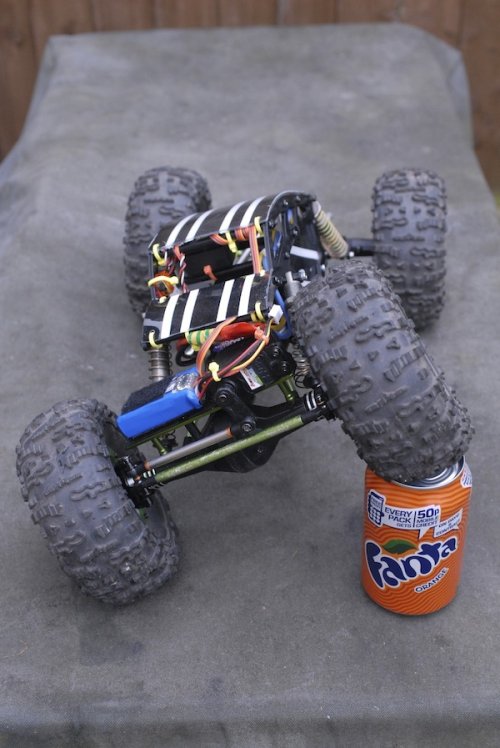
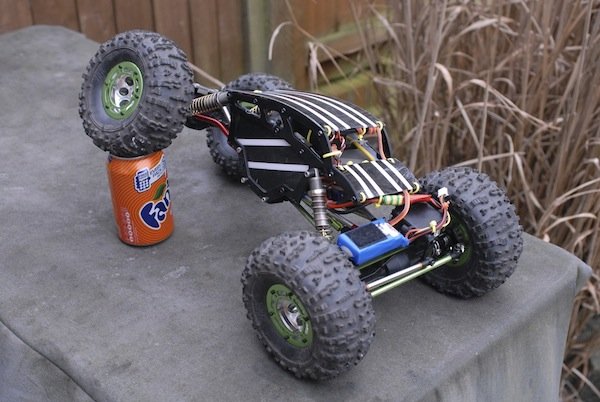
I'd tried various shocks on the bodied AX10 and settled on a semi droop set-up, using 3Racing shocks, 30wt oil and internal springs. Externally at got differential rate springs and a stiffer one on the left rear to try and take out torque twist.

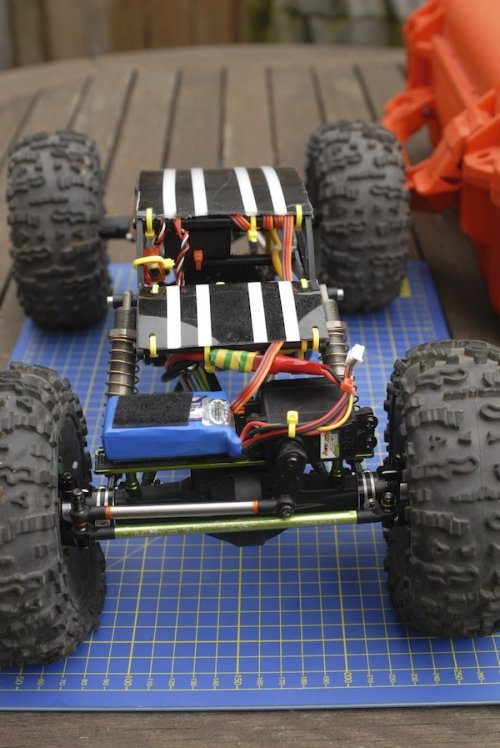
The Frogger didn't sem to like this, annoying as I'd spent a lot of time developing a mix that worked well.
 

Attachments

  • DSC_0181.jpg
    DSC_0181.jpg
    104 KB · Views: 1,009
  • DSC_0179.jpg
    DSC_0179.jpg
    98.6 KB · Views: 1,010
  • DSC_0180.jpg
    DSC_0180.jpg
    147 KB · Views: 972
I'm struggling to get the images to sit in the right place in each post, so. for now, I'll use multiple posts.

The rig has now got the mods that many use. Overdriven front axle, underdriven rear. It has always been the intention to keep this a Sportsman build - no dig.

The transmission is mirrored - ie I've taken out the plastic plug and re-built everything around it, but I wanted to keep the motor on its original side - the pinion faces forwards now though,

The upper links are separated to give 4 link set up. I already had this before but, again the Frogger likes his balance a little differently and I've put a lot of wok into getting link lengths that work well. I've kept the standard axial lower link lengths as I wanted to keep the wheelbase under 12.5".

I've also tried several skid configurations, Venom, STRC, STRC Delrin, Standard Axial - both cut (for inboarding)and uncut. Couldn't get the performance I wanted from them - ride height on a Frogger is on the low end (especially with std links) and so a slippy skid is essential.

I've now got Casey's old EEM Skid (Thanks Casey) and it work a treat.
 

Attachments

  • DSC_0186.jpg
    DSC_0186.jpg
    163.2 KB · Views: 937
  • DSC_0185.jpg
    DSC_0185.jpg
    146.8 KB · Views: 935
  • DSC_0184.jpg
    DSC_0184.jpg
    151.6 KB · Views: 950
I wanted to get a "semi pyramid stance from the shocks, by being outboarded at the axle and inboard at the chassis - I have this at the rear. At the front though this was putting a lot of torque and tension into the chassis mount. I've now laid them further back - this has improved performance too - and bought them outboard at the chassis. This has allowed the use of a brace, which I just couldn't do before as the twist was to great.

I also had the esc on a plate between the upper links. This works well with a 3 point set up but I felt it took away a lot of the advantages that a 4 point set up promised. The front was slow to articulate - and limited in its travel.

I'm also using a Rooster, which is on the large side and fouled the x-members under compression. Stubaru has mentioned before the difficulty in placing the electrics just right in the Frogger chassis. I didn't think that this was a problem but decided that it could be better - more on this in next post
 

Attachments

  • DSC_0190.jpg
    DSC_0190.jpg
    163.6 KB · Views: 944
  • DSC_0195.jpg
    DSC_0195.jpg
    55.6 KB · Views: 948
Boris was now coming together nicely.

I created a box in the roof void (between the upper and lower x-members) and dropped the receiver in there - it's a neat fit and one that can probably be carried over to the Poison Dart (when it arrives).

As mentioned in the previous post, I wasn't happy with the esc placement. I've tried the rear axle fix - don't like it, Boris likes falling off rocks too much, but with armour it would work. I'm trying to keep the wieiht down though as one thing I fixed at the start was that this build would have a 55T motor - as this, to an extent, keeps the need for heavy drivetrain to a minimum.

I've though long and hard about this and finally spotted that, once I'd put a turnbuckle in to brace the front shocks, I'd created a frame from which I could hang the esc.

I've fabricated an esc top plate from 1mm lexan, tied under the braces and velcroed the esc up to it. Clearance is good and so far it's working well.
 

Attachments

  • DSC_0200.jpg
    DSC_0200.jpg
    162.7 KB · Views: 902
  • DSC_0199.jpg
    DSC_0199.jpg
    115.3 KB · Views: 912
  • DSC_0197.jpg
    DSC_0197.jpg
    59.8 KB · Views: 902
  • DSC_0189.jpg
    DSC_0189.jpg
    108.9 KB · Views: 910
Flipping the servo over to run the STRC four link plate created an inelegant short throw and it was only a matter of time before the attachment points were reversed. The rod that I used was from RC4WD, as were the new upper links and the new turnbuckle.

Steering is from Hot Racing ("C"s and knuckles) - both alloy - so I can clock them if I need to. CVD is from 3Racing - I've been using this for a while now with no problems. There are no tubes in the axles, lockers are heavy duty Axial.

This is how it sits today - works well, fully built and back together in next post
 

Attachments

  • DSC_0194.jpg
    DSC_0194.jpg
    69.5 KB · Views: 939
  • DSC_0196.jpg
    DSC_0196.jpg
    77 KB · Views: 911
  • DSC_0206.jpg
    DSC_0206.jpg
    169.1 KB · Views: 866
  • DSC_0205.jpg
    DSC_0205.jpg
    162.8 KB · Views: 886
  • DSC_0203.jpg
    DSC_0203.jpg
    75.5 KB · Views: 890
  • DSC_0201.jpg
    DSC_0201.jpg
    90.6 KB · Views: 900
Boris is back crawling around again

This build was never intended to be to produce the perfect Sportsmans, more to find out what could be achieved within a reasonable budget - a step on the way to the ultimate. I decided early on that if I put a lot of power through it, then the front axle was going to need an investment the equivalent of an XR10 kit, that's why the motor is still 55T.

The rig runs really well, is very user friendly and holds it's own. Sure, it doesn't have the grunt to jump or get out of the tightest bind - but it does show what can be done without an engineer's bench - I work at the table, and my only powertool is a hand held Dremel.
 

Attachments

  • DSC_0208.jpg
    DSC_0208.jpg
    127.4 KB · Views: 935
  • DSC_0209.jpg
    DSC_0209.jpg
    124.3 KB · Views: 911
  • DSC_0210.jpg
    DSC_0210.jpg
    154.9 KB · Views: 877
  • DSC_0211.jpg
    DSC_0211.jpg
    91 KB · Views: 883
Last edited:
These Frogger's have a sense of humour and Boris is no exception and , so, in keeping with the 1:1 shot in Casey's original Frogger thread, here's Boris being a naughty boy!
 

Attachments

  • DSC_0183.jpg
    DSC_0183.jpg
    63.7 KB · Views: 855
Way to go, crawl that Porsche LOL. I can't wait to get my hands on a bodiless chassis for my next build. One thing I would suggest is putting set screws in both sides of your driveshafts. I have the same ones and did this aswell as drilling small dimples in the outdrives and those shafts aren't going anywhere (atleast until I can get some Junfac shafts but still waiting on my dig for length). You should try mounting the rear shocks outside the mounting tabs and the fronts on the inside and front links outside, not 100%sure with this chassis as I don't own one but it seems to be the best way to do it."thumbsup"
 
Way to go, crawl that Porsche LOL. I can't wait to get my hands on a bodiless chassis for my next build. One thing I would suggest is putting set screws in both sides of your driveshafts. I have the same ones and did this aswell as drilling small dimples in the outdrives and those shafts aren't going anywhere (atleast until I can get some Junfac shafts but still waiting on my dig for length). You should try mounting the rear shocks outside the mounting tabs and the fronts on the inside and front links outside, not 100%sure with this chassis as I don't own one but it seems to be the best way to do it."thumbsup"

Yeh, washed its tires first!
I'm running set screws in the additional holes, I agree, well worth it. I've not drilled a dimple in the shaft yet though - will do next time that they're off. The 3racing Dig shaft is nice and short - it will fit to a DNA dig, not sure about the Vanquish one.

On the bodied rig I had the lower links and shocks as you suggest. Getting the links to the outside helps on the standard AX10 as there's very little scope for triangulation -I've found that it's less of an issue with the EEM skid. I'm running a 35mm bolt to give me the space. The answer at the rear is to use Vanquish Razors - but they're impossible to source in the UK and I object to paying $40+ in shipping, tax and duty for a $14 item. The killer is that it's tax and duty free up to around $30 but that's $30 for goods and shipping!

The front is a different matter - I've run the shocks both in board at axle and chassis, outboard and a mix both up and down. Id like to bring the links out a little, but the bind is just not worth it. The fix is probably to do the shock cap mod and then invert them - might try it on some cheap shocks first! This of course be a "must" if I go BTA. Turning circle is good though so not in a rush to change it just yet.

On the rock, the rig is well balanced, climbs like a dream and side hills well too. Belly height isn't great, but the delrin skid allows you to power through things that used to catch solid on the alloy skid.

Thanks for your comments -will definitely do the dimple fix!
 
Well then you don't my suggestions LOL, you obviously have it all worked out (sarcasm). My 3racing rear shaft is still ok but the front one is my issue currently. Long story but I have a GC3A and clocked my front axle to get the shaft up out of harms way and now the shaft is a bit to long. I can't actually fully compress both front shocks because that center pin in the driveshaft comes to a stop, thankfully that's usually not an issue because it doesn't bind when only one side is compressed (which is 95% of the time).
 
Well then you don't my suggestions LOL, you obviously have it all worked out (sarcasm). .

Not got the front worked out at all, would like to get the links closer to the shocks but it's just not happy when they're close together.
The rear is working well now. razors will give me more belly height towards the rear and that's one attraction - at the same time I could then get the links outbound at the axle as you suggest. I'll also need to change the ends too, as the EEM skid is not great at allowing a lot of angle on the Axial ends. (Or more accurately, the Axial ends just don't pivot that well)

I probably need to address the length of the lower links. The Frogger uses a full width skid and so the whole thing is much less slender than the GC3A. The width of the skid was the original attraction as I wanted to put my DNA dig inside. I have a second Frogger and the dig is currently in that - it's still a project though!

I've escaped having to clock the axle as the upper links place the drive just right (luckily). I'm also on the limit of the shaft at the front when in compression - that can't solved with the 3racing dig shaft-it's much too short to use without a dig.
I like these shafts - I've been really surprised how the hold uo under stress - but then again, compared tomany who post on here, I don't put much power through them.
 
Hi Kitty
Thanks for the comments.
The battery pack is a "Turnigy 800mAh 2S 20C Lipo Pack". There's a UK seller got some on ebay now - they're light, cheap and work well. My rig doesn't draw a lot of current - I get about 50 mins from a pack.
"Cheapbatterypacks" do some similar Elite ones out of the US but they've never been in stock when I wanted them.

They sit nice on the axle - they're only 2S but my Rooster is only rated at 2S in any case
 
I've escaped having to clock the axle as the upper links place the drive just right (luckily). I'm also on the limit of the shaft at the front when in compression - that can't solved with the 3racing dig shaft-it's much too short to use without a dig.
I like these shafts - I've been really surprised how the hold uo under stress - but then again, compared tomany who post on here, I don't put much power through them.

I did notice another set of 3Racing shafts the other day at the hobby shop, was thinking about checking out if they are shorter. I just use a 55t Novak so I'm not to worried about anything happening to them. They've been through some serious abuse with me and other than adding the extra set screws and the little dimple in the outdrives I don't see anything wrong with them.
 
Diggin Boris ! I wish I could get my "Litoria xanthomera" out today. Sunny California is not happening, been raining and snowing now for going on 2 weeks. So glad spring has arrived here. ;-)
 
I have one of the shafts for use with the 3racing dig. I'll measure it later and post the results up for you. The dig itself is junk but the shaft is the same quaiity as the normal 3racing ones.

When, in the past, when I was racing, 3racing had a really bad press (the Integy of the day), but the only Crawler junk that I've seen from them is the dig itself. The cvd's hold up well and the shocks are very good - but 5" only.

Like you, I'm only running 55T and 2S Lipo. More grunt almost certainly needs kit to suit.
 
Diggin Boris ! I wish I could get my "Litoria xanthomera" out today. Sunny California is not happening, been raining and snowing now for going on 2 weeks. So glad spring has arrived here. ;-)

At least when it gets good, it's really good! been dry here in England for a week now!:)
 
.....going anywhere (atleast until I can get some Junfac shafts but still waiting on my dig for length). You should.....


My SWX uses junfac shafts, i have the set for the SCX10 and they are perfect, one is short and one is long, we are talking about your VP dig right?
 
My SWX uses junfac shafts, i have the set for the SCX10 and they are perfect, one is short and one is long, we are talking about your VP dig right?

Yes sir, I will take them if they work. That is literally the last thing I need for this truck. I'll PM you so I don't throw this thread off.
 
Back
Top