| |
 10-17-2011, 06:42 PM
| #1181 | |
| Quarry Creeper Join Date: Oct 2011 Location: Detroit
Posts: 347
| Quote:
 that's one way to get your money's worth out of a pair of brushes! I don't much like the trade off though... that's one way to get your money's worth out of a pair of brushes! I don't much like the trade off though... | |

|  |
| Sponsored Links | |
| | |
|
10-17-2011, 06:46 PM
| #1182 | |
| Quarry Creeper Join Date: Oct 2011 Location: Detroit
Posts: 347
| Quote:
| |
|
| |
|
10-17-2011, 07:03 PM
| #1183 | |
| MODERATOR   Join Date: Jul 2004 Location: Ohio
Posts: 18,928
| Quote:
Stormer: Search Results | |
|
| |
|
10-17-2011, 07:22 PM
| #1184 | |
| RCC Addict  Join Date: Feb 2008 Location: Nevada
Posts: 1,267
| Quote:
& yes the brushes were gone!, nothing left, they were very very tiny. The guy i bought this from (the used motor) If I remember right, he did say it needed new brushes, but I havn't needed it for 4 months. so I threw it in the rig and forgot to look at it...oops Now, i went and bought new brushes this morning, for all my motors, have to pay a little more attetion to the little guys, I do ask alot out of them  | |
|
| |
|
10-17-2011, 09:45 PM
| #1185 |
| owner, Holmes Hobbies LLC  Join Date: Nov 2004 Location: Volt up! Gear down!
Posts: 20,290
|
I see what you mean Eddie, a more conservative estimation on the minimum comm diameter will dissuade in-use failures that can harm some motor builds. I shouldn't be so quick to discount high speed use sometimes, my apologies there sir.
|
|
| |
|
12-10-2011, 07:42 PM
| #1186 |
| Nobody  Join Date: Sep 2008 Location: Maine
Posts: 966
|
Still the best thread ever on RCC. Just spent two days reading it from page one and learned a ton. Only thing I already knew was "fat girls need love too" I was disappointed to get to the end and see nobody ever did any good before/after rebuild dyno testing. I plan to do so. EddieO has been hooking me up with tools, parts and tons of tips. |
|
| |
|
12-10-2011, 08:02 PM
| #1187 |
| MODERATOR Join Date: Jul 2004 Location: Ohio
Posts: 18,928
|
Excellent. |
|
| |
|
12-10-2011, 08:16 PM
| #1188 |
| I wanna be Dave Join Date: Jan 2008 Location: Arat Alabama
Posts: 2,678
|
Dusty ole thread! |
|
| |
|
12-10-2011, 08:18 PM
| #1189 | |
| Nobody Join Date: Sep 2008 Location: Maine
Posts: 966
| Quote:
| |
|
| |
|
12-10-2011, 08:22 PM
| #1190 | |
| I wanna be Dave Join Date: Jan 2008 Location: Arat Alabama
Posts: 2,678
| Quote:
| |
|
| |
|
12-10-2011, 08:26 PM
| #1191 |
| MODERATOR Join Date: Jul 2004 Location: Ohio
Posts: 18,928
|
I got to page six and said eff this, I already read all this shit before.
|
|
| |
|
12-10-2011, 08:33 PM
| #1192 | |
| Nobody Join Date: Sep 2008 Location: Maine
Posts: 966
| Quote:
| |
|
| |
|
12-10-2011, 09:07 PM
| #1193 | |
| I wanna be Dave Join Date: Nov 2010 Location: 07456 N. NJ USofA
Posts: 8,314
| Quote:
I would love to do it again, but really don't have time. | |
|
| |
|
12-11-2011, 07:46 PM
| #1194 |
| Nobody Join Date: Sep 2008 Location: Maine
Posts: 966
|
Well, after the better part of a day I have some less than impressive data from my first motor, and I'm also in the doghouse. Figured I'd post the results anyways I started with an epic 27 turn motor that is a few years old. I bought it used 3 years ago from the lhs and beat the crap out of it in a lunchbox. Being my first time cutting a comm I started with this motor that I'll probably never use again. First thing I did was clean off off some bench space and set up a motor area down in my RC man cave. 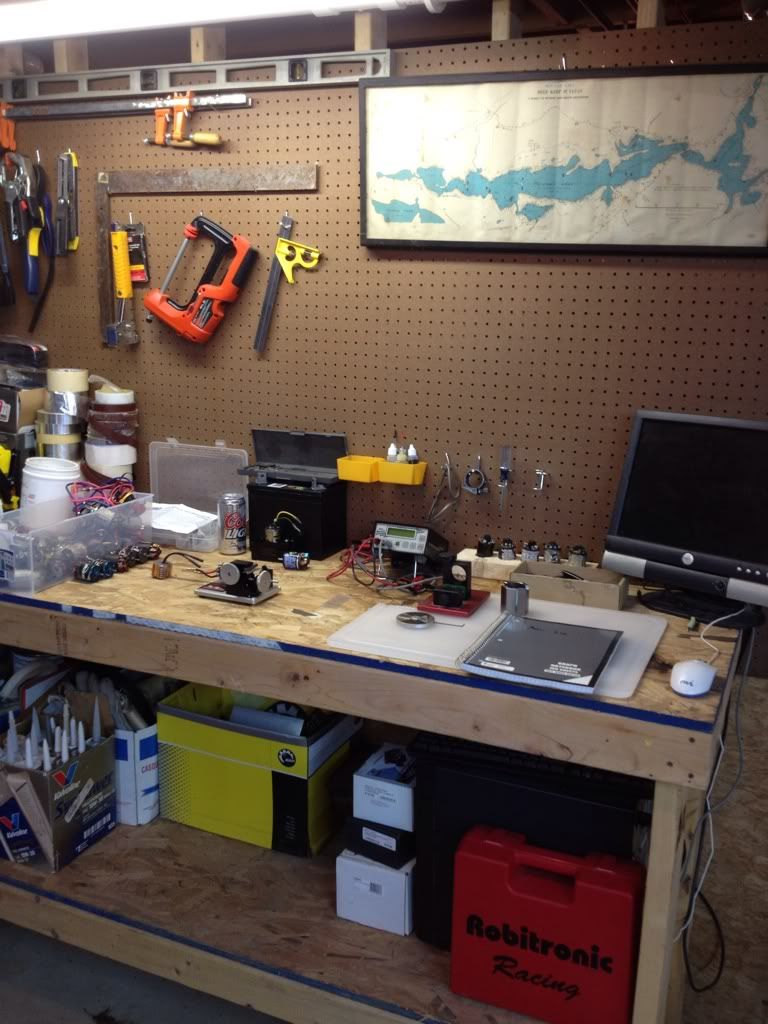 Results of the initial pulls are as follows. Wish I had it on video because on the first pull it screeched pretty f'ing loud. Timing is fixed at 24 degrees. Springs were 6.5 FU's positive and negative. ----------------- RPM--------POWER-------TORQUE------ EFFICIENCY------CURRENT---------TIME MAX POWER-----12682--------120-------------91-------------- 57.4------------- 34.8-----------.49 Max Eff----------19994--------73.2------------35---------------72.5-------------14.8-----------1.16 Average------------------------76.4------------------------------44.2 Avg(18-35A)-------------------108.4----------------------------65.2 Took it apart and here is the com and brushes. Brush pic isn't too good but they looked beat 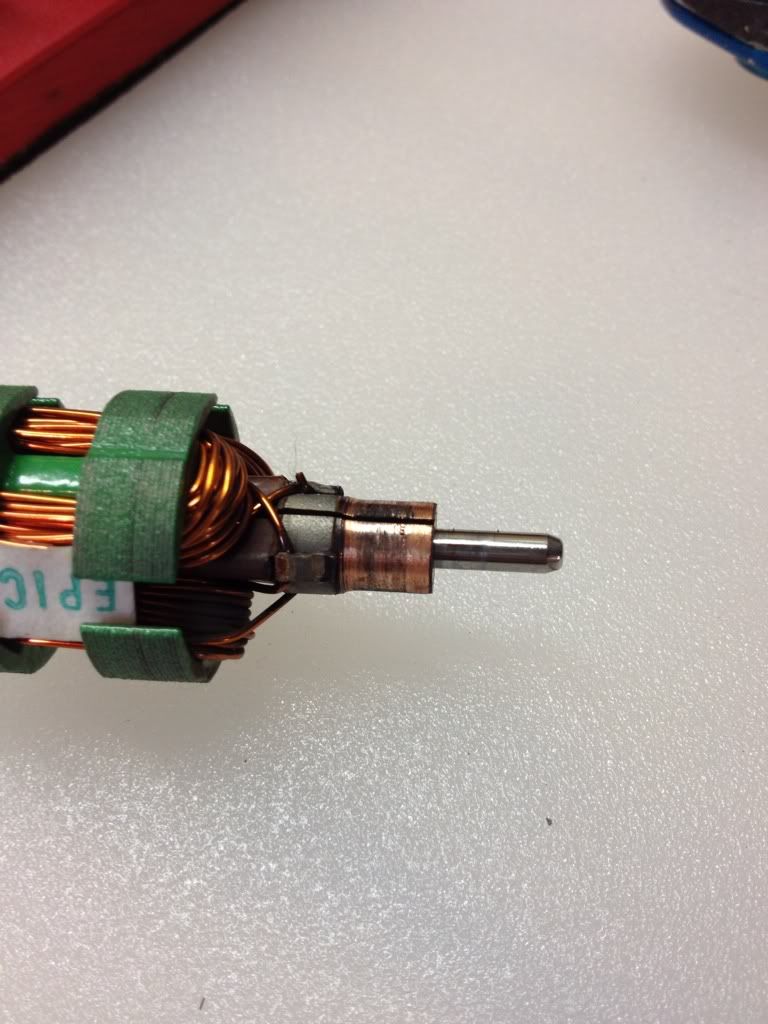 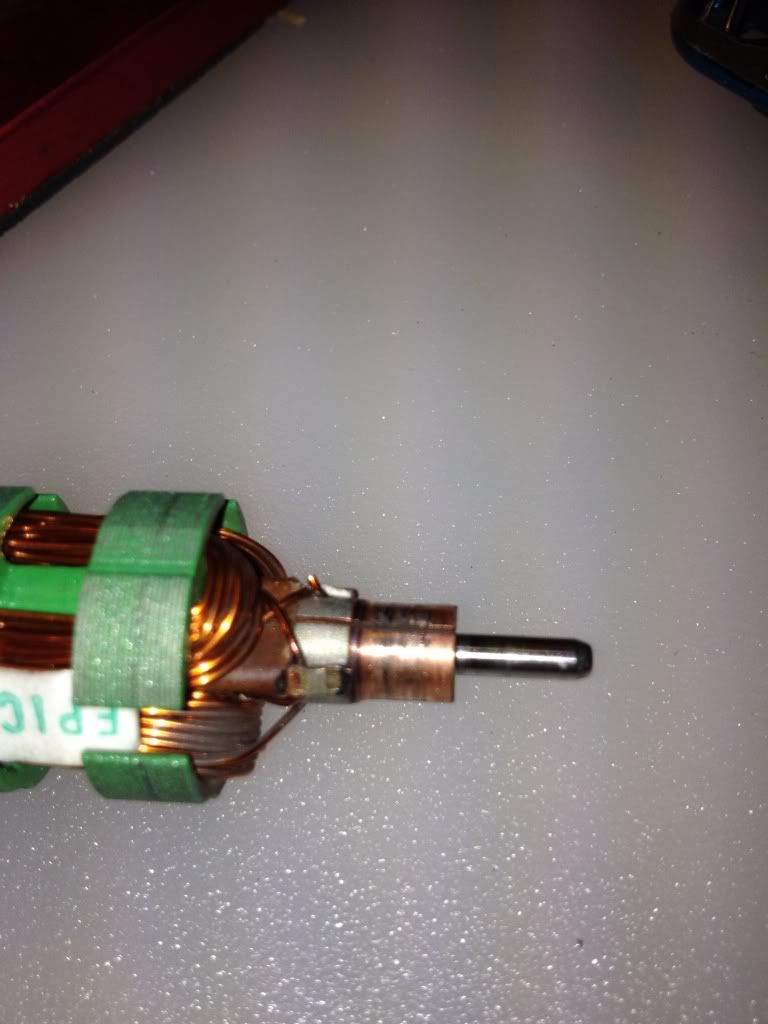 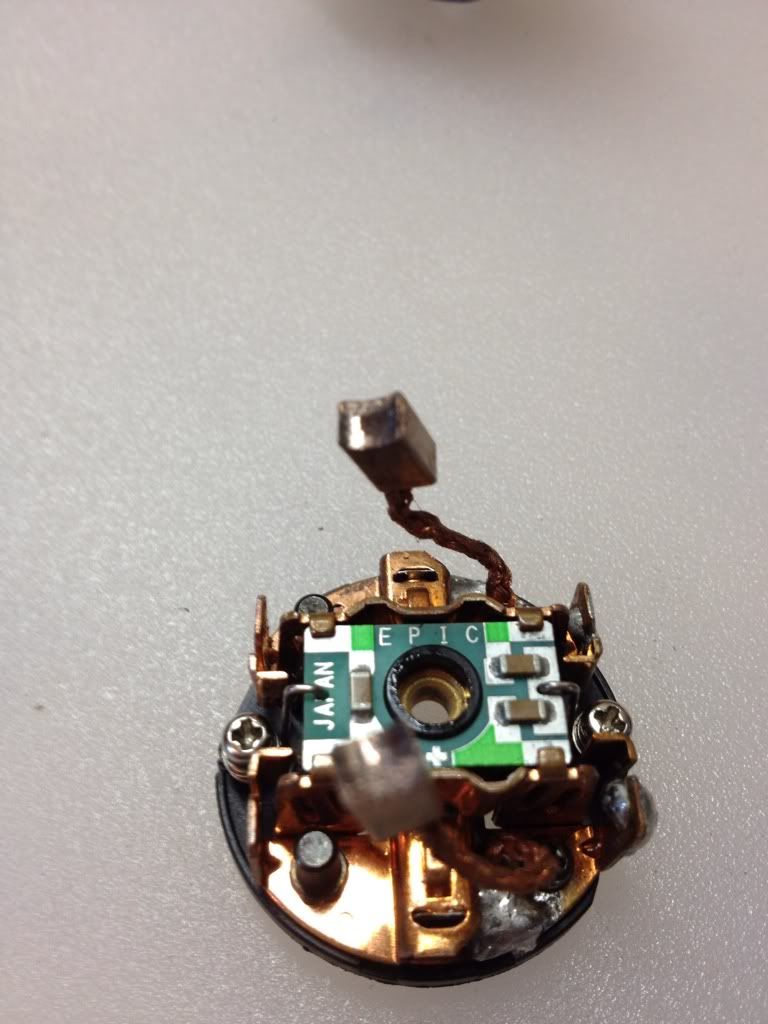 So, I cut the com first on my cobra lathe. I shimmed the bit up with a razor blade, used an Integy 55 turn motor and made a 4 cell NiMh pack. Seemed to cut good 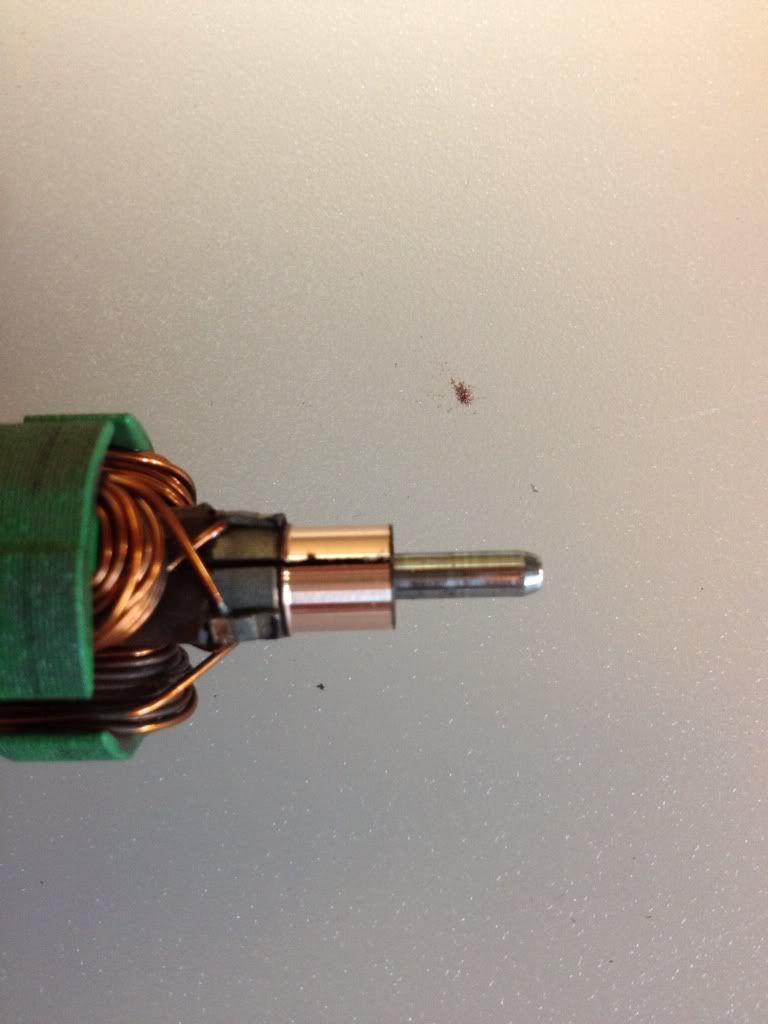 The brushes were really short so I changed them out with some trinity 766's, the only lay downs I have. I aligned the brush hoods and broke them in with a 3 cell NiMh for a few minutes. After playing with it for quite some time, I ended with results about what I started with. Springs were 6.5 FU's positive and 4.5 FU's negative. ----------------- RPM--------POWER-------TORQUE------ EFFICIENCY------CURRENT---------TIME MAX POWER-----13343--------120.1-------------86-------------- 56.7------------- 35.2----------.58 Max Eff----------21275--------91.4------------41---------------70.2-------------19.6-----------1.29 Average------------------------79.3------------------------------45.7 Avg(18-35A)-------------------105.8----------------------------65.4 Not quite what I was looking for but it's a start I guess. If anyone has any recommendations don't be shy. I admit I have no idea what I'm doing. Does 18-35 amps seem like a good range of an average to look at? Note I also used alligator clamps on the motor. I plan to rig it up better with solder connections. If you haven't seen a dyno before, it's pretty cool. Don't mind the H-mo music, it's all that comes in down there. http://i583.photobucket.com/albums/s...s/d3619864.mp4 |
|
| |
|
12-11-2011, 07:56 PM
| #1195 |
| I wanna be Dave Join Date: Jan 2008 Location: Arat Alabama
Posts: 2,678
|
Cool set up! I guess EdwardO hooked you up pretty good! You may want to run a charger on your power supply battery while running. I believe a small change in input voltage affects the consistency a good bit. |
|
| |
|
12-11-2011, 08:22 PM
| #1196 |
| Nobody Join Date: Sep 2008 Location: Maine
Posts: 966
|
Thanks. Yeah, Eddie is the man. I'm surprised he hasn't blocked me from PM's yet. I thought about that. The battery is on a slow charge now, and I worried that charging while using the dyno could mess up the dyno. |
|
| |
|
12-12-2011, 12:08 AM
| #1197 |
| I wanna be Dave Join Date: Apr 2007 Location: Arlington, Washington
Posts: 2,303
|
First, holy shit dude, where is the flywheel cover! Needs to be on there, that thing will turn into something out of tron if it spins loose. You don't want to be charging the battery while running it. The Robi actually has a battery drain factor used in the formula. Amp settings, just use the default Robi settings for a stock motor. We rarely ventured away from the default settings, though I do often test crawler motors at higher voltages...but I don't use the Robi a ton on them. 766 is a reedy brush. A few minutes at 3.6 volts probably wasn't enough to break it in all the way.. Spring tension is probably a little low for 7+ volt motor testing. The 766 is famous for being a bit smaller than other brushes on some batches, so they cock in the hoods worse than others....some alignment is a bit more critical. I personally hate the brushes on stock motors......they were ALWAYS down on power compared to other brushes. The comm looks like it still has some wear showing at the slots. May need to cut it more, though it might just be the pic. I only block PMs if you send me pics of man boobs.....that's about it. Later EddieO |
|
| |
|
12-12-2011, 04:40 AM
| #1198 |
| I wanna be Dave Join Date: Nov 2010 Location: 07456 N. NJ USofA
Posts: 8,314
|
Original brushes don't look like they made contact all the way across, could be the picture though.
|
|
| |
|
12-12-2011, 04:46 AM
| #1199 |
| Nobody Join Date: Sep 2008 Location: Maine
Posts: 966
|
Flywheel cover? Those are for pussies. Or........I don't have one. I'll get one made up out of something. Cool Whip container or something. I'll switch the amp range back to default. I think it's 20-60 amps or something. I was thinking that 18-35 might be a range a crawler motor would spend a lot of time at so logging that average could come in handy for comparing motors, but I dont know. I did actually cut that comm one more time, just forgot to mention it. After the first couple pulls I made another quick skim cut. You're right about the brushes, they didnt look fully seated at all. I'll reread the brush alignment stuff in the black book and double check it with some more run in time. I'll PM you for some brushes to try in this. I have another one of these motors to play with. On the spring tension, I did try heavier springs that were around 9 FU's and saw no difference Power wise, which is why I was playing around with the lighter spring tensions at the end. I've discovered a small problem though....I'm color blind. From what I can tell, there are springs that are silver, and springs that are not silver. I can't identify any different colors, so I have to pretty much put them on and fiddlestick them. Couple questions: 1. Are the units on the fiddle stick ounces? 2. Would it be more worthwhile testing these motors at 11.1 volts since I'd likely be running them on 3s in any vehicle they go in? 3. Can someone recap what a minimum brush length should be. And where are you measuring it from. 4. Are there way too many brushes available, or could someone lay out what the part numbers for the most common stand up and lay down brushes, maybe with some pro's/con's of each. Charlie, the original brushes were missing chunks and were not contacting in those ares. Between those and the comm I thought for sure it was going to make a lot more power after the rebuild. Eric |
|
| |
|
12-12-2011, 06:01 AM
| #1200 |
| I wanna be Dave Join Date: Nov 2010 Location: 07456 N. NJ USofA
Posts: 8,314
|
Ahhh....OK on the original brushes, the picture was a little blurry so I wasn't sure. Minimum brush length, I don't mwasure, I eyeball. With the brush & spring assembled, look at the brush hood where the spring goes to cpntact the brush. I like to keep a minimum of ~1/16th" from the bottom of the spring slot and the spring arm. This allows brush wear without bottoming the spring in the slot which will kill tension on the brush. Hopefully this makes sense. Since different hoods have slightly different slots, as well as how the hood is assembled on the motor, the minimum brush length can be different, thus no length dimension. Also make sure the brush shunt is NOT caught on the hood. Too many times people have complained of low performance or "dead" motors when it was the shunt hung on the hood. I usually get some shunt and cram it into the hood so the brush can wear without getting the shunt hung up. As to your test, just doing a comm cut, seat brushes (new or old) & lubing the bearing/bushing and then doing your test is good in my book. This is a back to back test to see how much you gain just from that. Tweaking the hood alignment, motor timing, etc. can then show what a motor maintenance & tweak can yield for max performance. Holmes or Eddie0 can discuss numbers better than I for targets, I just looked at relative numbers across my motors as well as before/after testing. Have some fun. |
|
| |
 |
 LinkBacks (?)
LinkBack to this Thread: http://www.rccrawler.com/forum/electronics/223989-cutting-motor-commutator-motor-tweaks.html | ||||
| Posted By | For | Type | Date | |
| Hiilimoottorin kunnostaminen | This thread | Refback | 10-04-2011 03:19 PM | |
| |


 Linear Mode


