| |
 05-09-2010, 12:35 AM
| #21 |
| Quarry Creeper Join Date: Apr 2010 Location: lake havasu city
Posts: 285
|
oh dang almost forgot about the wheels. well they look awesome waaay better then the pics they do it no justice lol. but the one thing i found that did bother me a bit is they have no vent holes...? but they hold air well... Last edited by talon0713; 05-09-2010 at 01:57 AM. |

|  |
| Sponsored Links | |
| | |
|
05-09-2010, 05:58 AM
| #22 | |
| Quarry Creeper Join Date: Apr 2010 Location: Idaho
Posts: 226
|
The pics look great I'm really interested to see how the 4 link mod holds up and what your opinion of it is when you are crawling. We cant wait to see how the mongoose set up works out for you, looking great though and put it through its paces we love the feedback  Quote:
| |
|
| |
|
05-09-2010, 07:23 AM
| #23 |
| Rock Crawler Join Date: Feb 2010 Location: Sturgis
Posts: 719
|
why did you spread the top links out ? I was under the belief that more triangulation is better.
|
|
| |
|
05-09-2010, 12:21 PM
| #24 | |
| Quarry Creeper Join Date: Apr 2010 Location: lake havasu city
Posts: 285
| Quote:
| |
|
| |
|
05-09-2010, 04:40 PM
| #25 |
| Rock Stacker Join Date: May 2009 Location: LI
Posts: 98
|
I like it keep in going!!!!! |
|
| |
|
05-09-2010, 04:40 PM
| #26 |
| Rock Crawler Join Date: Feb 2010 Location: Sturgis
Posts: 719
|
God speed ! let me know what you find out . I seem to have misplaced my links for now but you never know what will happen next time I charge my batteries  |
|
| |
|
05-09-2010, 09:59 PM
| #27 |
| Quarry Creeper Join Date: Apr 2010 Location: lake havasu city
Posts: 285
|
ok well today i put the truck together to give the zno parts a run and bad things happened. i broke 2 of the bat wing eliminator blocks and it might be due to having the bolts for the links a little too tight or because i had the spacers on there putting more leverage on them but it didnt take long about 20 mins in to my first run and "SNAP". im going to set it up without the spacers and give it a go. and as far as the spacing out the upper links to make it like a 4-link it didnt really have any affect on the articulation it was still flexing pretty good with almost no difference. as for the rest of the zno parts they are holding up strong the skid plate has taken quite the pounding and is still holding up really well. got lots of surface scratches so its not too clear anymore but its still as smooth as a babies bottom and slides right over anything. i havent seen any signs of fatigue in the bolt holes on the skid plate either. as for the servo tray it seems to be holding up really well but we will see how it does when i get my high torque servos from CKRC. and i got the hammers mounted and on and gave them a run, they have great traction but can definitely hinder your axle clearance and in my home course theres alot of obstacles that i get hung up on with them. but if you are in an area with more flat rocks and not alot to get hung up on your axles they are great. as for me i will be looking for something a bit taller. |
|
| |
|
05-09-2010, 10:21 PM
| #28 |
| Quarry Creeper Join Date: Apr 2010 Location: lake havasu city
Posts: 285
|
so i just did some more thinking as i was taking it apart and looking at it and i had it mounted in the very front hole and it only broke that front hole so im going to leave it mounted on there and shorten the links by putting the shorter traxxis rod ends on and connect it to the back hole and see if that makes it stronger. i hav a feeling it broke because of a combination of things the fact that i had it mounted in the farther front hole, the spacers causing more leverage, over tightening, and the fact that i put alot of force on my front end climbing steep rocks in wedged spots and it puts alot of torque on the upper links due to the amount of travel. so im going to sset it up again and see how it goes. oh also they only broke on the front none on the back. not even stress fractures on the back block. Last edited by talon0713; 05-09-2010 at 11:25 PM. Reason: typo's |
|
| |
|
05-10-2010, 10:39 AM
| #29 |
| Quarry Creeper Join Date: Apr 2010 Location: lake havasu city
Posts: 285
|
ok so sense changing everything about how i mounted the links to the block it has held up great so far. i ran through a full battery cycle with nothing broken and twisted tweaked and crammed it in to everything my home course has to offer and the ZNO-RC bat wing elimination blocks are not showing any signs of breaking any time soon. so with that being said my recommendations to anyone geting this kit i would not use the farthest forward hole and try not to space out the links too far away from the block as it puts a bit too much stress on the block and also be carefull not to over tighten and use thread lock as it should not be tightened more then a half a turn past finger tight. other then that its a really great product and seems to hold well. |
|
| |
|
05-10-2010, 11:23 AM
| #30 |
| Quarry Creeper Join Date: Apr 2010 Location: lake havasu city
Posts: 285
|
heres some pics of the carnage. the first one i broke. 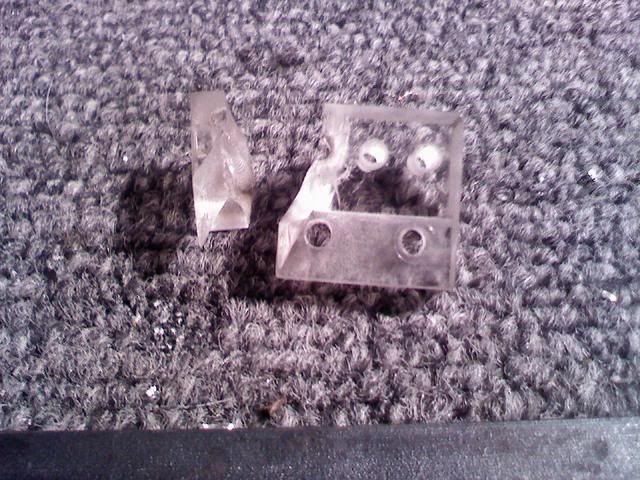 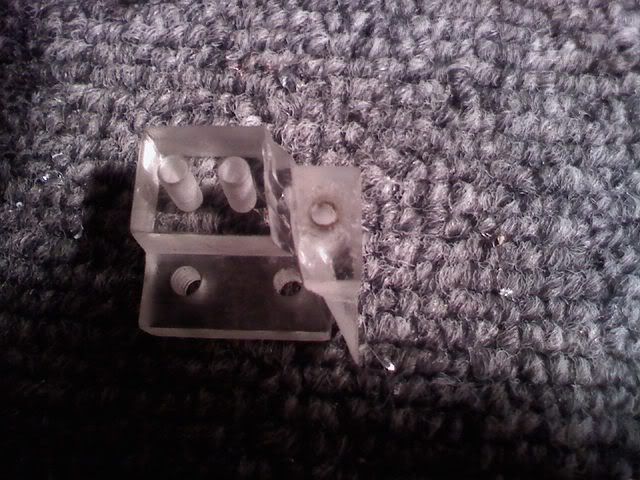 the second one i broke. 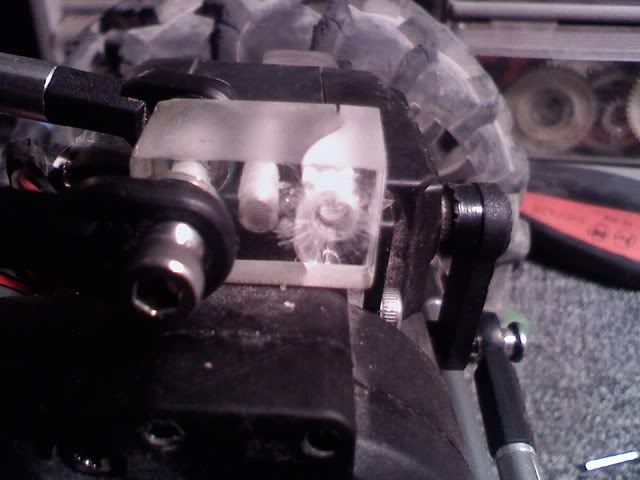 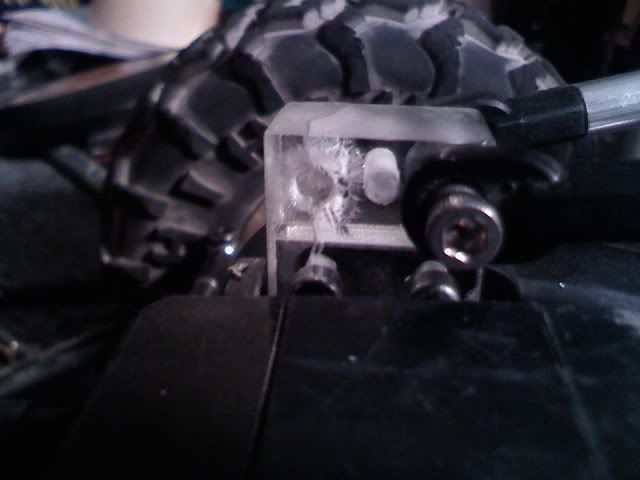 Last edited by talon0713; 05-10-2010 at 11:26 AM. |
|
| |
|
05-10-2010, 03:15 PM
| #31 | |
| Quarry Creeper Join Date: Apr 2010 Location: lake havasu city
Posts: 285
| Quote:
| |
|
| |
|
05-10-2010, 03:57 PM
| #32 | ||
| Quarry Creeper Join Date: Apr 2010 Location: Idaho
Posts: 226
| Quote:
The difference between a 3 link and a 4 link is actually the relation to the trailing links on the chassis not the points at which it connects on the axle itself if that makes any sense. Basically if you had your top links mounted at the same place as the lower links on the chassis and 2 different points on the axle to prevent rotation that would be a 3 link. It has nothing to do with the triangulated upper link set up. Quote:
| ||
|
| |
|
05-10-2010, 04:51 PM
| #33 |
| Pebble Pounder Join Date: Apr 2010 Location: Canada
Posts: 161
|
Sorry I have to be the wet blanket here. The link mount is the most assaulted piece on a rig,this is clearlly (sorry for the pun) not an appropriate material for this application. Nothing a 50cent flat piece of alluminum wouldnt accomplish 20x better.......sometimes the wheel doesnt need to be reinvented Dont get me wrong I love your products,the world needs more people not afraid to try something new |
|
| |
|
05-10-2010, 05:11 PM
| #34 |
| Quarry Creeper Join Date: Apr 2010 Location: lake havasu city
Posts: 285
|
well now that i dont have 2 long pry bars screwed in to it they are holding up fine. i just had 2 long bolts in it and had the links spaced out away from the block so the normal force applied was multiplied so of course it broke lol. |
|
| |
|
05-10-2010, 06:59 PM
| #35 |
| Quarry Creeper Join Date: Apr 2010 Location: lake havasu city
Posts: 285
|
ok so there was more carnage today... i havent even put the mongoose motors in yet and im already breaking stuff in the gear box. i broke the pin that i guess you could say acts as the locker drive pin. heres a pic of the carnage. 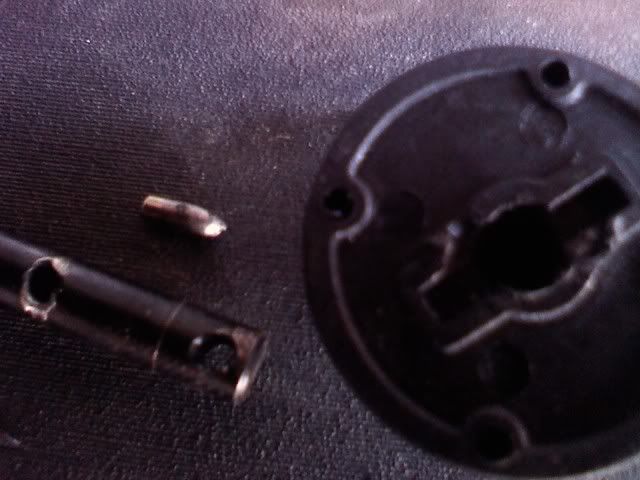 that being done i hope this gear and assembly will be metal as well when redcat puts the metal gear set out because that pin shredded the slot that it sets in inside the gear. Last edited by talon0713; 05-10-2010 at 07:02 PM. |
|
| |
|
05-10-2010, 11:33 PM
| #36 |
| Newbie Join Date: May 2010 Location: Albuquerque
Posts: 1
|
I just recently finished installing the mongoose setup in my RS 10. The Good: Lots more power, Makes lots of wheel speed, Good braking, motors stay cooler. Less clod stall, "The Dig" awesome works flawless with them. The Bad: pretty weak drag brakes 50% max, Auto shut off when over worked is a pain in tough spots, different size motor shaft, Strange clunky shifting from forward to reverse, high speed can be scary with plastic gears. I have only put six 4200 NIMH packs through them, but I worked some hard trails. Some of the bad may be worked out through adjustment I really am just getting to know them. P.S The upper arms really lose a lot of articulation when they arent joined on a single ball joint. Use the plastic with a ball joint in the end instead of putting the uppers on each side. Or run one upper on front and back. |
|
| |
|
05-10-2010, 11:55 PM
| #37 | |
| Quarry Creeper Join Date: Apr 2010 Location: lake havasu city
Posts: 285
| Quote:
as far as the links i like it in this setup due to the fact that the original design i thought was a bit much flex. articulation is great to look at but over articulating just tends to cause it to bind up and break things more. 70 degrees of articulation is waaaay too much. i also have spacers in my shocks to limit the travel so having links that can flex waaay out like that is pointless. i find that it is also much more stable and puts the power to the ground better in tight spots that twist your chassis rather then over rotating and binding up. and i tend to flip on my lid less from over rotating and the wheel being set on its side (no traction on its side) lol. anyway these are the things i have learned in my experiance. if theres something im missing about needing more then 50 degrees if total articulation please let me know. Last edited by talon0713; 05-11-2010 at 12:00 AM. Reason: typo | |
|
| |
|
05-12-2010, 11:33 PM
| #38 |
| Quarry Creeper Join Date: Apr 2010 Location: lake havasu city
Posts: 285
|
ok so the final touch has been added to the build. i got my stuff from ckrc and installed the mongoose setup and all i can say is WOW these motors got BALLZ the one touch setup was a bit tricky but once its all set up it works great although the only thing that really seems irritating is the thermal overload cut off cuts power a bit too early but thats prob a good thing. also if you want to use the 8t pinions you have to drill out the rs10 ones because i dont think anyone else makes an 8t pinion with a 1/8 shaft hole. also you will want to do one touch setup then once you have the basic setup done reverse your front motor rotation then dont isolate each esc. to put it in expo mode or the throttle setings will be off from front to rear for some reason and reverse will be full throttle instantly on one axle and normal on the other read the manual close to do all of the setup. and you will have to make a parallel harness for the batt power and you should be able to buy a y harness for the reciever plug at your lhs. oh and annother wierd thing is the esc's wont turn on unless they are both on and wont turn off unless they are both off i will be wiring mine into one switch to simplify things once i get the settings all down and dialed in. anyways all and all the mongoose setup is a big 2 thumbs up just be careful with the throttle it can get a little hairy
Last edited by talon0713; 05-12-2010 at 11:38 PM. Reason: missing info |
|
| |
|
05-13-2010, 12:11 AM
| #39 |
| Quarry Creeper Join Date: Apr 2010 Location: lake havasu city
Posts: 285
|
dang i got so excited about the mongoose setup i didnt even talk about the servos lol. well anyway i put in the cheap tower pro mg 995 ckrc specials so far they are not too bad the torque works good but they are a bit glitchy/twitchy nothing that is crippling but a bit annoying sometimes other then that they work great so far we will see how they do long term. if you dont read anything further then assume that they are lasting lol. anyway i will post anything else bad i find with them. oh and the zno parts are holding up very well and the skid plate works great i slide right over anything the mongoose motors dont hop me over lol... big thanx to chris and all the guys at zno for all the help and support. |
|
| |
|
05-13-2010, 08:48 AM
| #40 |
| Pebble Pounder Join Date: May 2010 Location: Central Coast
Posts: 111
|
How did you break the axle shaft thingy? <- technical term |
|
| |
 |
| |


 Linear Mode


