| |
 04-22-2008, 07:12 PM
| #41 | |
| RCC Addict Join Date: Oct 2007 Location: Long Island-Land of one batch of rocks in Sag Harbor and at least one fellow crawler
Posts: 1,371
| Quote:
Well thanks Davies. I wouldnt say it is "perfect" but it really is a blast to tear around with. I am most impressed with the tires and how they perform. Up next is a 45 turn lathe for some more crawlin power. Again thank you for the nice words. | |

|  |
| Sponsored Links | |
| | |
|
04-22-2008, 08:01 PM
| #42 |
| Sinking with the ship   Join Date: Mar 2005 Location: El Capitan...sole survivor and sinking fast
Posts: 8,864
|
Another long islander, cool  , Jeep looks good. I have one myself that I just havent had time to do anything with :-(. Where on the island are you? , Jeep looks good. I have one myself that I just havent had time to do anything with :-(. Where on the island are you?-Mike |
|
| |
|
04-23-2008, 05:53 AM
| #43 | |
| RCC Addict Join Date: Oct 2007 Location: Long Island-Land of one batch of rocks in Sag Harbor and at least one fellow crawler
Posts: 1,371
| Quote:
I think I remembered seeing your Jeep. Yellow right? Well if you ever get to messing with it, be sure to post some pics. I live in Manorville. We should go Jeepin' one day. Mine needs more rock rash! | |
|
| |
|
05-02-2008, 05:19 PM
| #44 |
| RCC Addict Join Date: Oct 2007 Location: Long Island-Land of one batch of rocks in Sag Harbor and at least one fellow crawler
Posts: 1,371
|
OK just a small update but I swapped out the hummer wheels for High Lift wheels painted semi gloss black and with TSS rock rings. Also thew in the Integy 45 turn motor. I also repaired the front headlights since they both popped out last run. No pics of the front body mount but I reconfigured it a bit and it is way better than before. Here are a few pics with the new wheels.
|
|
| |
|
05-02-2008, 06:48 PM
| #45 |
| I wanna be Dave Join Date: Aug 2007 Location: santa monica
Posts: 3,687
|
very nice. super clean rig. you can add bolts to the TSS rock rings, like this: 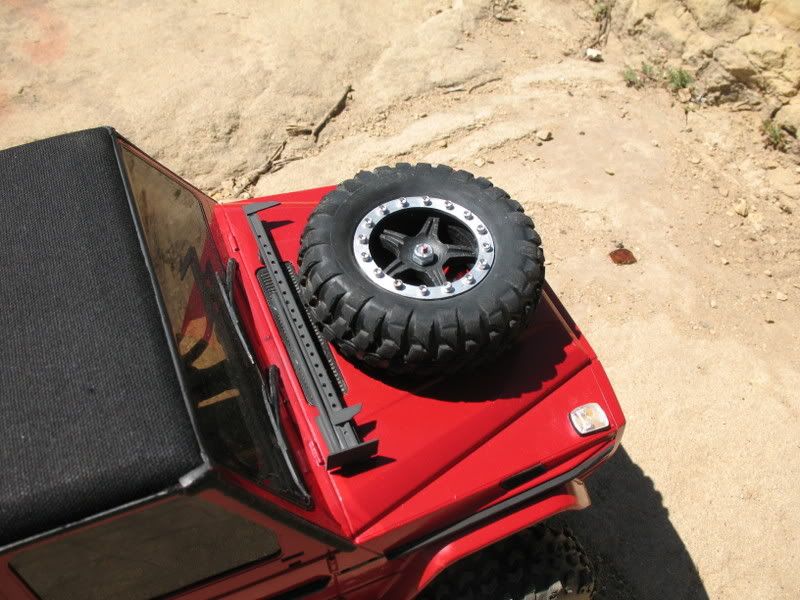 |
|
| |
|
05-02-2008, 07:18 PM
| #46 | |
| RCC Addict Join Date: Oct 2007 Location: Long Island-Land of one batch of rocks in Sag Harbor and at least one fellow crawler
Posts: 1,371
| Quote:
Are they just the bolt heads glued on or did you drill holes in the wheel and screw them in? What size bolts are they also? Thanks in advance and I love your soft top G bye the way. | |
|
| |
|
05-02-2008, 09:39 PM
| #47 |
| I wanna be Dave Join Date: Aug 2007 Location: santa monica
Posts: 3,687
|
I dont know the exact size of the screws. they came with my TSS chassis as extra screws. They're socket head wood screws though. very thin and about 5/16" long IIRC. I drilled a hole just bin enough to self thread the screw, drilling through the rim (and likely the tire bead) then screwed them in. They look pretty good on the gwag and appropriate as I have true beadlocks on the wheels as well. thanks. Yours looks killer too! |
|
| |
|
05-03-2008, 09:07 AM
| #48 | |
| RCC Addict Join Date: Oct 2007 Location: Long Island-Land of one batch of rocks in Sag Harbor and at least one fellow crawler
Posts: 1,371
| Quote:
| |
|
| |
|
05-05-2008, 08:28 PM
| #49 |
| Rock Crawler Join Date: Jul 2007 Location: Beechview/Pittsburgh
Posts: 536
|
Hey there, gotta say I love the build.... I am about ready to start getting all the electronics for THIS.......   I was wondering what all you did to the front suspension to get travel out of it... Also really digging the rear suspension.. I am really considering hacking this body up... maybe even going so far as to make the hardtop truely removable, along with the doors..... Your Evil Twin and the othe Blue Jeep are true insirations... Anyone can restore somthing, but it takes nuts to cut it up! |
|
| |
|
05-06-2008, 05:32 PM
| #50 | |
| RCC Addict Join Date: Oct 2007 Location: Long Island-Land of one batch of rocks in Sag Harbor and at least one fellow crawler
Posts: 1,371
| Quote:
I didnt really do much of anything to the front suspension. As for cutting up the body, it took me a few days to really decide to do it but I think I mentioned earlier in the thread that I have another Tamiya Jeep kit NIB so I knew if I messed it up I had another to build someday. But I am really glad I did it because it is different and since I will build the other one mostly stock, I think they would look cool side by side. I would love to see the removable hard top and doors so make sure you post pics if you go that route. Your body looks like its in great shape too so you may want to try to give it a sweet paint job before you cut it up. Who knows you may like it uncut. Then if you dont like the way it turned out... hack it up Anyway good luck and thanks for the compliments. | |
|
| |
|
05-06-2008, 06:36 PM
| #51 | |
| I wanna be Dave Join Date: Aug 2007 Location: santa monica
Posts: 3,687
| Quote:
| |
|
| |
|
05-06-2008, 08:43 PM
| #52 | |
| RCC Addict Join Date: Oct 2007 Location: Long Island-Land of one batch of rocks in Sag Harbor and at least one fellow crawler
Posts: 1,371
| Quote:
Rock on | |
|
| |
|
05-06-2008, 09:21 PM
| #53 | |
| Rock Crawler Join Date: Jul 2007 Location: Beechview/Pittsburgh
Posts: 536
| Quote:
The main reason I wanted this sucker is because I had a wrangler ed YJ but always wanted to turn it into more of an off road rig.. only got as far as a 2 inch lift.. So now is my chance.. I would love to see it on a trailer behind my Blackfoot/High Lift hybrid... would just look so right... | |
|
| |
|
06-05-2008, 06:39 AM
| #54 |
| Rock Crawler Join Date: Jul 2007 Location: Beechview/Pittsburgh
Posts: 536
|
What gauge/weight styrene did you use for building up the rockers? and how did you attach it? (aside from with glue) did you glue anothe piece behind the body and then lay the new rocker down on it and glue it to the body and back peice?
|
|
| |
|
06-05-2008, 09:21 AM
| #55 | ||
| RCC Addict Join Date: Feb 2008 Location: Hiatus..sutiaH
Posts: 1,620
| Quote:
Quote:
Hope I didn't hijack - thanks for the info from you both. Jon | ||
|
| |
|
06-05-2008, 09:41 AM
| #56 |
| ~THE SCALE SHOP~ Join Date: Apr 2006 Location: KILLEEN TX
Posts: 10,056
|
there 2-56 wood/sheetmetal socket heads.
|
|
| |
|
06-05-2008, 09:49 AM
| #57 | |
| I wanna be Dave Join Date: Aug 2007 Location: santa monica
Posts: 3,687
| Quote:
I had the rings glued to the wheel previously. The rings come with the holes in them already. You attach the rings by gluing them to the wheel, and Stang Killa SS is the guy that makes and sells them. Then I drilled through each hole with 1/16" drill bit (I think). Then I screwed the 2-56 wood/sheet metal socket head screws into the wheel. They were self threading so they're threaded into the wheel plastic. | |
|
| |
|
06-05-2008, 10:11 AM
| #58 |
| ~THE SCALE SHOP~ Join Date: Apr 2006 Location: KILLEEN TX
Posts: 10,056
|
1/16" is correct. same size i use to drill the chassis skids/braces. looks great imo pablo! |
|
| |
|
06-05-2008, 11:42 AM
| #59 | |
| RCC Addict Join Date: Feb 2008 Location: Hiatus..sutiaH
Posts: 1,620
| Quote:
Is glue really strong enough? They don't pop off when scrubbed against rocks? I am definitely buying some regardless, but I want to make sure before I do. Will these fit these wheels? Would you suggest I get the 16-hole pattern? | |
|
| |
|
06-05-2008, 12:01 PM
| #60 |
| I wanna be Dave Join Date: Aug 2007 Location: santa monica
Posts: 3,687
|
I dont know how the CA would hold up on the aluminum rims but on my plastic rims I did eventually pop a couple off. Luckily I saw when they came off and reglued them...I guess if you did the screws you wouldnt have the problem, lol... although one thing to be concerned about if you do the screws on the wheels is that they stick out and will catch on the rocks. true beadlocks have the screws somewhat recessed so its not as big an issue on them. |
|
| |
 |
| |


 Linear Mode


