| |
 12-11-2009, 10:00 AM
| #1 |
| I wanna be Dave Join Date: Jan 2009 Location: By a lake in Thornton
Posts: 2,218
|
Pool all your lil tweaks and mods and why you did them!! I just got 2 of these last night and have been goin back and forth through the forum to find all the MODS! so lets get them all in one Place. Remove or shorten shock springs. helps suspension and COG (I spun 4 coils of the spring off the shafts to shorten them) Re-mount battery and ESC to the axels. this helps COG. De-foam and weight wheels. gives beter traction, helps COG (i used 12'' of solder) flip the tranny, shifts weight forward. Get lipos, better runtimes and increases speed and power. i have done all but the Lipo.  what you got? Last edited by BEELZEBOB; 12-11-2009 at 10:15 AM. |

|  |
| Sponsored Links | |
| | |
|
12-11-2009, 10:09 AM
| #2 |
| Rock Crawler  Join Date: Nov 2005 Location: Rock-throwing country
Posts: 847
|
Remove plastic case from esc and shrink wrap or wrap in tape Bb's in tires no foams Droop up front (some use rubberbands I don't) Inboard shocks Use shorter shocks (micro t's, I actually cut my shock cylinder down and drilled new holes for cap) and of course the best mod is the LIPO |
|
| |
|
12-11-2009, 10:14 AM
| #3 |
| I wanna be Dave Join Date: Oct 2007 Location: Scumrise, Flooriduh
Posts: 5,181
|
BWD wheel weight kit. Relocated battery and esc to axles Removed internal plastics - lower CoG Cut the original battery holder down to use as a chassis brace to reduce flex of having taken plastics out. (coming soon BWD Wedge) full droop using mirco t rears stretched over the shock cap and ball cup as return springs, red (medium) rear and white (soft) front Inverted shocks lowering CoG extended bent lower links extended upper links Lowered upper shock mounting point to old internal plastics mount, lower CoG lipo flipped tranny shifting weight forward Hacked the body to allow droop clearance of esc on front axle. Cut windows out of the body (weight redux?) lol just for fun. hs-65 servo - ridiculous steering power! upcoming mods: BWD Wedge kit torquier motor TBD Last edited by DickyT; 01-09-2010 at 08:26 PM. |
|
| |
|
12-11-2009, 03:27 PM
| #4 |
| Pebble Pounder Join Date: Feb 2009 Location: Long Island
Posts: 141
|
Don't forget to oval out where the bearings ride in the tranny cover if you got one thats binding
|
|
| |
|
12-11-2009, 05:10 PM
| #5 |
| Rock Stacker Join Date: Dec 2009 Location: O.C.
Posts: 70
|
I don't want to move my esc and lipo yet, and didn't want to spend 5 bucks on lead at the LHS. So instead I put 4 quarters on top of the front servo, and two in the back. "Crawls" much better now.
|
|
| |
|
12-11-2009, 05:12 PM
| #6 |
| I wanna be Dave Join Date: Jan 2009 Location: By a lake in Thornton
Posts: 2,218
|
but the weight o=f your electronics is still too high, IMHO id move it |
|
| |
|
12-11-2009, 05:24 PM
| #7 |
| Newbie Join Date: Aug 2008 Location: Brunswick
Posts: 29
|
If one removed the foams in the tires, how many BB's would be recommended? Wouldn't they just roll down to bottom all the time?
|
|
| |
|
12-11-2009, 06:17 PM
| #8 | |
| RCC Addict Join Date: Oct 2007 Location: Kennewick, Washington
Posts: 1,382
| Quote:
| |
|
| |
|
12-11-2009, 08:07 PM
| #9 |
| RCC Addict Join Date: Sep 2007 Location: Western ND, Bakken central
Posts: 1,653
|
I moved my shock top shocks mounts down on the chassis. IMO the suspension is smoother this way 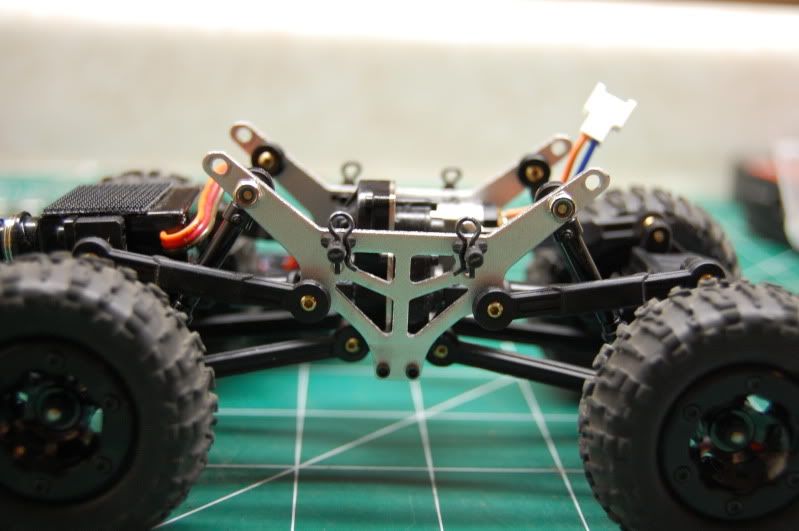 |
|
| |
|
12-11-2009, 09:44 PM
| #10 | |
| Rock Stacker Join Date: Dec 2009 Location: maine
Posts: 67
| Quote:
I will just wait for an answer from Losi. I would hope that Rich has chimed in with Losi's input. (although I haven't researched this yet) If not, I would hope that Losi is doing there own research and will figure out that something is not right. Losi has been around for awhile, they don't want one kit to f*ck up there good name and will make good on the situation. | |
|
| |
|
12-11-2009, 11:34 PM
| #11 | |
| Pebble Pounder Join Date: Jan 2008 Location: Mission B.C. Canada
Posts: 156
| Quote:
| |
|
| |
|
12-12-2009, 07:16 AM
| #12 |
| I wanna be Dave Join Date: Jan 2009 Location: By a lake in Thornton
Posts: 2,218
|
Lets keep the debates in the topic specific threads, and keep posting modifications only!!
|
|
| |
|
12-12-2009, 07:48 AM
| #13 |
| Rock Stacker Join Date: May 2005 Location: dfw
Posts: 59
|
If you do all the mods to get your c.g. low enough you can use servo tape and mount a parkzone 300mah lipo from the mini cub to the underside of the roof of the body. I get aprox. 30 minute run times with this battery - and it's only 17 bucks.
|
|
| |
|
12-12-2009, 07:50 AM
| #14 |
| I wanna be Dave Join Date: Jan 2009 Location: By a lake in Thornton
Posts: 2,218
|
I assume that parkzone will plug into my multi port charger for my p-51 and MSR. Good lookin out gravel, i mean pavel
|
|
| |
|
12-12-2009, 10:29 AM
| #15 |
| Rock Crawler Join Date: Jan 2007 Location: Tuscaloosa
Posts: 855
|
Great idea getting all these in one place. Those are some great mods already listed but I can't believe you guys left the coolest one out ... putting a wicked, cool scale body on it. Here is what I've done to mine * Scale Chassis * Scale Body * Moved Electronics around for better weight distribution * Weighted Wheels with solder * Flipped the Transmission * Extended Links with styrene tube * Extended Driveshaft with Bic pen * Removed Rear Shocks replaced with hair band droop limiters (After breaking rear shock beyond repair) * Removed Servo Saver To replace the shocks with the hair band/pony tail holder just borrow a couple from your lady (or take one out of your own pony tail if you have one). Then, cut it so its one string not a loop. Tie a slip knot in one end. Put the slip knot over the ball where the shock attaches to the axle and tighten it down. After that, run the other end through the hole in the chassis where the top shock mount was. Set it to the desired length and tie a knot in it. This gives you a droop set up just like removing the springs. This mod does allow for a little more side to side movement of the axle but until a better set of shocks are available it beats paying $6.99 plus shipping for a replacement set. 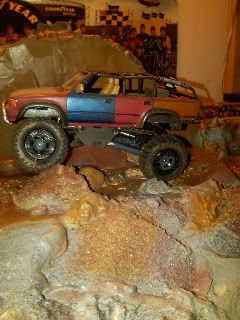 To remove the servo saver take the screw out of the front of the servo and then remove the spring, servo horn, and other plastic pieces. Toss everything aside except for the servo saver part that has the teeth on it, servo horn, and screw. Glue the v part of the servo saver to the matching part of the servo horn. Then, cut a little off the screw. When the glue dries reattach everything. 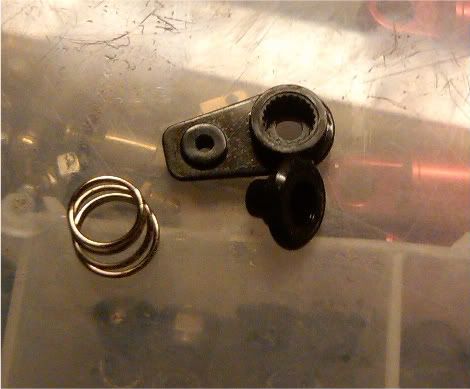 Last edited by nascarkeith; 12-12-2009 at 10:39 AM. |
|
| |
|
12-12-2009, 10:50 AM
| #16 |
| I wanna be Dave Join Date: Jan 2009 Location: By a lake in Thornton
Posts: 2,218
|
Damn good piont Keith!! I may just have to buy another so i can do both!! i really enjoy makin it comp worthy, so if i want scale i need another! what model kit did you use? |
|
| |
|
12-12-2009, 12:07 PM
| #17 |
| I wanna be Dave Join Date: Aug 2006 Location: under a rock and a hard place
Posts: 5,443
|
Remove spur gear cover (not needed and excess wieght) Dont over tighten the slipper it will bind up the tranny. Locked mine out with,super thin double sided tape between the plates...no more slipage Heat the stock springs to a glow, it will give you a softer spring rate and a small amount of droop. Change the wires (esc and batt)out to small diameter silicone wire,it will flex better with less resistance 3/16th lead rope fits in the groove of the beadlock for extra weight 3/8th lock washer fits over the hex hub on the wheel for extra weight remove esc outer case(less weight) Heli tail rotor motors are a great high torque motor to swap over to. HAVE FUN withthe little thing Last edited by hotwheels000; 12-12-2009 at 12:11 PM. |
|
| |
|
12-12-2009, 02:03 PM
| #18 | |
| Rock Crawler Join Date: Jan 2007 Location: Tuscaloosa
Posts: 855
| Quote:
These things are kind of addicting. I want about 3 more. Its an Aoshima 4-Runner kit. All the details on it and my styrene scale chassis can be found in the build thread here Rocked Out 4-Runner | |
|
| |
|
12-12-2009, 03:46 PM
| #19 |
| Rock Crawler Join Date: Oct 2009 Location: Wasilla, Alaska
Posts: 852
|
I made functional beadlocks on mine with a pvc connector cut to width, like what you can do with stock 1.9 wheels.
|
|
| |
|
12-12-2009, 08:43 PM
| #20 |
| Rock Crawler Join Date: Sep 2009 Location: Spring, Texas
Posts: 697
|
I made some modifications to my crawler today, which I'm testing out. Other than having put the ESC on the front servo and added a LiPo battery, this is what I came up with: 1) Losi Mini-T ball ends and threaded rods replaced the upper and lower links. This lengthened and lowered the truck. 2) Cut the drive shafts, put each end in a section of aluminum tube with a little CA and added a section of black heat shrink to cover. 3) Cut small sections of nitro fuel tubeing and slid them onto the output yolks to keep them from snapping off. 4) Drilled out the chassis holes made for the ESC/battery mounting platforms and used them for the upper shock mounts. 5) After removing the tires from the wheels, I cut the foam down to about half and installed lead weights around the inside of the wheels. 6) Installed red Micro-T shock springs (stretched to stock length). Now it is longer, the wheels are weighted and the foams allow the tires to compress more. It seems better and the COG is definitely lower, but it does bottom out more often. Still tweaking... The pictures also show a comparison with a stock micro crawler:         |
|
| |
 |
 LinkBacks (?)
LinkBack to this Thread: http://www.rccrawler.com/forum/losi-micro-rock-crawler/216157-micro-mod-bible.html | ||||
| Posted By | For | Type | Date | |
| Breaking The Silence... - TheToyz Forums | This thread | Refback | 10-04-2011 06:23 PM | |
| |


 Linear Mode


