| |
 10-27-2008, 06:17 PM
| #121 |
| Quarry Creeper Join Date: Sep 2008 Location: Petaluma
Posts: 282
|
yes- sry I was just looking at the pic. that's a great idea- I wish I would have found you sooner. |

|  |
| Sponsored Links | |
| | |
|
11-16-2008, 12:19 PM
| #122 | |
| Pebble Pounder Join Date: Aug 2008 Location: frederock,maryland
Posts: 117
| Quote:
Can you please re-host the pics that were here? I would really like to do some of these tips you speak of | |
|
| |
|
11-19-2008, 09:15 PM
| #123 |
| Quarry Creeper Join Date: Nov 2008 Location: The land of bagged milk
Posts: 260
|
Also wanting to see the pics re-hosted if possible please. I need to see how you stack the leafs together. Also, what servos do you guys recommend for the shifting and steering (metal geared of course |
|
| |
|
12-04-2008, 01:17 PM
| #124 |
| Pebble Pounder Join Date: Oct 2008 Location: L.A. lower Arkansas
Posts: 122
|
Does anyone know where to find the lost pics? I am building my high lift and would like to know.
|
|
| |
|
01-28-2009, 06:32 AM
| #125 | |
| Newbie Join Date: Feb 2008 Location: wi
Posts: 38
|
How does the 350 go with the brushless set up? I am contemplating the change but mine was a stock shelf queen.. now it may be time to make it useful! jsut wondering before I make the b-less commitment Quote:
| |
|
| |
|
02-17-2009, 07:31 AM
| #126 |
| Newbie Join Date: Sep 2008 Location: China
Posts: 8
|
Hi Guys, Don't know if you know this already but junfac made a 4 link conversion kit for the high lift. check it out at www.junfac.com it also shows a video of the f350 converted in action. |
|
| |
|
03-03-2009, 07:11 PM
| #127 |
| Newbie Join Date: Feb 2009 Location: ottawa
Posts: 4
|
anyone have pics of the truck changed to two wheel steer
|
|
| |
|
04-05-2009, 11:13 AM
| #128 | |
| Quarry Creeper Join Date: Sep 2008 Location: Petaluma
Posts: 282
| Quote:
Let me know if this helps but I took off the rear steering on my F350 (more for realism) and found you have several options as to how to finish the front steering. Moving the side duel steering servo forward gave me a place to store extra wires in a side mounted gas tank under the cab. I found by moving the servo to the front (next to the shifting servo) you get more direct steering too [which is more responsive]. You can keep the axle's fixed wheel steering rod in the rear (next to the driveshaft) but by moving it forward the axle and swithching the steering rods, you'll have a tighter turning radius because the steering arms have more travel. Sounds confusing - after I read it. Check out my thread iif you need more clearification Petaluma F350 Build High Lift - you might see some other pics there that will help you but I'll take a few more if you need. I know I ran into a few hick-ups but nothing you shouldn't be able to fix and make work. The biggest problem was the steering arm. This pic here shows the steering arm in the back of the axle. When I moved it forward of the axle, it gave me a better turning radius.  This is a pic of the steering arm in front of the axle. I had to cut a gap in front push bar bracket to accept the steering arm and locked steering rod. 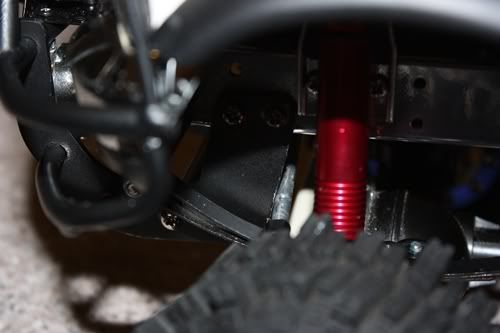 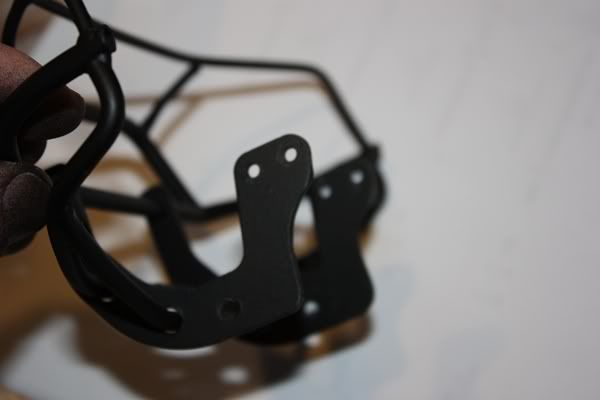 This is how I locked the rear steering. 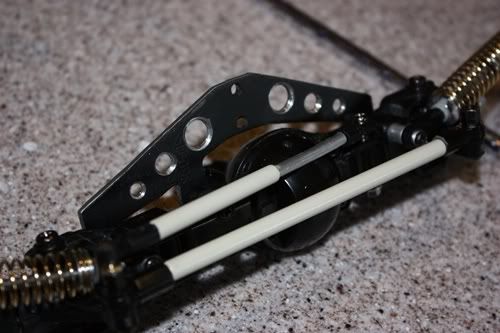 Hope that helps.  Last edited by FodigoDave; 02-06-2010 at 02:06 PM. | |
|
| |
|
04-10-2009, 09:17 AM
| #129 |
| Newbie Join Date: Feb 2009 Location: Toronto
Posts: 47
|
wowtons of info. Thats gonna help me set up my highlift that I recently picked up. I'm pumped to modify!!!
|
|
| |
|
10-04-2009, 09:16 AM
| #130 |
| Newbie Join Date: Jul 2009 Location: Belgium
Posts: 13
|
hey i have got a 350 my self and i have bought de 4link from junfarc and with that i also bought diterent axcels from the transmision to the diffs so that the flex cane get to the limed this al in combination with new shocks |
|
| |
|
10-23-2009, 03:38 AM
| #131 |
| Newbie Join Date: Jul 2009 Location: Belgium
Posts: 13
|
i hae bougth de 4link conversion off junfac
|
|
| |
|
11-10-2009, 12:20 PM
| #132 |
| Newbie Join Date: May 2009 Location: Bromont
Posts: 31
|
nice work!! Wow!
|
|
| |
|
12-03-2009, 03:47 AM
| #133 |
| Quarry Creeper Join Date: Sep 2008 Location: Petaluma
Posts: 282
|
Well, the 4 link Junfac setup certainly works great and is super easy to put together...but the center chassis connections makes for an unrealistic scaler attachment point - especially when you have to raise your rig. If you go custom, takes more time and hassel but you get a better low profile look with the same results as the Junfac (in my opinion). Junfac you keep the same trannie location but going custom is all about tucking up the trannie nicely and sticking to a stock look but gain more travel. 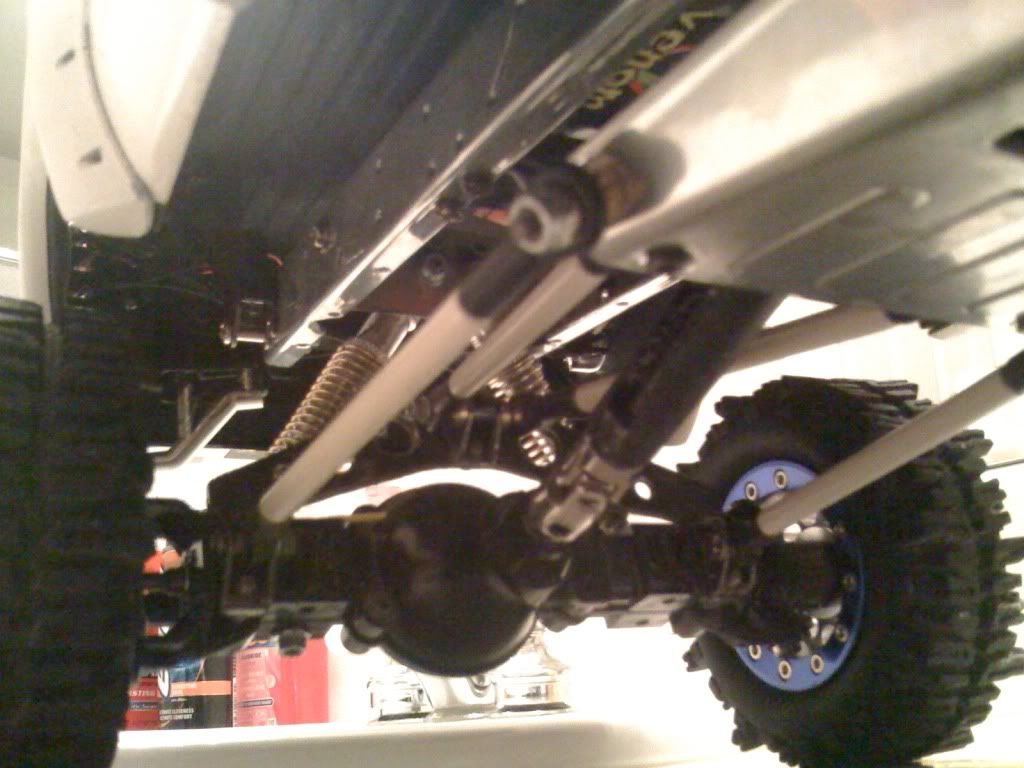   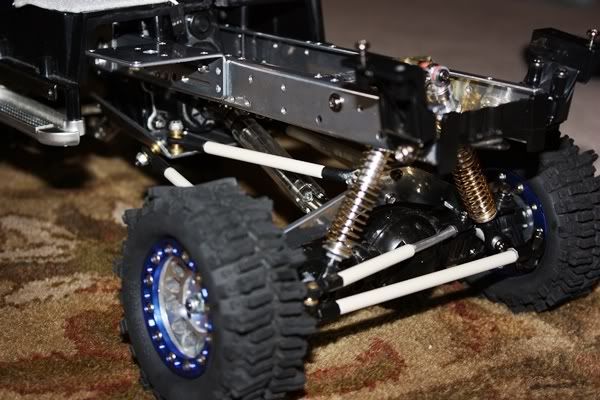 |
|
| |
|
04-26-2010, 11:20 PM
| #134 |
| Rock Crawler Join Date: Sep 2008 Location: Delta B.C.
Posts: 554
|
i,d sure like to see a pic of the anti axle wrap mod for a soft leaf setup..anyone..lol is it like a panhard?
|
|
| |
|
05-27-2010, 05:19 PM
| #135 |
| Rock Crawler  Join Date: Jul 2008 Location: E. City
Posts: 883
|
You can gain 1/4" of free ground clearance at your skid plate by cutting off 1/4" from the screw posts on the skid plate mount.
|
|
| |
|
12-05-2010, 04:32 PM
| #136 |
| Newbie Join Date: Jul 2008 Location: me
Posts: 32
|
Just finished building mine. Fairly disappointed in the flex, I'm only running the main leaf and no coils in the shocks. I was trying to get it to sit a little low, so I would hopefully get a ton of droop, but no.. It seems that the driveshafts are causing a lot of the lack of droop due to the fact that they are fully compressed and not allowing the compressed spring to travel all the way up. Kind of bummed out right now, spent a shitton of money on this thing and kind of hoped it would be a bit more of a crawler than a basher. Maybe I'll cut the shafts in the middle and weld a sleeve over them after... they only need to be about a 1/4" shorter. |
|
| |
|
06-23-2011, 11:15 AM
| #137 |
| Quarry Creeper Join Date: May 2010 Location: trinity
Posts: 295
|
hey i just got a highlift tundra and have a few question's. 1'st off what is the easiest body lift and tran's lift. and what about the bumper as well i want to fit large tire's on it and keep it leafed. 2 what is my option's on mounting a winch to this pig of a truck. 3 what are my led kit option's on it thank's yall zach. |
|
| |
|
11-09-2011, 11:14 AM
| #138 |
| Newbie Join Date: Sep 2010 Location: limestone
Posts: 11
|
all red stripped and body lifted. has a hot bodies lightning 1/8th truggy front bumper like a pre-runner bar.
|
|
| |
|
08-01-2012, 08:59 AM
| #139 |
| Rock Crawler Join Date: Jul 2011 Location: USA
Posts: 624
|
Some nice looking rigs!! So are High lifts dead? or is there a newer thread? I have one I'm looking to do a custom 4 link front and rear and could use some good pics |
|
| |
|
08-17-2012, 12:24 PM
| #140 |
| Rock Stacker Join Date: May 2012 Location: San Luis Obispo
Posts: 84
|
I have been working on my high lift, they aren't quite dead! I lifted mine to fit some bigger tires, and am considering lifting it even more to fit some Imex singled dually tractor tires and making it a mud truck. 4-link might be nice though, these things seem kind of stiff.
|
|
| |
 |
| |


 Linear Mode


