| |
| |||||||
 |
| | LinkBack | Thread Tools | Display Modes |
 08-13-2011, 09:55 PM
| #1 |
| Quarry Creeper Join Date: Jul 2011 Location: Lake City, Fl
Posts: 380
|
Ordered a Honcho RTR kit as my introduction into scale crawlers, knowing I wouldn't leave it stock for long I'm a total picture whore, so I figured it be best that I just make a thread to keep this rig's progress posted up in. I'm a huge fan of DIY projects, and would rather make something myself if I can rather then buy it from a store, even it the cost is the same, so expect to see a lot of that. 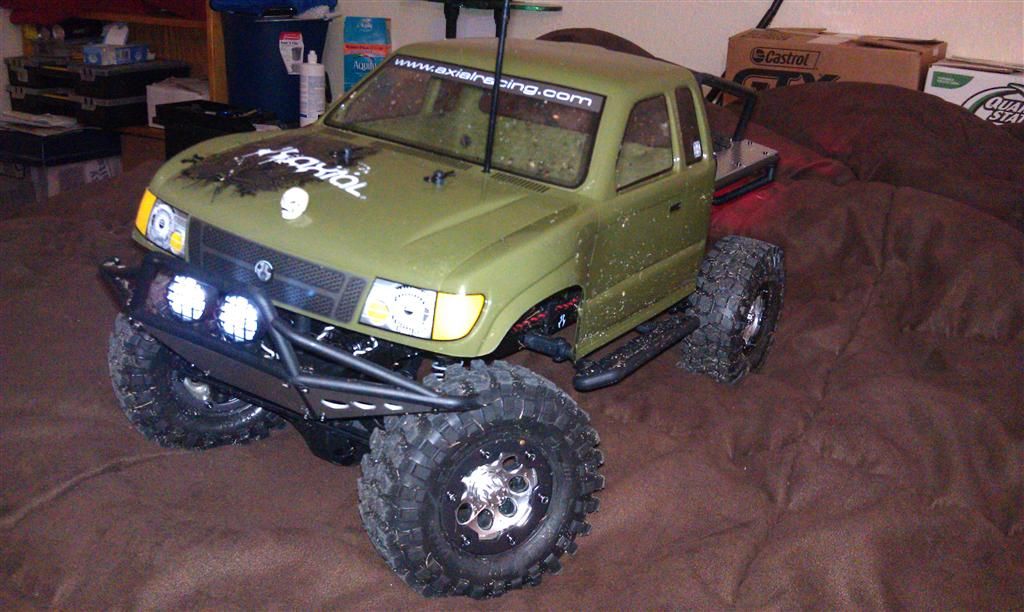 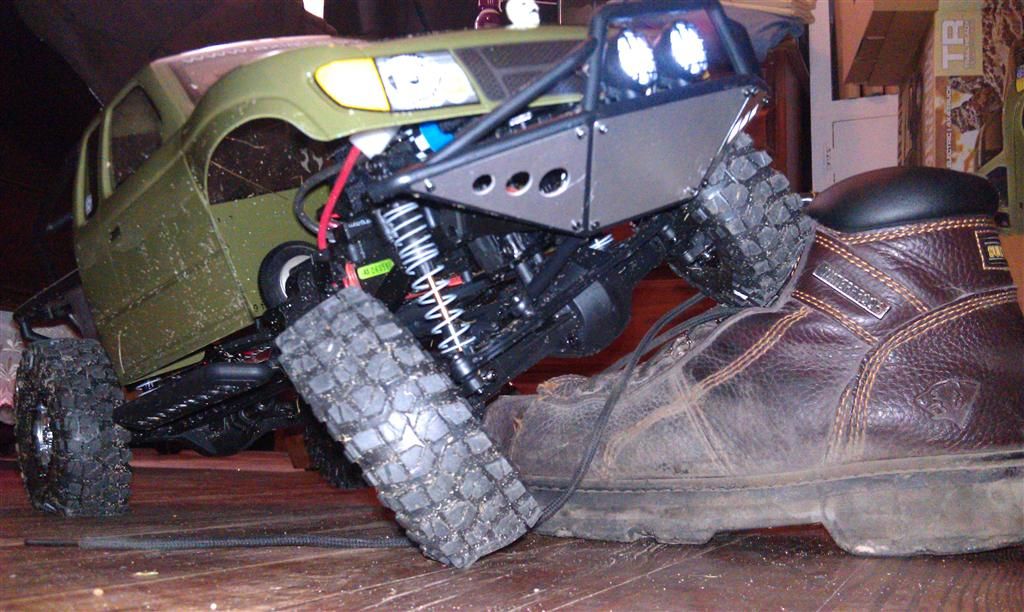 About a week after having it, I started work on a DIY chassis mounted servo, to give the front steering linkage a little more of a scale look (I don't really like the look of the servo on the axle...). In the process, I remounted the front bumper up on TOP of the mounted bracket, but chances are that bumper wont be on there for long. I plane on getting into brazing and making my own steel brake line tube front bumper soon. 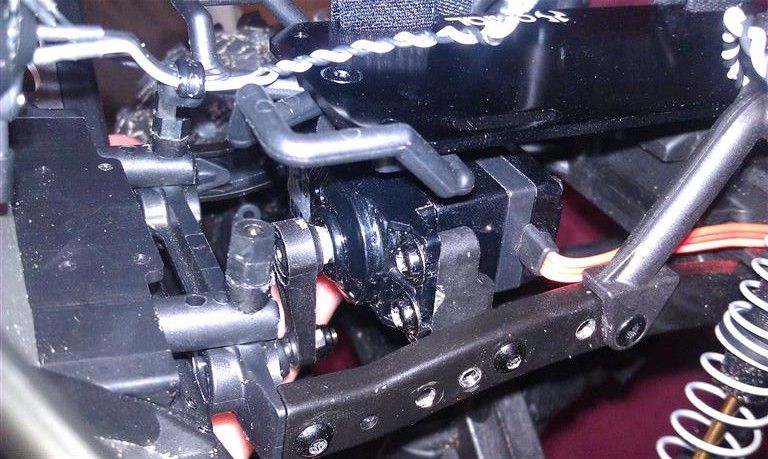 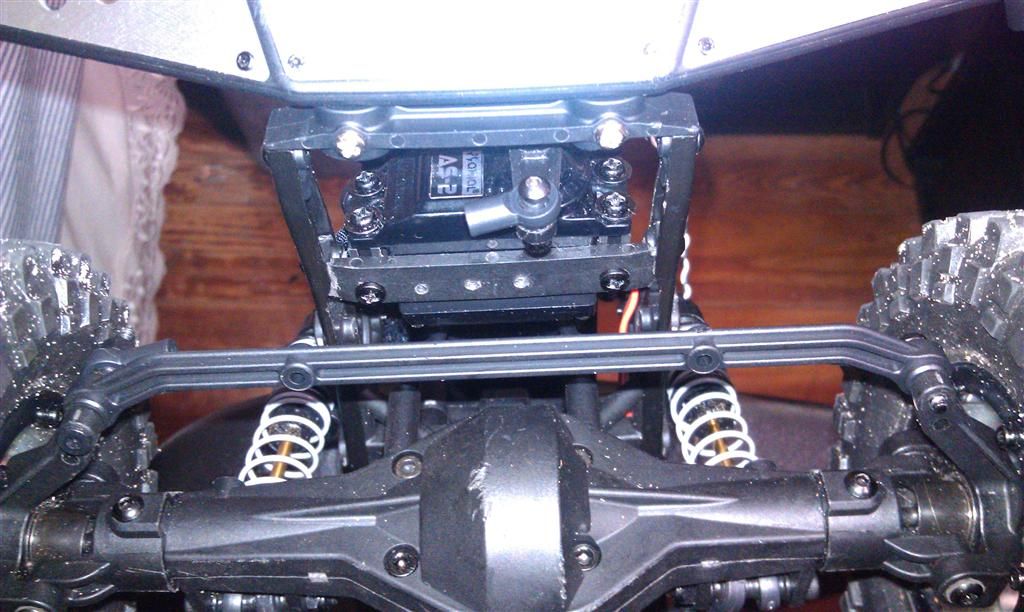 Then I decided it was time to get rid of the sorry plastic linkage and that weird sloppy top linkage Axial puts on these things, and order some Traxxas rod ends and make my own 4 link and steering linkage with 8/32 all thread and 1/4 steel brake line. I'd say it came out rather well for my first try; I'm very pleased with it! I've got the front fabbed up and installed, including the steering linkage, but I need to tweak the steering setup a little now. I'll probably end up relocating the servo to a better place, probably against the left frame rail with the servo output facing straight down so the servo horn rotates on a horizontal plane. I'll also make a new drag link with some bends in it, since a straight one contacts the differential, and I don't have any bent offset rod ends... 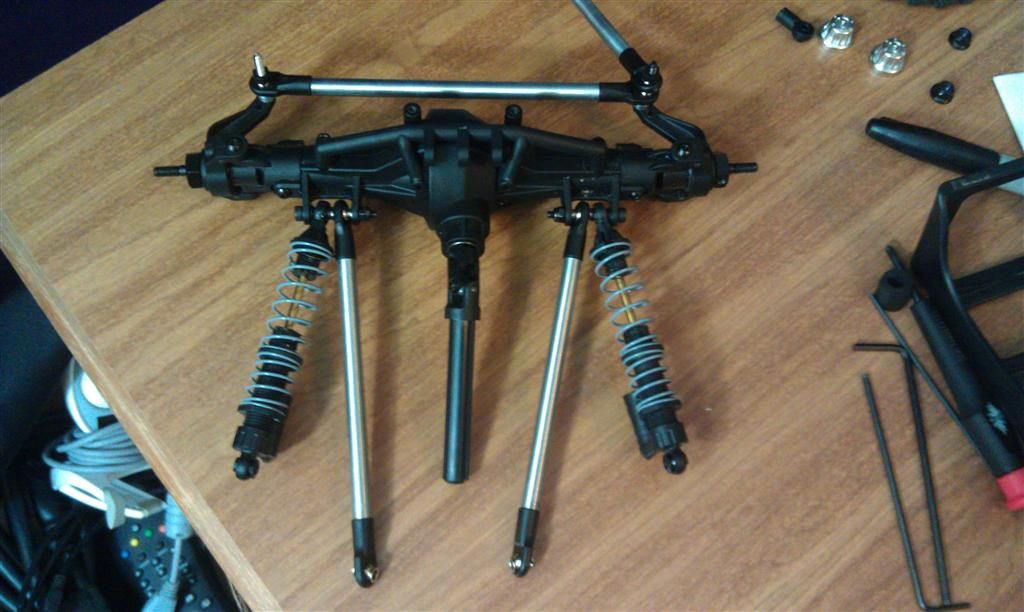 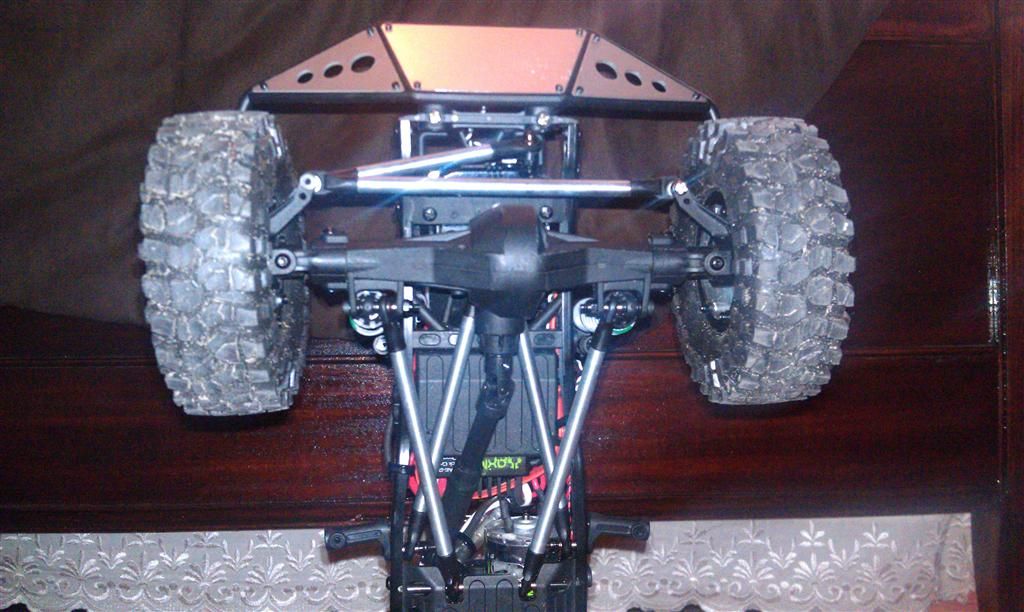 I have BOWTIE's Tacoma sticker set on it's way, so that should really help it in the body's looks. I actually like the Honcho body since it's obviously bases off a Toyota Tacoma. Being a Tacoma driver myself, I'm a big fan of it  This week I'll probably make some scale bungie cords and some scale recovery straps. If anyone's got any other small scale DIY projects or ideas, please don't hesitate to suggest Last edited by iamsuperbleeder; 08-13-2011 at 09:57 PM. |

|  |
| Sponsored Links | |
| | |
|
08-13-2011, 10:01 PM
| #2 |
| RCC Addict Join Date: Jul 2011 Location: Orlando
Posts: 1,153
|
Nice rig, its amazing how addictive these damn little cars can be. My 1:1 WRX was always getting the attention but now its a different story. Even though she did get a nice bath today. Anyways nice Honcho, cant wait to see more mods. Good luck |
|
| |
|
08-13-2011, 10:06 PM
| #3 |
| Quarry Creeper Join Date: Jul 2011 Location: Lake City, Fl
Posts: 380
|
OH, and I almost forgot about my little hood ornament. I found this random thing on the ground at work one day, and it sat on my desk for a few months. When I got this SCX in, I knew right away it HAD to go on as a hood ornament 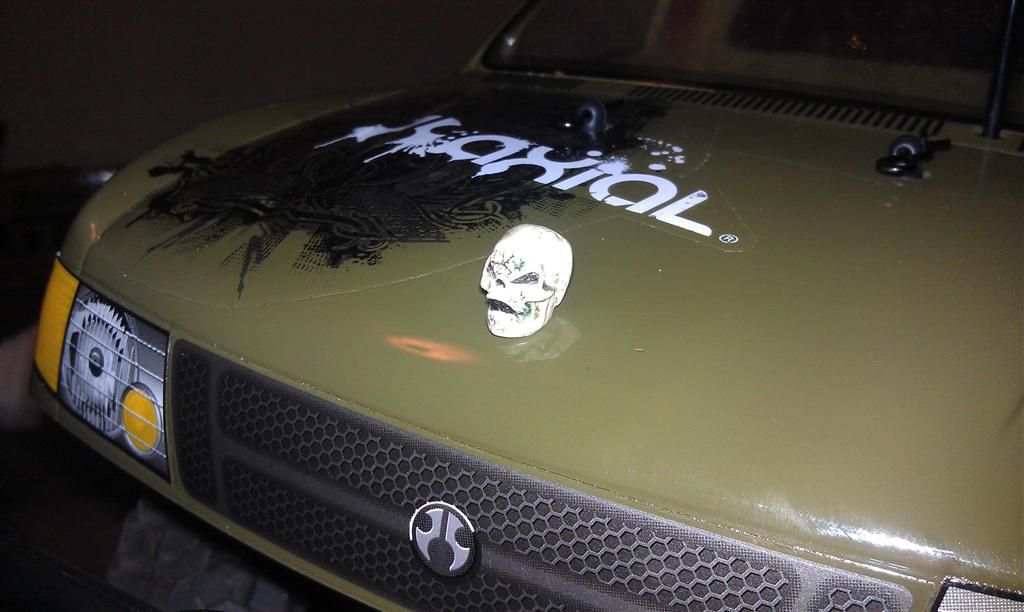 |
|
| |
|
08-14-2011, 10:09 PM
| #4 |
| Quarry Creeper Join Date: Jul 2011 Location: Lake City, Fl
Posts: 380
|
completed the 4 link today! came out pretty good. the suspension movement is SO much smoother, and all of the slop is gone now that was there with the plastic links 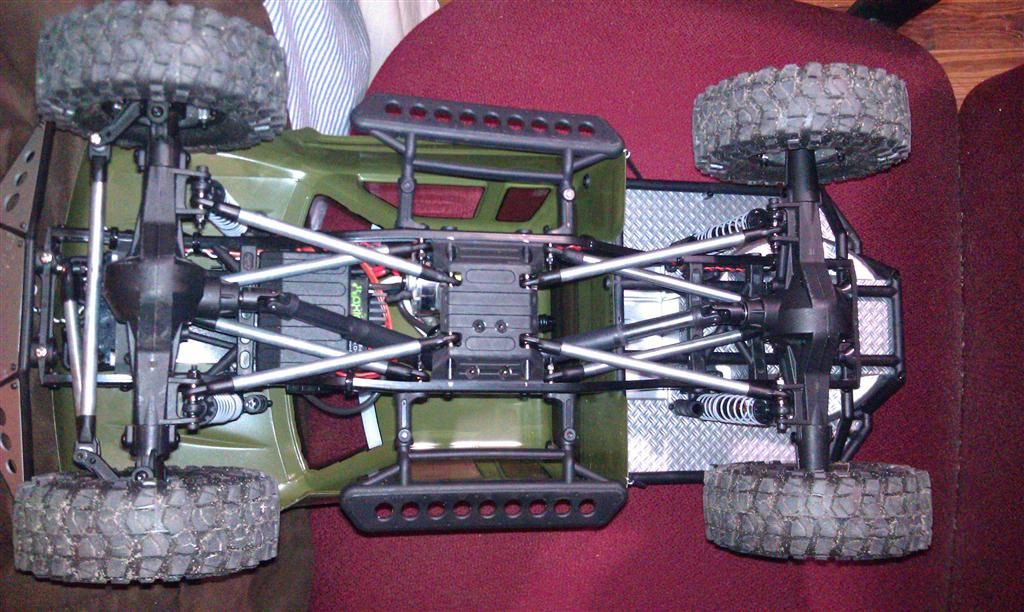 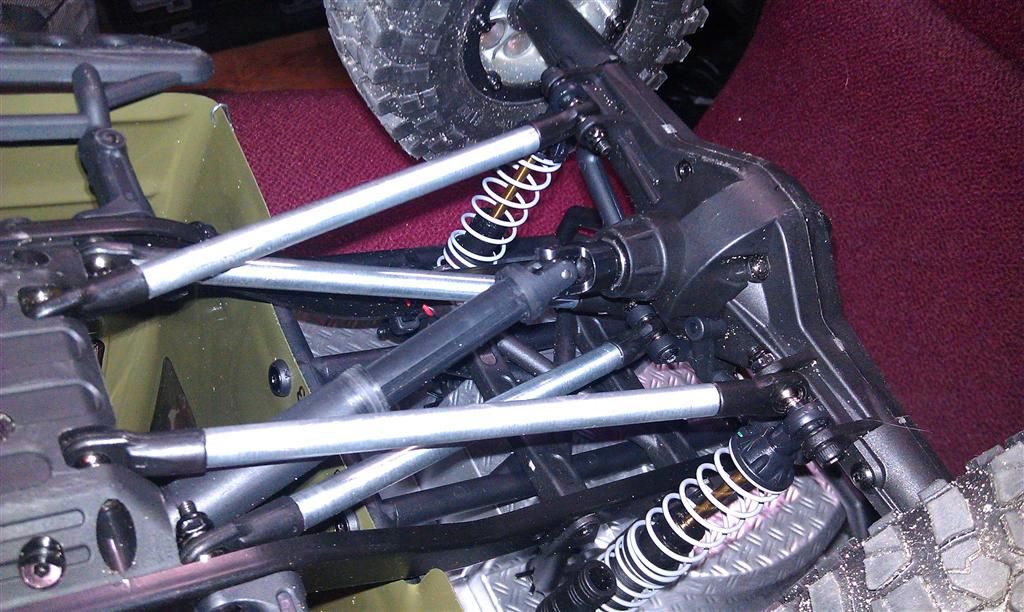 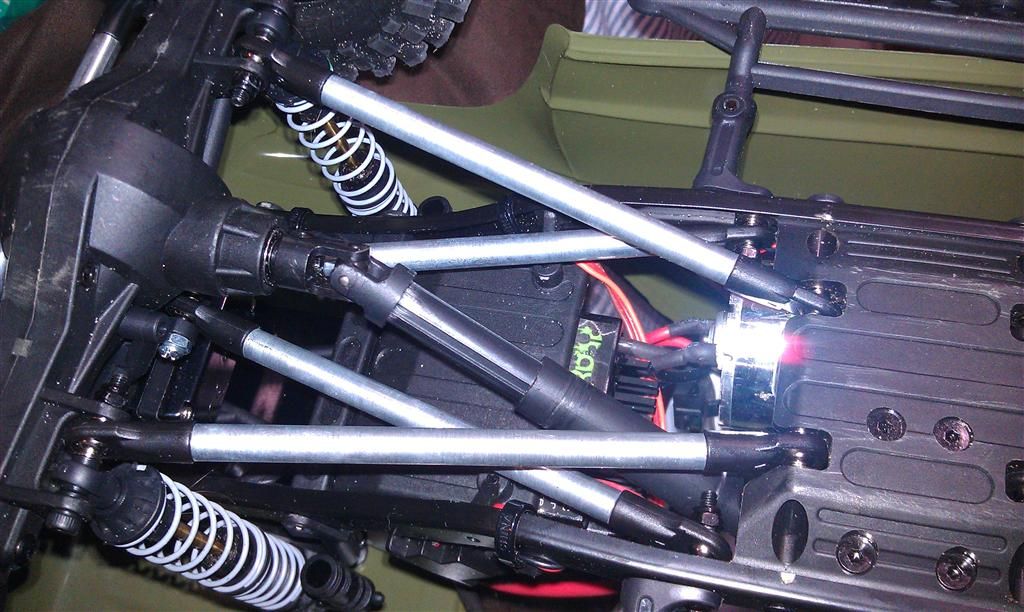 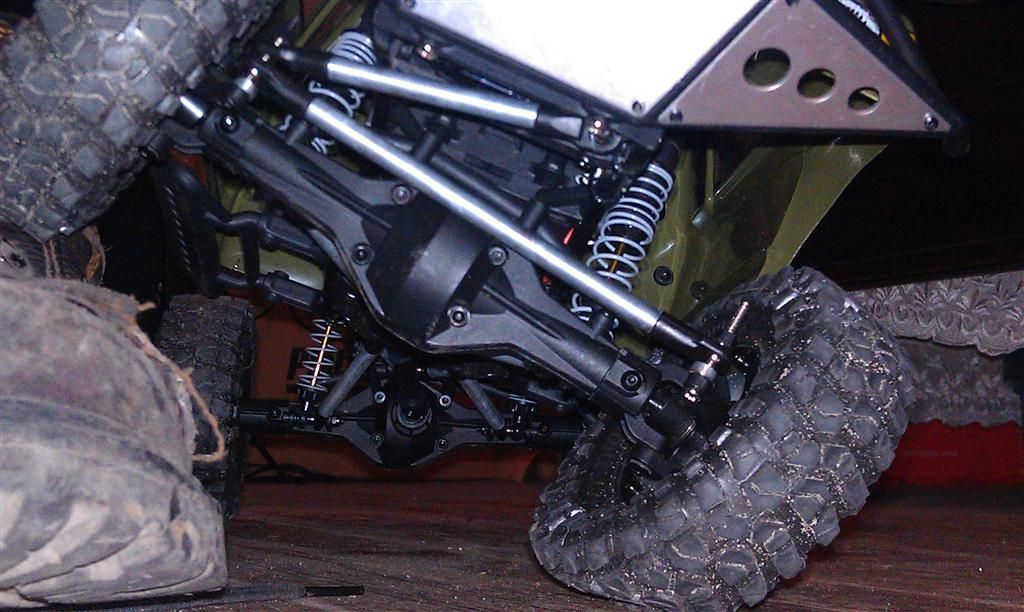 then proceeded to try my hand at making some bungie cords. found a couple hair ties and paper clips laying around the house and went to work on them. it was completely free, so I'm not too concerned that the paper clips aren't those fancy ones with the colored plastic coating on them   \ \then had to find something to strap down with them, lol. so I grabbed a shop rag out of the garage and proceeded to hack it up. made a canvas top just to see what it looks like, and I don't think I like it... 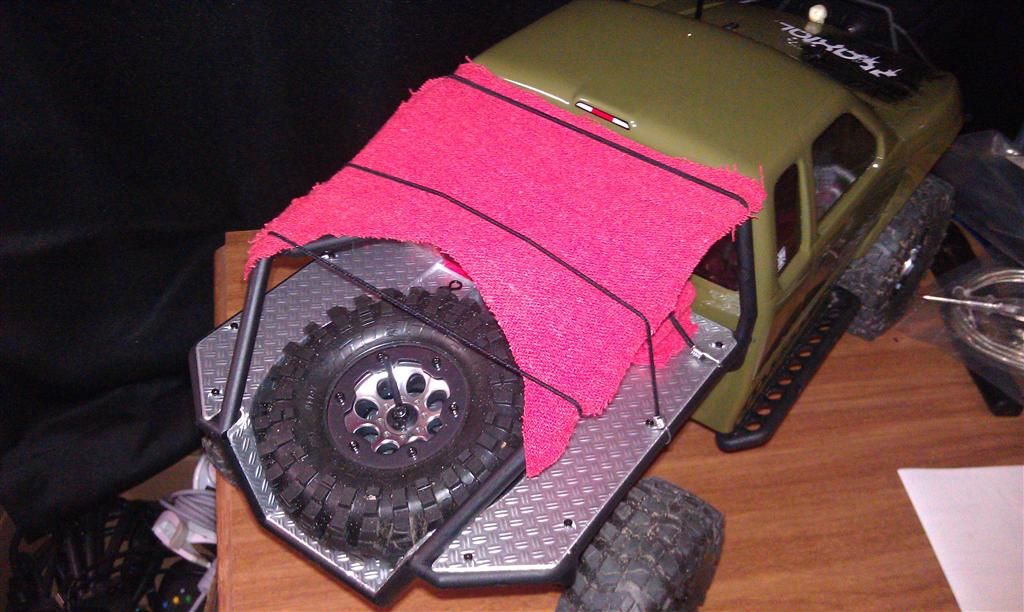  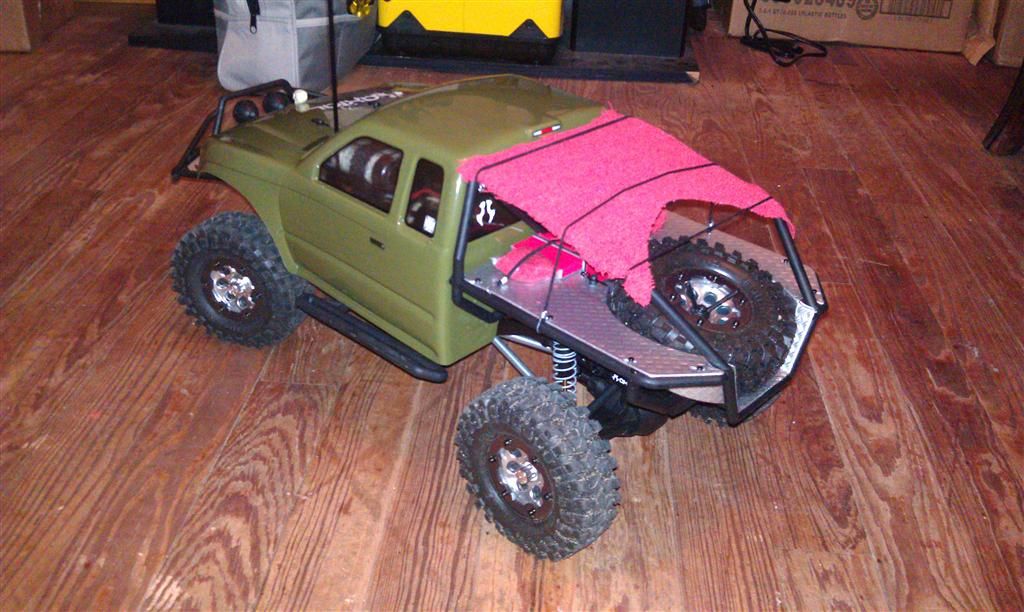 but I also used what was left of the rag to make a blanket-like thing 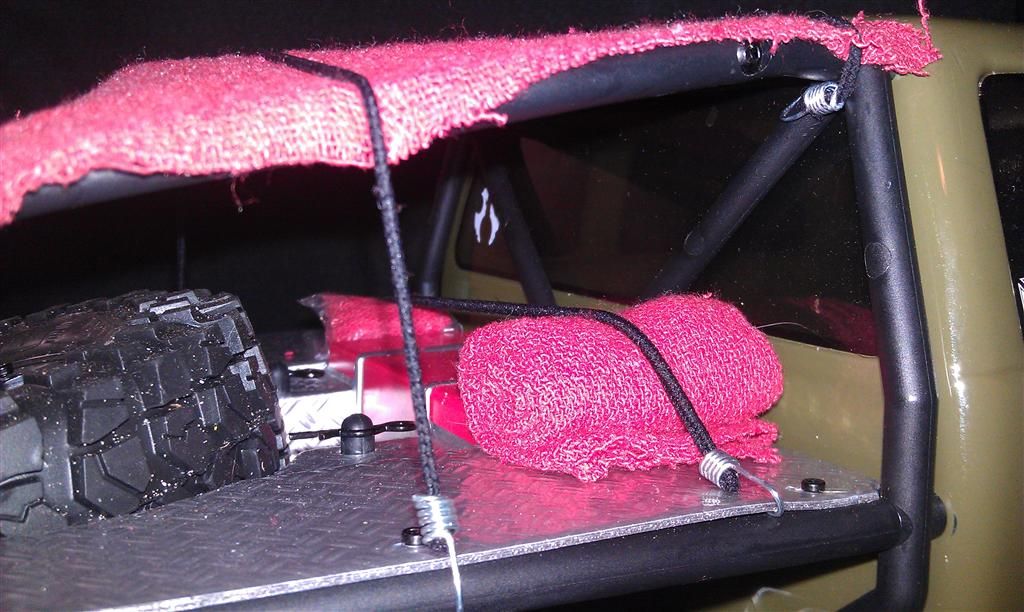 and of coarse, a bag of miniature shop rags 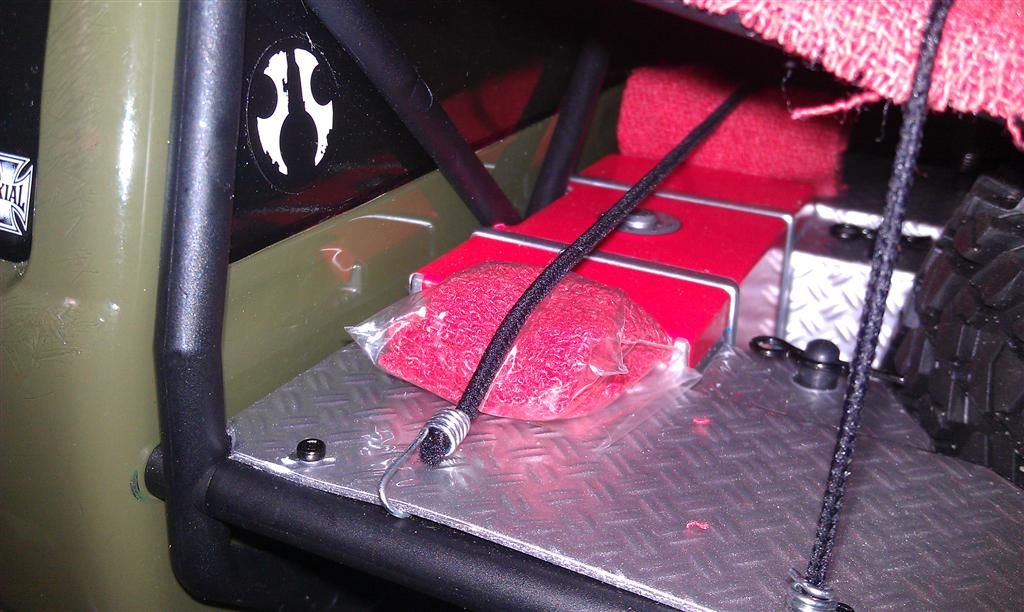 the canvas top probably wont stay though; that was just me screwing around |
|
| |
|
08-14-2011, 10:25 PM
| #5 |
| Pebble Pounder Join Date: May 2011 Location: Vacaville
Posts: 179
|
Looks awesome. I like the Canvas top bud Also, how did you mount the truss? What hardware? I plan on adding mine as soon as I get more all thread. Fellow HONCHO rtr guy here Justin |
|
| |
|
08-14-2011, 10:49 PM
| #6 |
| Pebble Pounder Join Date: Aug 2011 Location: Twin Cities
Posts: 123
|
Looks like you are having fun...and I think we all like picture whores  |
|
| |
|
08-14-2011, 10:55 PM
| #7 | |
| Quarry Creeper Join Date: Jul 2011 Location: Lake City, Fl
Posts: 380
| Quote:
the hardware (the actual truss that bolts to the axle for the upper link mounts) actual comes with the RTR kit. it's nice that Axial actually provides that kind of stuff the only thing I had to source was some more screws, since there are NO extras that come with the RTR kit... I ended up finding some machine screws small enough at Lowe's when I picked up the threaded rod, and picked up a bunch in about 4 different lengths, so I have extras later | |
|
| |
|
08-14-2011, 10:58 PM
| #8 | |
| Quarry Creeper Join Date: Jul 2011 Location: Lake City, Fl
Posts: 380
| Quote:
| |
|
| |
|
08-18-2011, 09:47 PM
| #9 |
| Quarry Creeper Join Date: Jul 2011 Location: Lake City, Fl
Posts: 380
|
couple of updates! *removed the "soft top" like I said I was going to... didn't really like it... *changed the mounting of the servo. fabbed up my own bracket out of a thick piece of plastic that I had laying around, and mounted it up against the left frame rail, so now the horn moves in a horizontal plane *in the process of moving the servo, I relocated the battery to get a lower COG, and in doing that, I had to find a new spot for the electronics, so EVERYTHING got moved *got the Tacoma sticker kit in from BOWITE. FANTASTIC looking stickers! completely took the truck in the direction I wanted to take it! *a little something extra on the rear of the truck, just 'cause I was bored 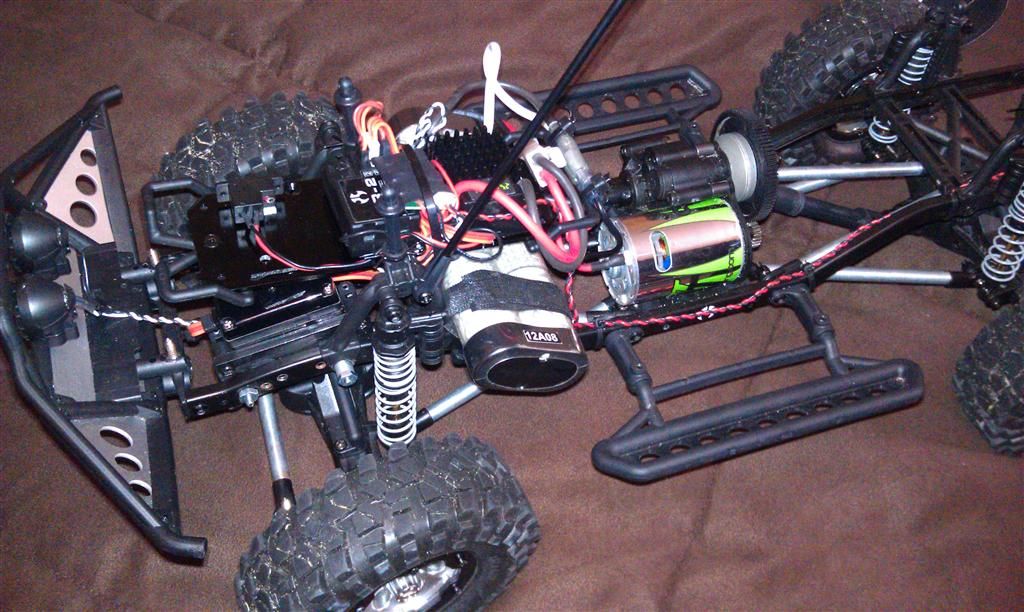 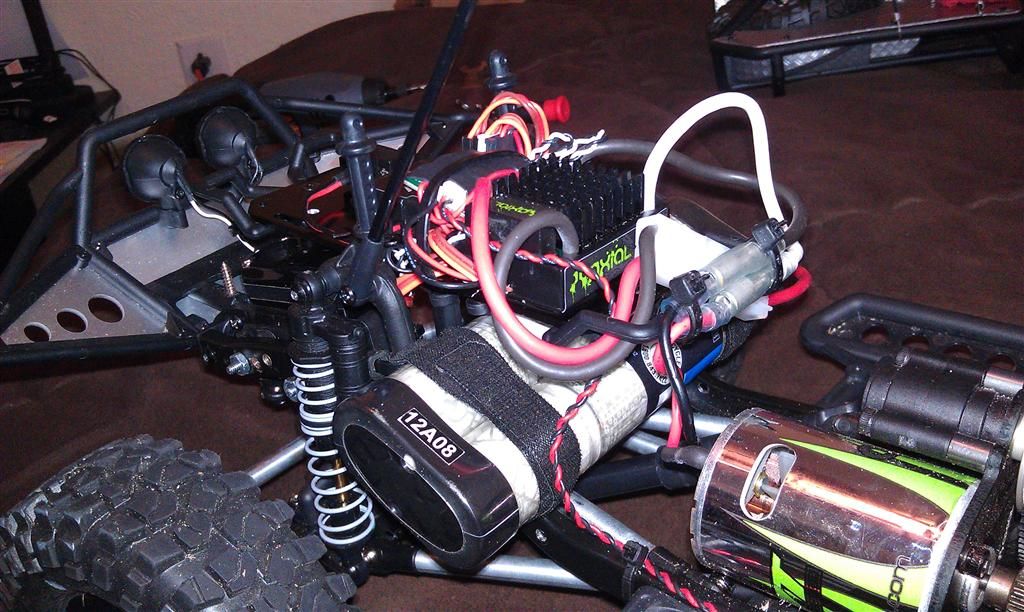 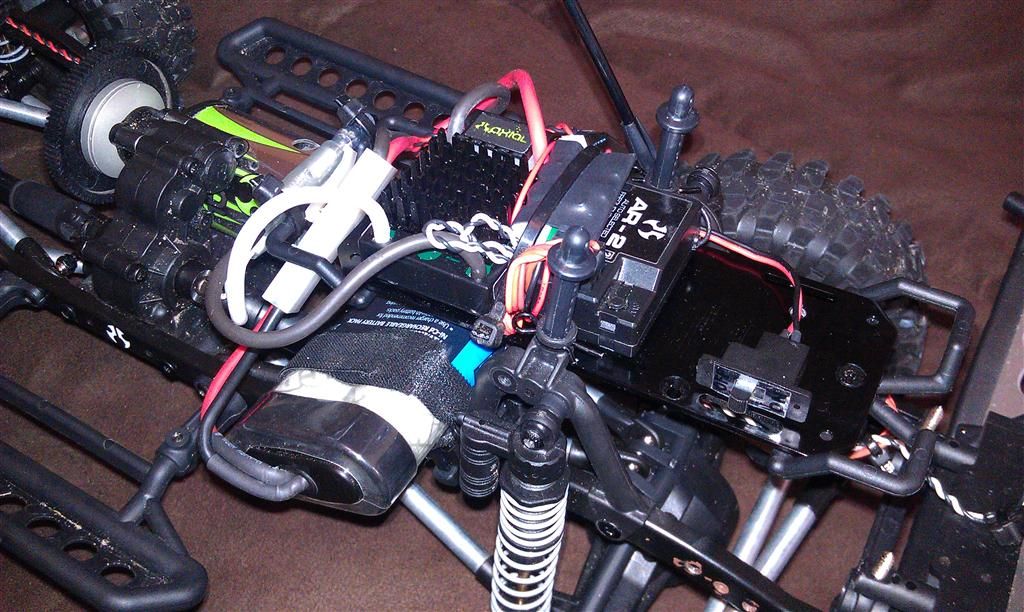 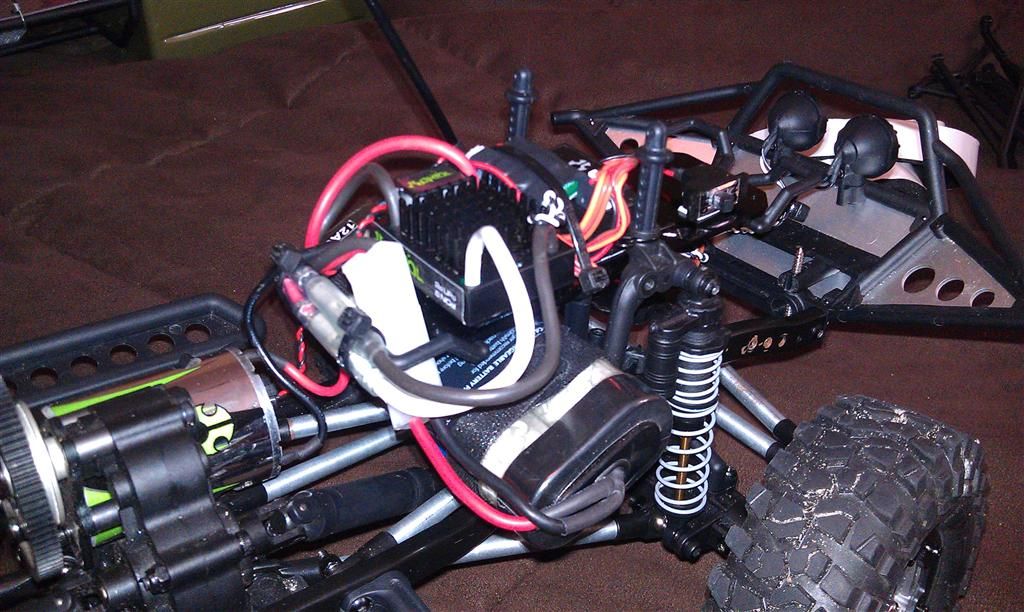 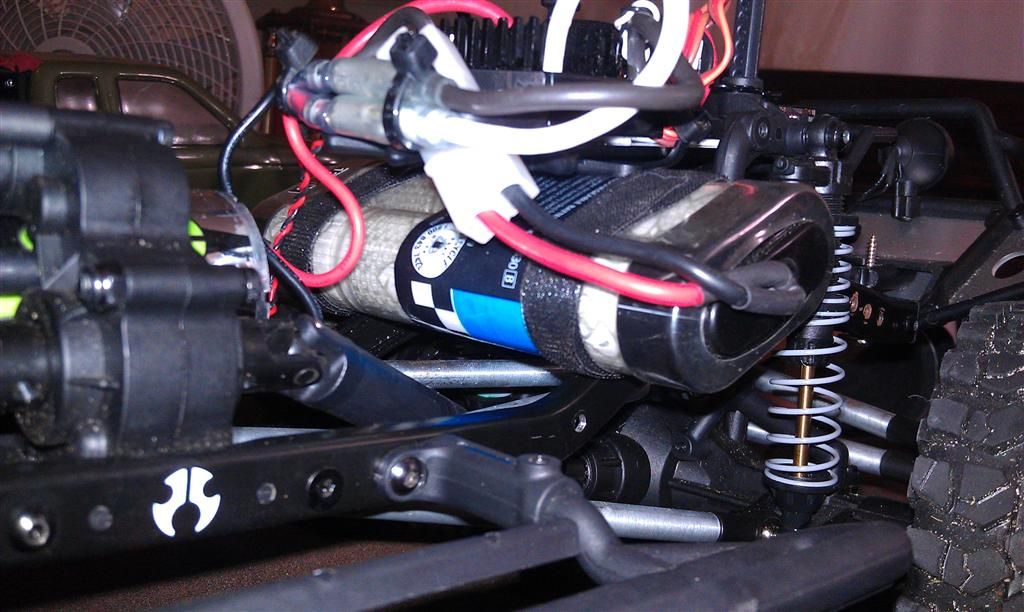 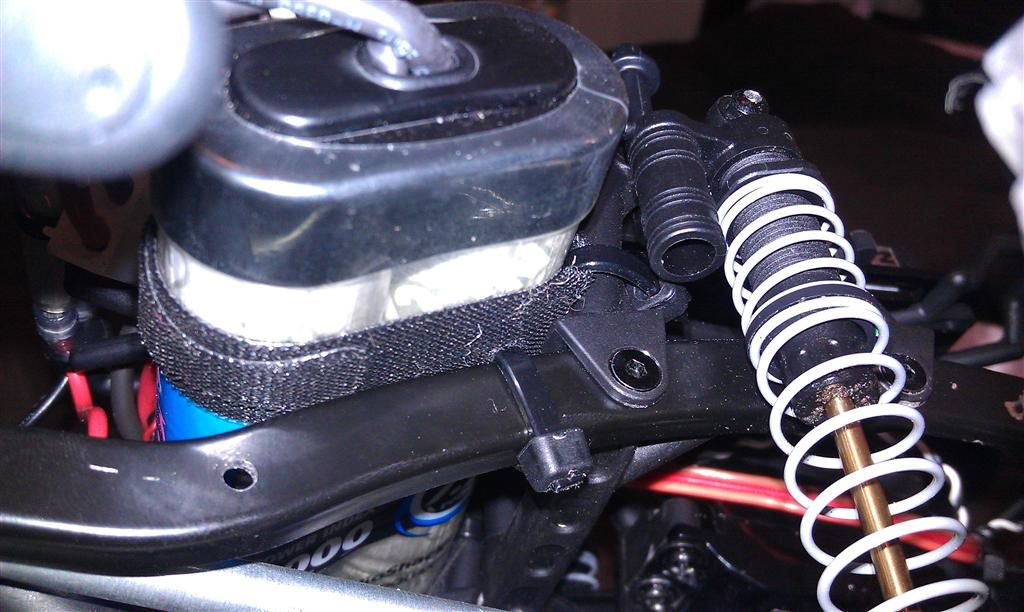 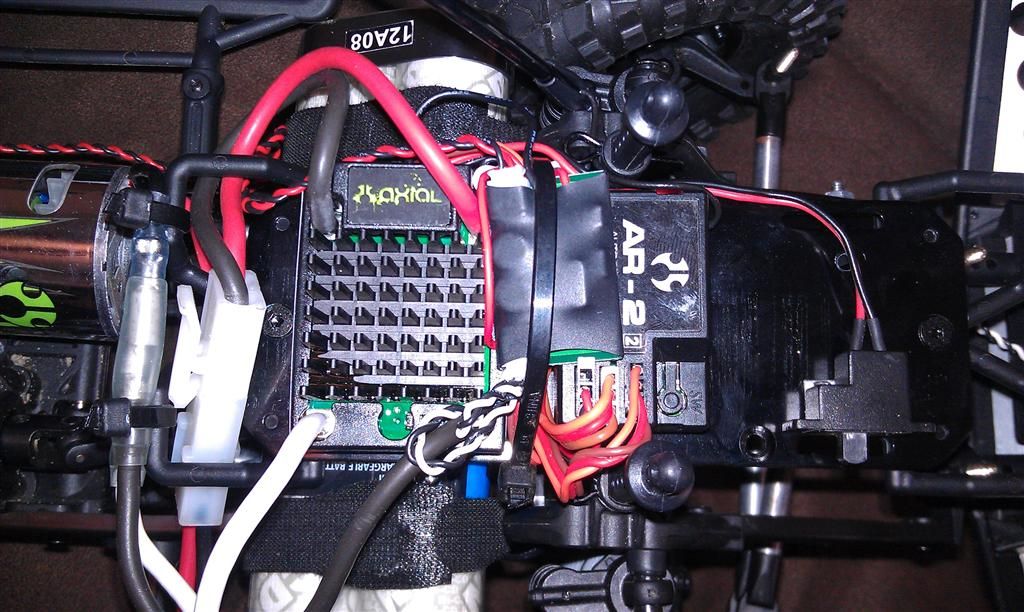 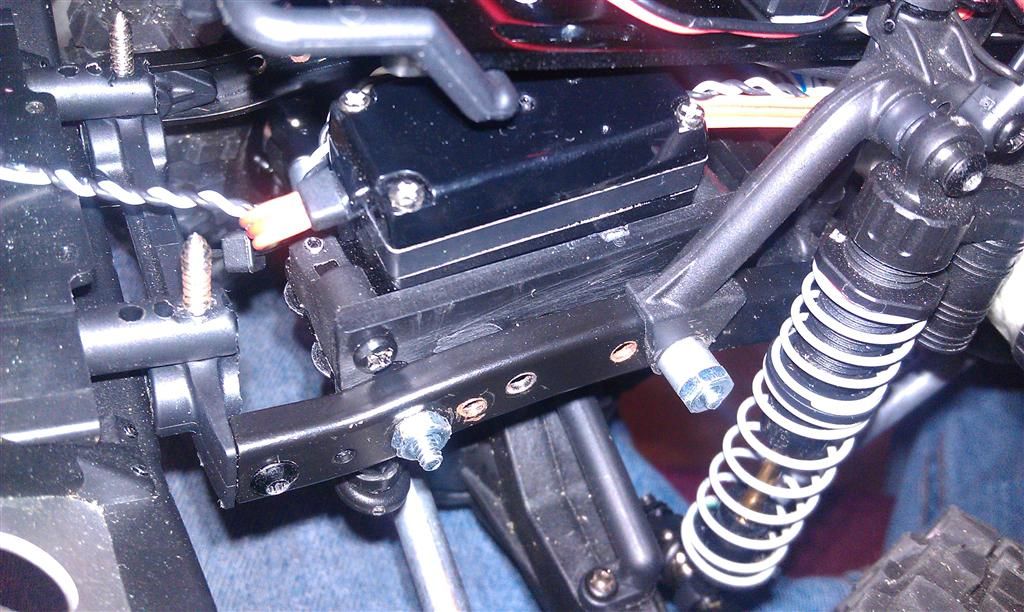 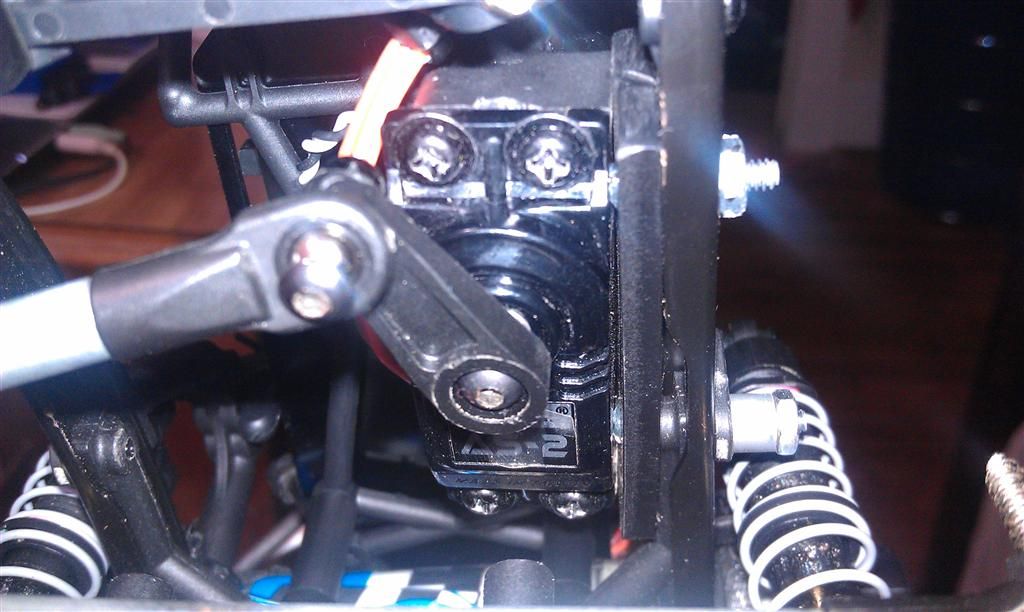 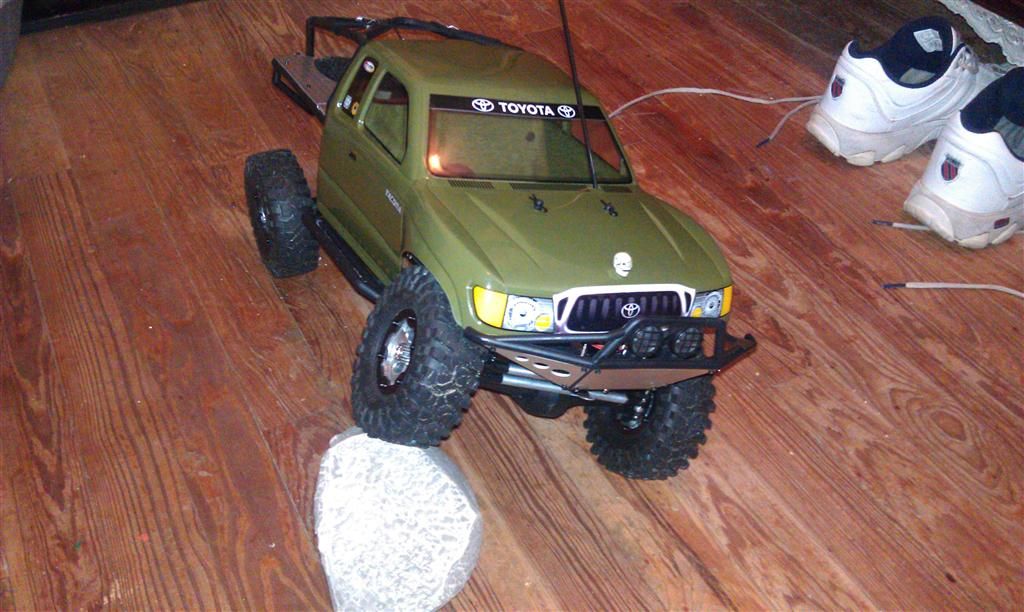 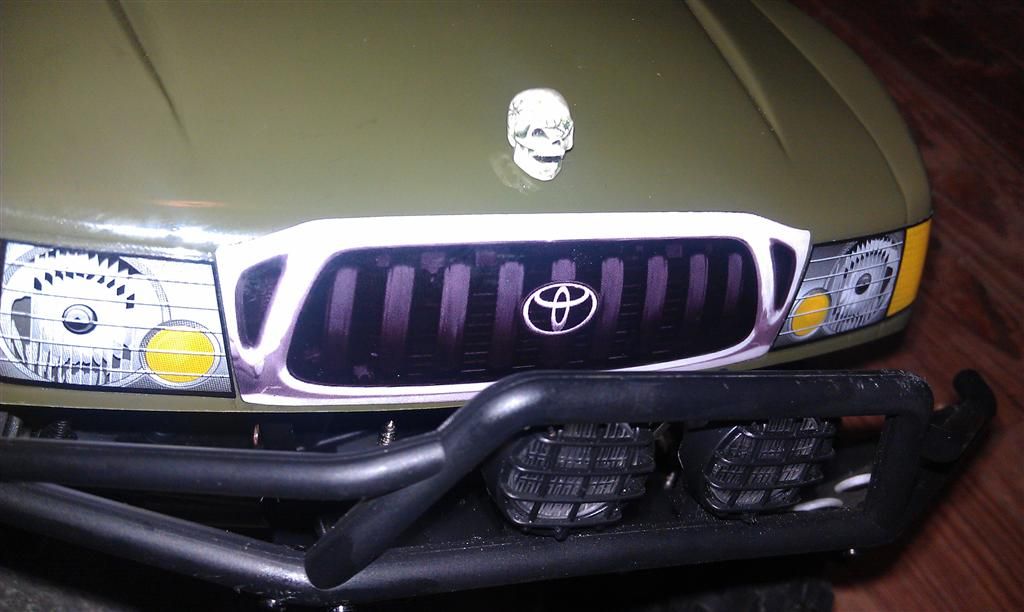 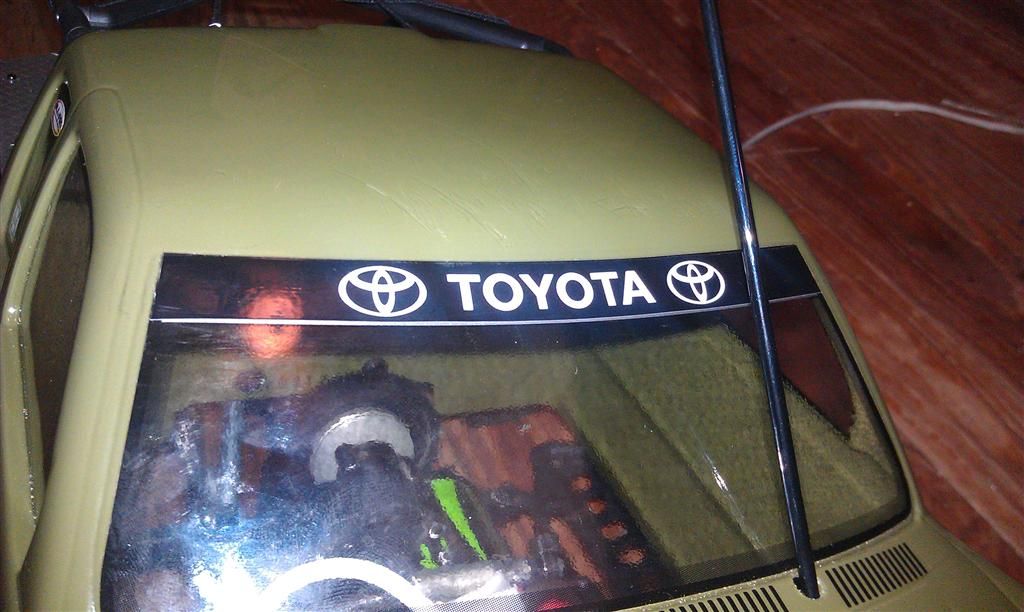 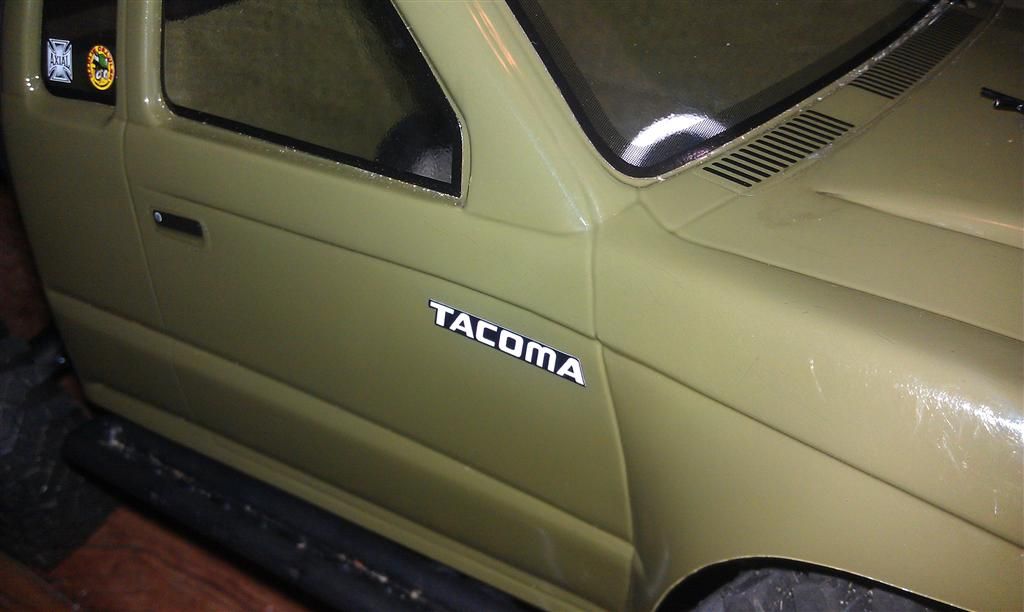  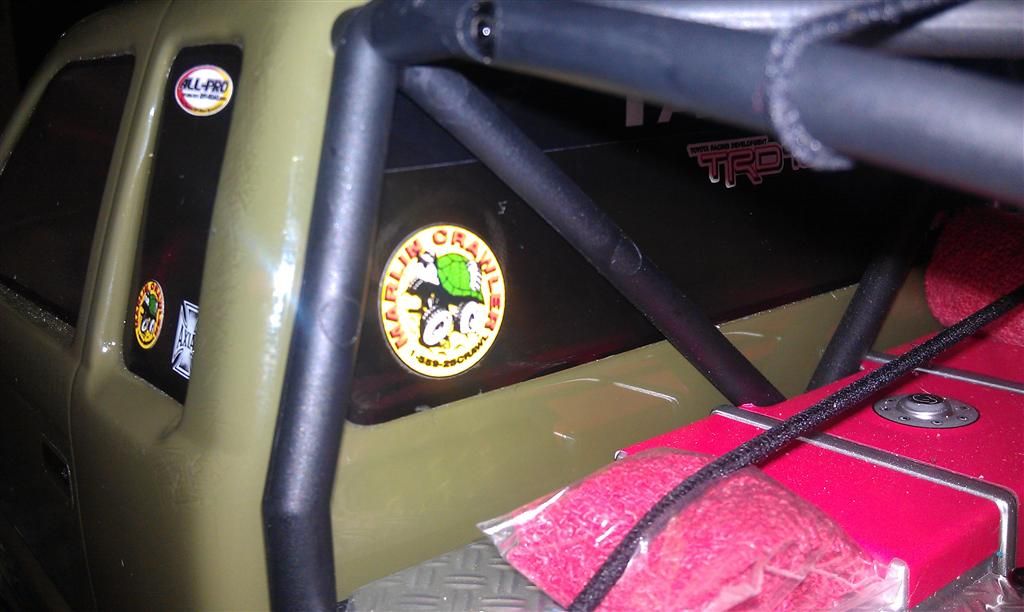 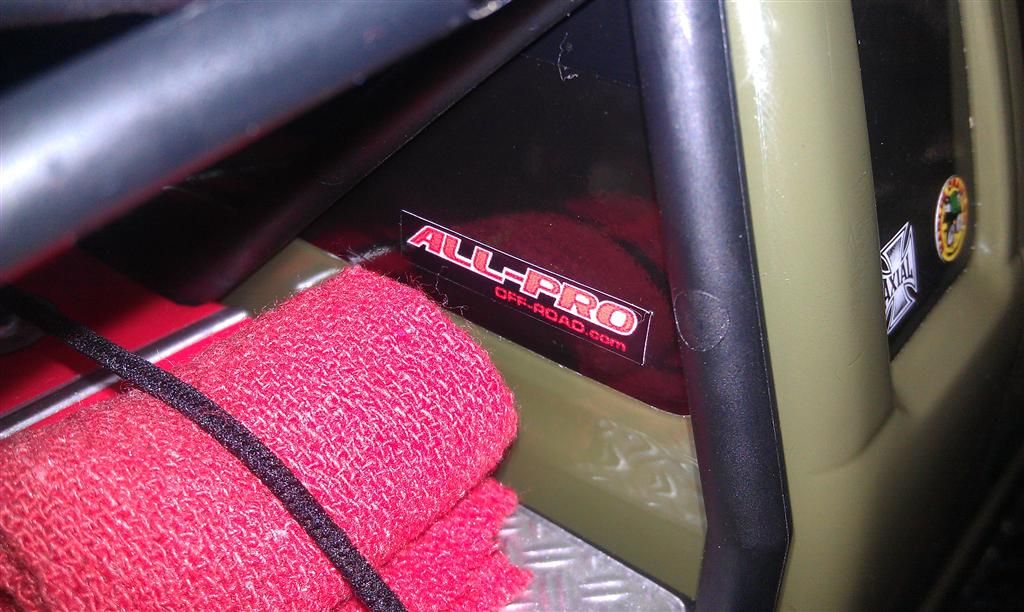  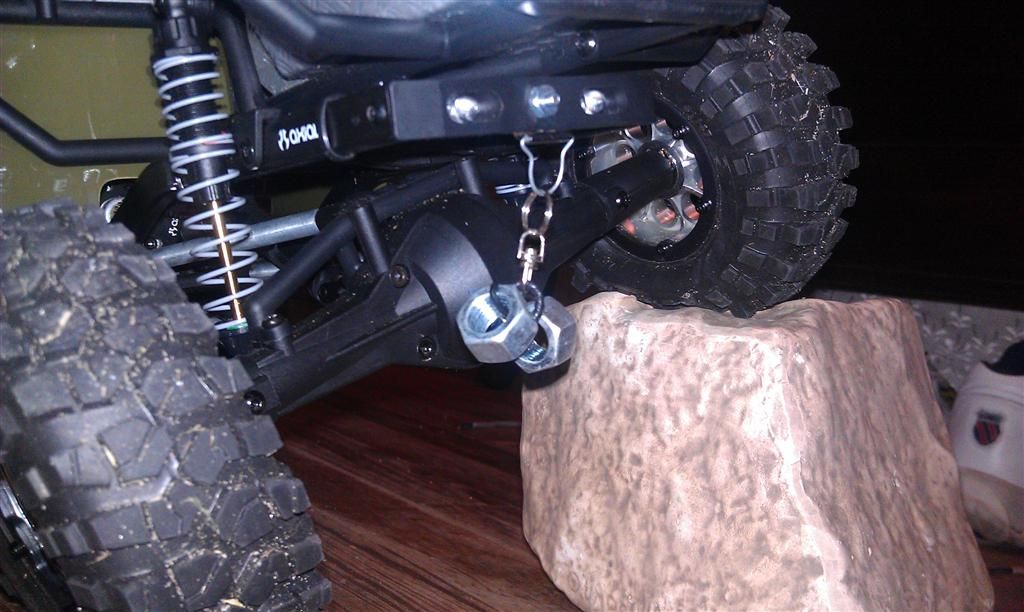 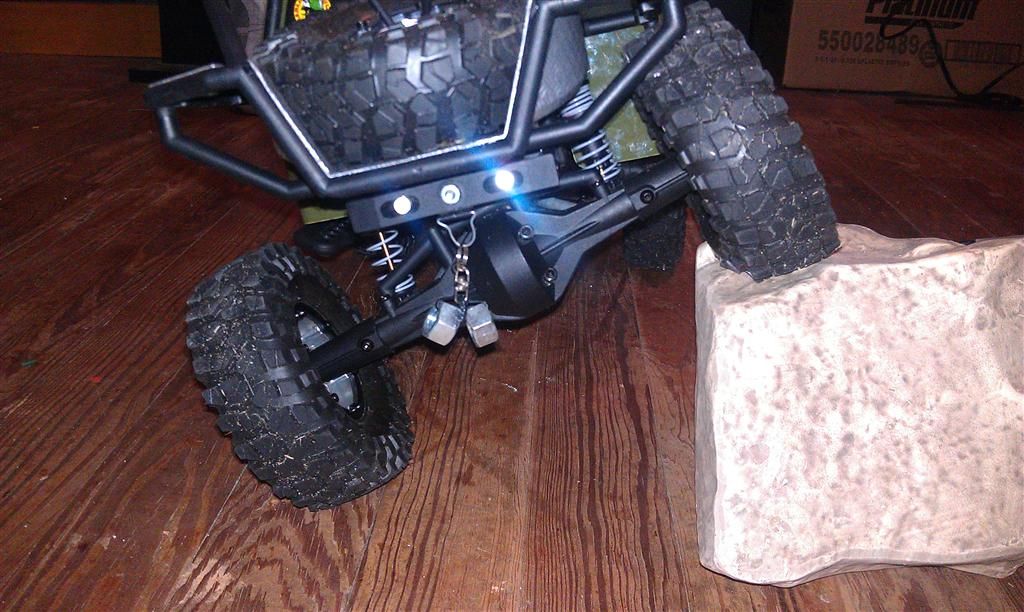 *I still need to remake the draglink... it's killing my steering... 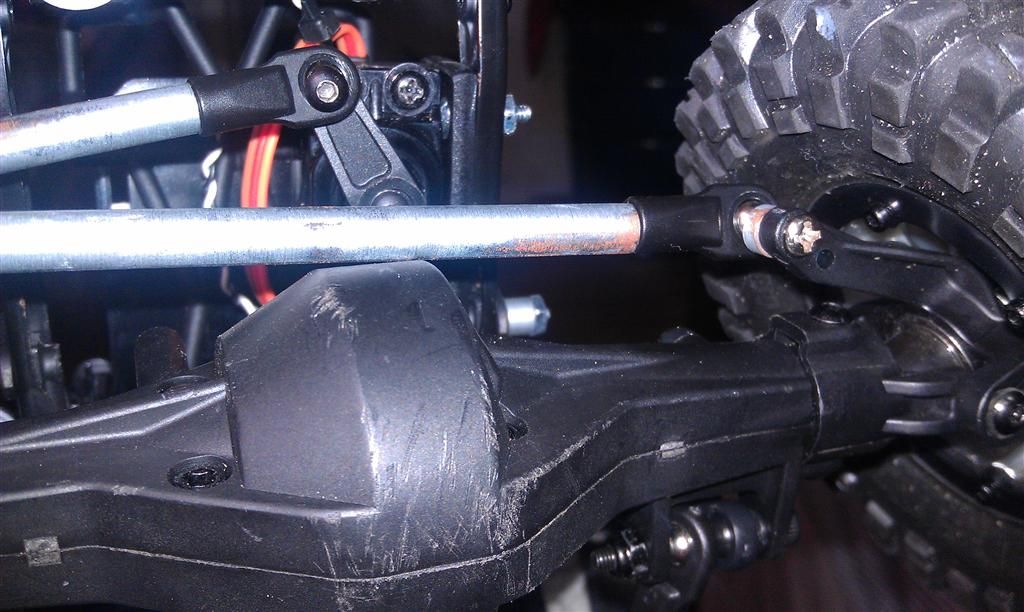 next on the list is some longer shocks to get a little more travel, an aluminum servo horn because I can see this one flex now that it has some up and down forces on it since it's chassis mounted, and I might see what I can do to get a few more LED's lighting it up once I get everything set up how I want it for the time being, I'll water proof the electronics, since EVERYTHING is now open to the elements... I'd like to go the Radio Shack project box route instead of the traditional "in a balloon" trick, but I'll decide when that time comes 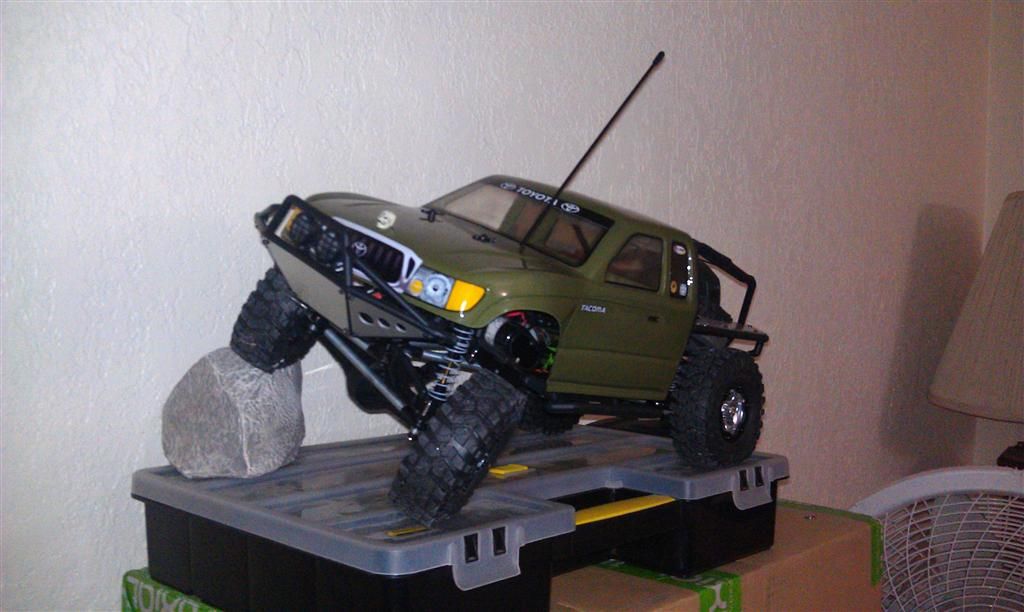 Last edited by iamsuperbleeder; 08-18-2011 at 11:28 PM. |
|
| |
|
08-18-2011, 10:11 PM
| #10 |
| RCC Addict Join Date: Jun 2009 Location: Salmon Arm BC
Posts: 1,777
|
how do you like your battery where it is now??? how does the rig perform?? i've been kicking around the idea of moving my battery to where you have yours and mounting my ESC and receiver on the battery plate.
|
|
| |
|
08-18-2011, 10:18 PM
| #11 |
| Quarry Creeper Join Date: Jul 2011 Location: Lake City, Fl
Posts: 380
|
pretty good so far. I haven't actually tested it out fully, just messed around in the house, but it seems to go a lot further before just tipping over I originally tried to actually mount the battery plate down there with some hand made bracketry, but it seemed a little flimsy... and then I had no easy way to mount the electronics |
|
| |
|
08-18-2011, 10:28 PM
| #12 |
| RCC Addict Join Date: Jun 2009 Location: Salmon Arm BC
Posts: 1,777
|
hmmm... thats interesting... thats what i needed to know thanks... sounds like i might be relocating my electronics in a few minutes!!
|
|
| |
|
08-18-2011, 10:37 PM
| #13 |
| Quarry Creeper Join Date: Jul 2011 Location: Lake City, Fl
Posts: 380
|
that's all it takes, a few minutes it's worth a try. if you don't like it, is always easy to just go back to the way it was |
|
| |
|
08-18-2011, 10:49 PM
| #14 |
| RCC Addict Join Date: Jun 2009 Location: Salmon Arm BC
Posts: 1,777
|
haha yeah.. i already got the thing torn apart lol.. probably hold everything in place with zipties for now to see if i like it..lol
|
|
| |
|
08-19-2011, 12:51 AM
| #15 |
| Pebble Pounder Join Date: May 2011 Location: Vacaville
Posts: 179
|
Looks awesome bud! Need to Chassis mount my servo. I think i have a spare Axial battery plate I can hack up Justin |
|
| |
|
08-19-2011, 02:32 AM
| #16 |
| Rock Crawler Join Date: Jul 2011 Location: Incirlik AB, Turkey
Posts: 605
|
I have the similiar truck nuts on my Jimny |
|
| |
|
08-19-2011, 03:34 AM
| #17 |
| Pebble Pounder Join Date: May 2011 Location: Antwerp Belgium
Posts: 109
|
Hi, here an example of how i did it: Before:  After:  Then sideways: Before: a little bid higher then this:  After:  |
|
| |
|
08-19-2011, 10:16 AM
| #18 |
| Newbie Join Date: Nov 2008 Location: Dawsonville
Posts: 38
|
Truck nuts huh?
|
|
| |
|
08-19-2011, 10:57 AM
| #19 | |
| Quarry Creeper Join Date: Jul 2011 Location: Lake City, Fl
Posts: 380
| Quote:
Sent from my space age wireless communication device. | |
|
| |
|
08-19-2011, 07:56 PM
| #20 |
| Quarry Creeper Join Date: Jul 2011 Location: Lake City, Fl
Posts: 380
|
a buddy at work wanted to look at it today; he's been thinking about getting a crawler himself for about 10 minutes until the front drive shaft popped off the trans, and of course I didn't bring my hex set with me so when I got home, I popped the drive shaft back on, went in the back yard, and proceeded to run the battery down no pics of the playing around at work, but I do have some from the back yard  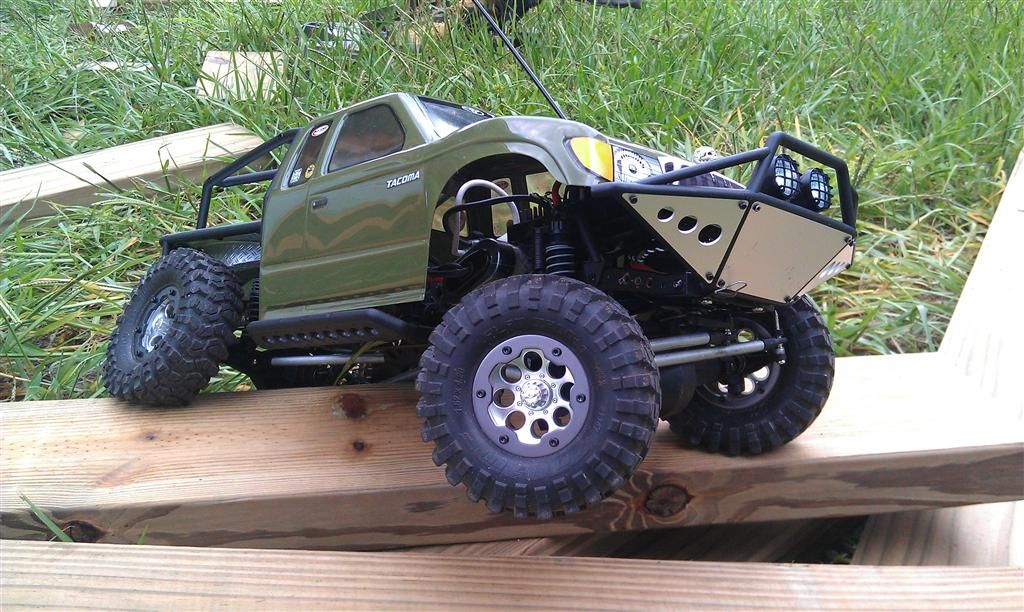 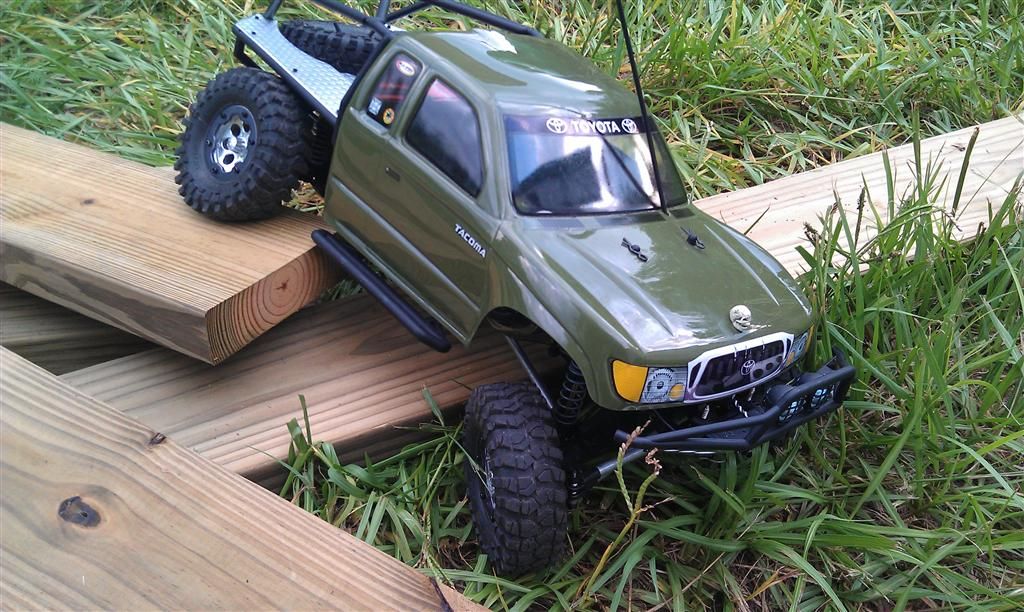 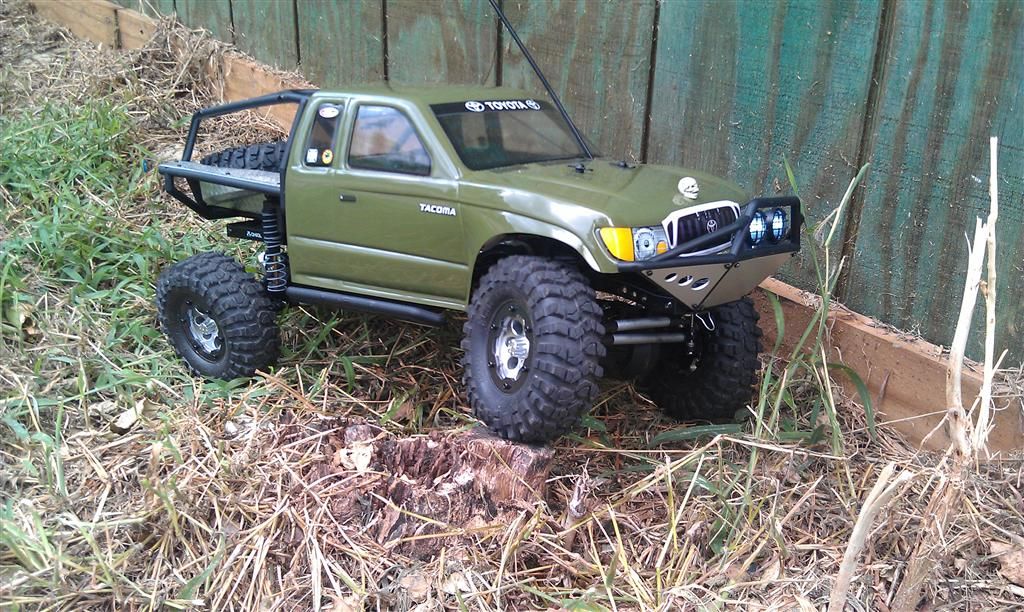 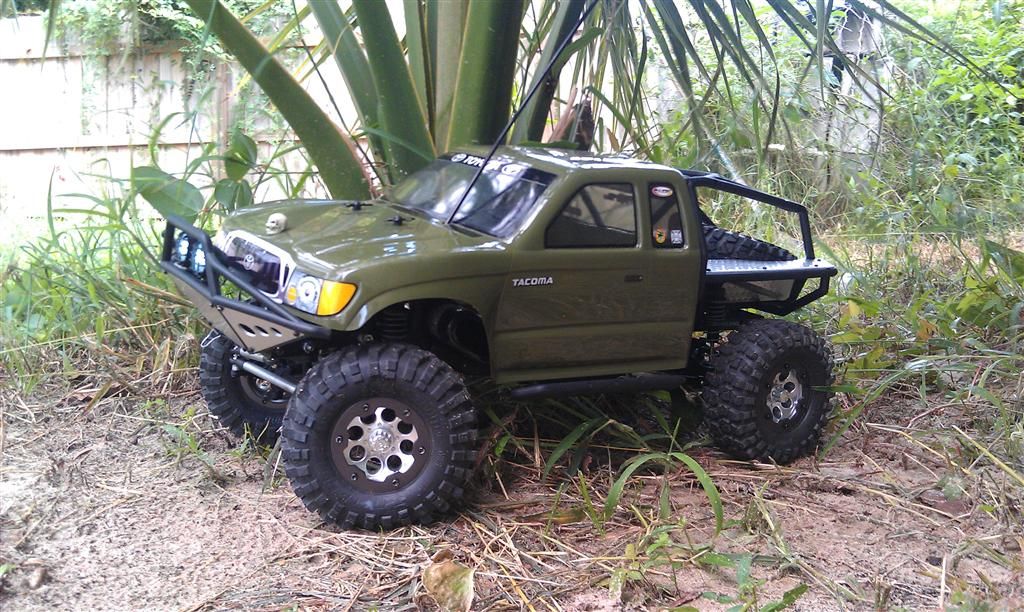 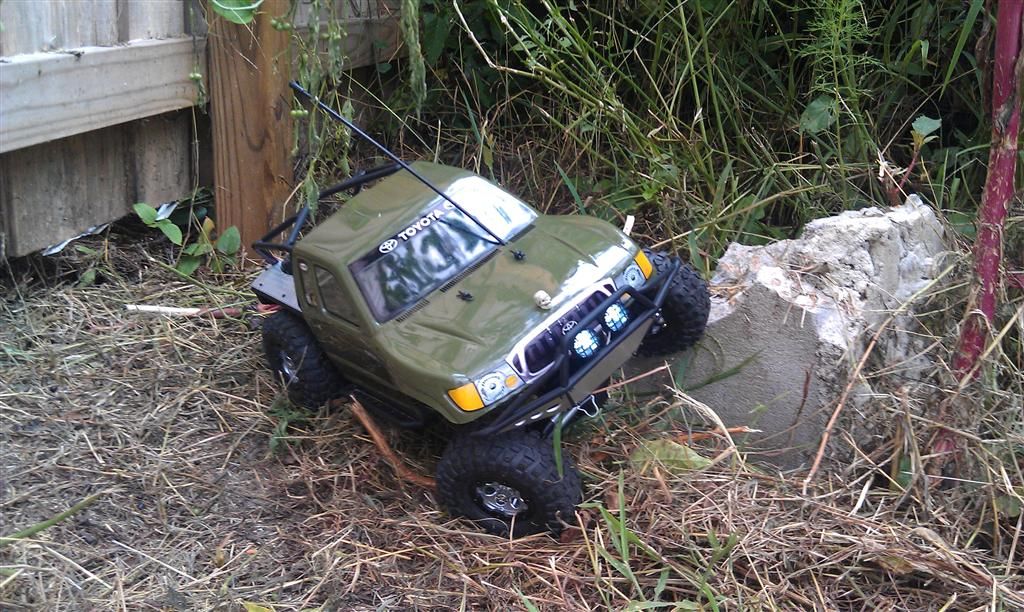  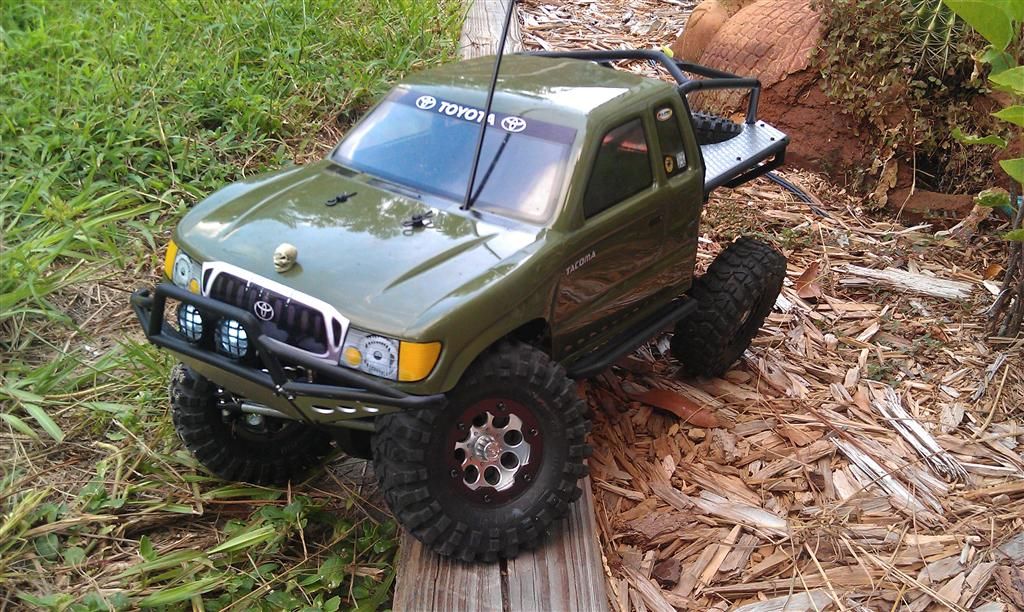 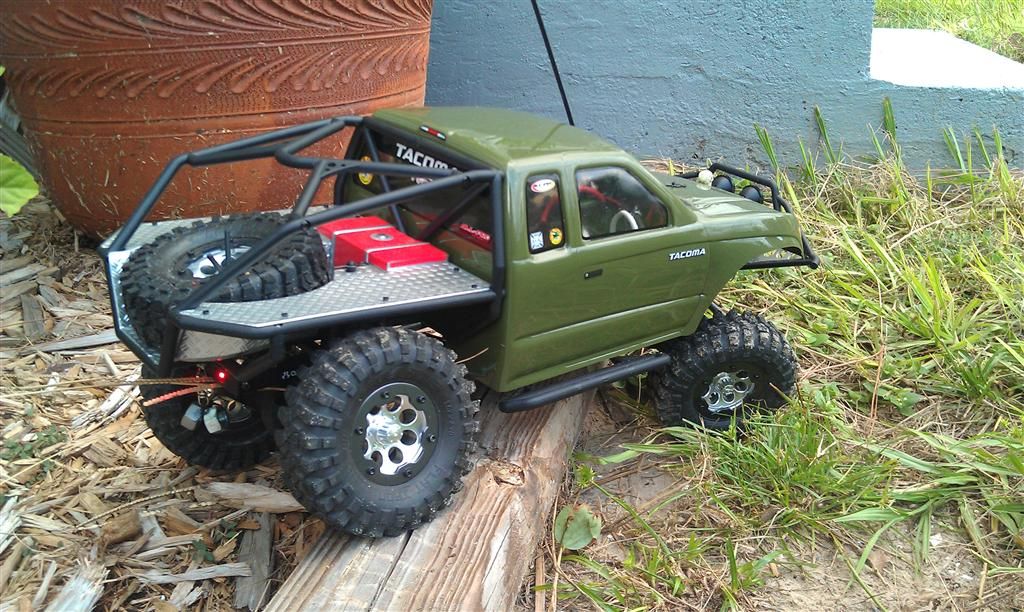 and carnage... I dropped off a ledge on the side of my pool, and the bumper pushed back and jammed the lights into my new grille 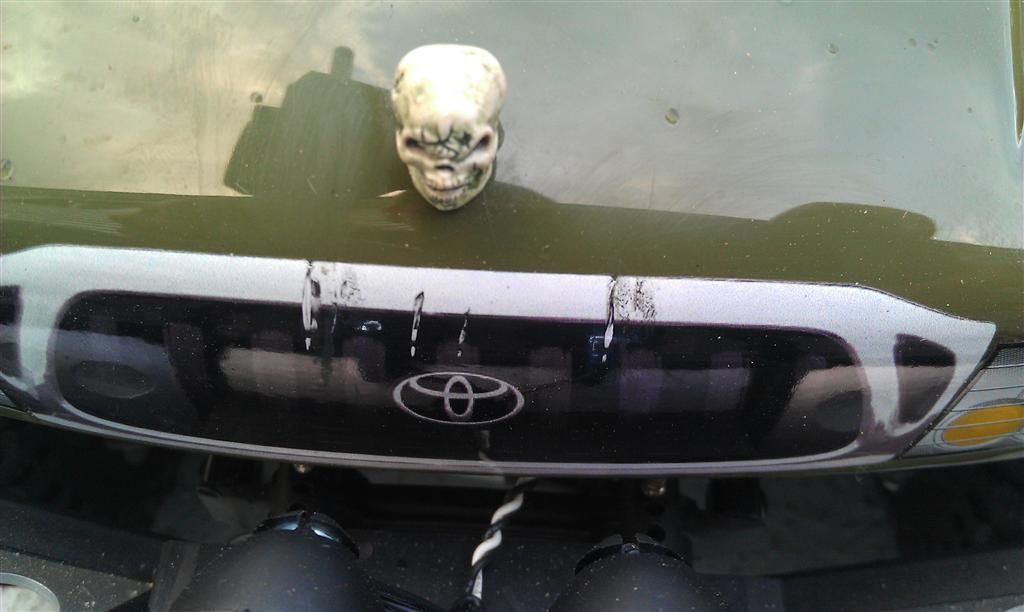 and I also bent up the "hook" I mounted on the front, lol. it was weak to begin with, but I just bolted it on after making it from some crap I had laying around anyway 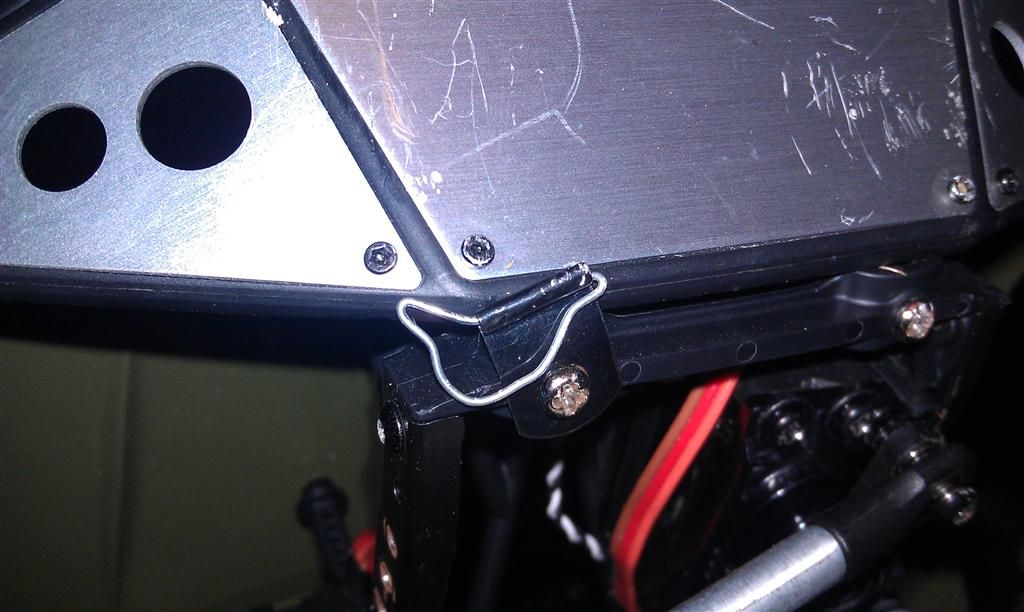 I think a good metal tube bumper is in it's future... I won't bother replacing the front grille sticker until a different bumper gets installed, lol. at least I do still have the black grille sticker left on the Tacoma decal sheet Last edited by iamsuperbleeder; 08-19-2011 at 07:59 PM. |
|
| |
|
| |


 Linear Mode


