| |
| |||||||
 |
| | LinkBack | Thread Tools | Display Modes |
 12-13-2013, 03:05 AM
| #1 |
| RCC Addict Join Date: Jul 2013 Location: Planet Earth
Posts: 1,286
|
I thought id write up this series of mods for those new to the SCX10 or for those want more from just bolt ons out of their scx10 A lot this will be common knowledge but maybe some of you haven't seen done before and it can maybe help you get started in the right direction. As coming from a drag racing back ground in a class where you had to deal with what you had stock to perform; ive transferred that learning curve over to RC in general and it has been tested/proven to at least myself to be just as effective concerning performance Some of you may want a comp rig or just a basic play around the house basher or just something to play with friends/family in the front yard..These mods/changes will work for all scenarios. I will be including detailed descriptions of the changes along with pictures of the said changes and explain exactly how each improves its performance. The reason for this write up is to show how you can make your rig a better performer without just bolting on the most expensive or even less expensive parts hoping it makes a difference for you. This does not reflect making ones rig better than someone elses but does aid in making ones rig better in general as you advance with your SCX10 So I hope some of you can enjoy this write up and it helps you advance even further down the road as you possible wish for more. Last edited by 6sharky9; 07-25-2014 at 02:40 PM. |

|  |
| Sponsored Links | |
| | |
|
12-13-2013, 03:05 AM
| #2 |
| RCC Addict Join Date: Jul 2013 Location: Planet Earth
Posts: 1,286
|
Id like to start by showing you the best video on youtube showcasing the capabilities of the RTR Honcho. My guess is that it was a very experienced driver showcasing its abilities right out of the box. http://www.youtube.com/watch?v=wNxjF0PFTa0 Simply the best trail truck on the planet bar none. Seems hard to believe you could even ask more of this truck but it is ready to respond to many changes for the better. Here is another video some of you may like http://www.youtube.com/watch?v=pZJNdq7q_gE Last edited by 6sharky9; 12-13-2013 at 10:32 AM. |
|
| |
|
12-13-2013, 03:05 AM
| #3 |
| RCC Addict Join Date: Jul 2013 Location: Planet Earth
Posts: 1,286
|
So where to begin...It already looks like with some skilled driving you can accomplish just about anything. Well; driving skill is a must...No matter how much you spend or what you do your truck its only as good as its drivers ability...So get out and practice all you can..challenge yourself and your truck as this will be needed to move forward to bigger and better things should you decide you want it or need it. Approach angle,speed, finess,the line you take ;will all determine success or maybe failure no matter how good your truck is. Don't think your truck is not capable because its stock or near stock and definitely don't think because you bolted on all the latest high dollar parts your truck is any better. There's more to performance than just bolt ons. Think smart and it wont take near as much as you think to have a very well performing scx10. Last edited by 6sharky9; 04-27-2014 at 01:57 PM. |
|
| |
|
12-13-2013, 03:06 AM
| #4 |
| RCC Addict Join Date: Jul 2013 Location: Planet Earth
Posts: 1,286
|
KIT vs RTR So Im going to begin with some basics...Some of us Purchase the RTR models and some purchase in kit form. Both have advantages depending on ones skill and budget. To purchase a kit is less money up front but can cost upwards of what you may pay for an RTR by the time you buy electronics and motor a radio receiver etc. Lets take a look at some of these differences. 1.) With a kit you receive parts that are considered upgrades such as aluminum steering links and lower suspension links front and rear. You also get aluminum bodied shocks..The shocks in my opinion aren't necessarily better performers over the plastic rtr shocks but do look better. 2.) The RTR gives you an already assembled vehicle without the upgrades of the kit but you receive great entry level electronics and a very very capable Electronic speed controller that can be used in the trucks future as well..The RTR comes with the same assembly instructions as the kit incase you need to disassemble something to repair it. Some may not know that the RTR ESC is made by CastleCreations and is a very reliable ESC..It has its limits out of the box but has potential to be used down the road as well for improved performance. With an external BEC you can use a 3s battery safely with the RTR esc and also have a lot more power sent to whatever servo you are using.It is also programmable using the castle link programmer and can set up drag brake and throttle inputs like any other good ESC. The RTR servo is a metal geared servo producing over 100oz./in. of torque and is suitable for most users. However its does have a weak point. Axial used a plastic bushing instead of bearings internally and they tend to wear quickly causing a lot of play in the servo output which is not a welcome problem. However you can resolve the problem by using traxxas 2075 servo bearings or some other bearing options and have yourself a reliable servo..The cost for the upgrade is generally around 10 dollars. I personally found the bearings in a Hitec HS645MG to be the same diameter needed..So if you have an old one laying around that doesn't work you can use the bearings to upgrade your rtr servo. Here is a link about changing the bushing over to a bearing for more reliable performance http://www.axialracing.com/blog_posts/1073906959 The radio is 2.4G and has proven at least with my experience to be a reliable radio and receiver combo..Most entry level radios don't have very many bells and whistles but this RTR does have what you need to make the truck drive straight and has a throttle adjustment as well. So in my opinion buying the RTR is not such a bad deal as you are getting reliable electronics compared to what most rc vehicles receive as rtr electronics quality wise. If you look at it, buying the rtr and selling what you don't want should you chose to use your own electronics and radio and servo can be a good thing. The esc you can easily get 40 50 dollars for if new The radio and receiver another 35 new maybe you don't like the RTR wheels and tires..Another 35 new the servo you can get 15-20 for new Maybe you want a different body?...40-50 dollars for the new rtr body easily with the stickers. So add this all up and you can get back a pretty penny for items you don't want from an rtr/kit should you chose to use your own electronics or whatever else you may already have or want to replace...Just take those parts off when they are still new and help pay for your wanted upgrades. Take that money off the cost of the rtr and you got a pretty sweet deal for an scx10 roller...Much less than purchasing a kit and you have the money for the kit upgrades plus some money left over for some good stuff...Id say one hell of a deal for a brand new roller for less than 200 U.S. dollars.. Some prefer the kit no matter what and that's fine; just showing another option to some who may not have seen it. So with this info in mind I will get started on and mainly focus with RTR scx10s as the basis for mods and changes..all will apply to kit form as well except with electronics you may choose to supply for yourself and the upgrades you would already receive in kit form. Time to put it in first gear and get rolling..stay tuned. Last edited by 6sharky9; 07-25-2014 at 02:48 PM. |
|
| |
|
12-13-2013, 03:06 AM
| #5 |
| RCC Addict Join Date: Jul 2013 Location: Planet Earth
Posts: 1,286
|
So here we go with the series on how to get the most form youre stock SCX10. This will be upgrades one should consider as the first step in improving your scx10 RTR performance. I would first like to touch upon what battery one should be using to power their scx10. A lipo is highly recommended over a NiMh battery...Better power delivery and much longer run times. Now the decision is rather or not to use a 2s or a 3s battery to power it. This can be a touchy subject but I recommend based on intended use and how far you plan to take your upgrades down the road. If you are a beginner or even an rc veteran a 2s battery will be much easier on your parts should you be more on a budget with your truck. A 3s provides a substantial amount more power (Plus 3.4volts) but most of your stock drivetrain will not handle this for very long periods of time..So please keep this in mind when choosing power for your stock truck...Not that if you use a 3s everything will break parts immediately but if not careful it will destroy parts a lot more quickly. I can honestly say ive never used a 3s but can also say I personally haven't found the need for more power than I already have using a 2s..so its more a preference decision on what you wish to use. A 3s does have its advantages with power and longer run times but also has consequences with a stock scx10. For this series I recommend a 2s battery until we get farther down the road with upgrade options that will allow you to use a 3s more effectively. So here we go with some first upgrades for an RTR model that should be considered. 1.) Upgrade Lower suspension links.(front and rear) 2.) Upgrade steering links (upper and lower) 3.) Replacement bearings for the stock servo or a replacement servo. 4.) Replace the 20T pinion with a 16T pinion. 1.) will improve the performance by keeping your whole axle assemblies from wrapping up under load which can cause items to break and poor overall performance. 2.) will allow for more precise steering and hold a selected line better..You wheels wont try to steer independently and will work together as a team 3.) will improve the life of your servo until you decide you want more or even need more power..In most situations it is plenty powerful enough..In other situations such as hard core comp use or some types of bashing ;it may not hold up..Decide what your plans are and select accordingly for a servo...you can use a servo with less than 200oz/in of torque without needing a BEC to control it and gain steering power. 4.) Changing your motor pinion can improve things a significant amount..With the stock 27T motor you have an abundance of wheel speed but you sacrifice control and torque geared like it is..Gearing it down will improve its ability to crawl at a slower rate of speed and provide better control with your throttle finger as well..You will not have to give as much throttle input to get over said obstacle...its also less strain on your motor making it last longer as well. RTR MOTORS: The RTR motor is nothing special in the way of power and is a throw away sealed can motor..you need to ask yourself what you intend to do with the truck to determine if you want or even need a better motor..If your plan is to waterproof your truck and run in mud and water and sand then the sealed can motor may be a better choice for you as installing a better quality,more expensive motor can be damaged just as easy and cost you a lot more to replace..So what motor is best???..Well this is also a give and take scenario. Most tend to use either a 27T or a 35T motor...both have advantages and disadvantages when using a 2s for power. If you like hill climbing or running through the mud then a 27T will provide you the wheel speed to help you accomplish these feats with a 2s lipo. But keep in mind when geared properly can provide very good control on the rocks and maintain a good wheel speed. If you want more power for crawling and don't mind a decrease in speed then a 35T would be the better choice on a 2s lipo. but expect maybe to be less capable on hills and mud blasts. Now, you have an option to get basicly the best of both worlds but this will require more battery power to do so in the form of a 3s or better and will require different gearing to accomplish..In general you need a 3s to match the wheel speed of a 27T on a 2s using a 35T motor and if geared properly you will benefit from even more low end control and retain the wheel speed you had with a 27T using a 2s battery,...again; keep in mind some changes may be needed for increased reliability to use the 3s in an aggressive manner. For noobies or those not wanting to worry much about reliability I recommend a 2s until its determined you can use more should you want more. Just these changes alone so far will definitely show you an increase in overall performance..Very basic common mods. Last edited by 6sharky9; 07-25-2014 at 02:56 PM. |
|
| |
|
12-13-2013, 03:06 AM
| #6 |
| RCC Addict Join Date: Jul 2013 Location: Planet Earth
Posts: 1,286
|
Suspension. So here we are at a more closer look at the rtr suspension..a well designed set up in general but not without some flaws. The rtr shocks are notoriously known for leaking and losing oil but this is not a problem that cant be resolved. The stock shocks work very well when tuned properly and have no leaks. You can gain more travel from the stock shocks by performing a simple mod to them..On the shock shaft on the outside of the shock there are little rubber stoppers that are limiting the upward travel of your shocks..Removing them can gain you quite a bit more travel..this will improve articulation over rocks and un even terrain...you can also have whats knows as longer down travel..but this will require a shock change and I will discuss more about that when I reach that area....for now the goal is to get the maximum performance with what you have stock Tuning is another aspect of performance some may overlook...A shock is capable of providing you the best compromise for its intended use given its tuned properly...To tune a shock you have to experiment with shock oils and spring rates..in most instances your vehicles weight and intended use will dictate what is the best compromise for you...Using a heavier oil will dampen the shock under compression and rebound..springs generally cater to such movement..A softer spring will allow faster movement as a heavier spring will slow it down as does the oil weight...Right out of the box its not set up badly and just needs some fine tuning...Most find by changing the upper springs to something a little softer and using 10 to 15wt oil to work very well with a stock weight scx10 for crawling purposes..Some use no oil at all but I wont get into that discussion and don't recommend it personally. Stage 2 Mods 1.) repair any leaks with the factory shocks 2.) remove the spacers on the shock shafts 3.) proper tuning via oil and spring rates Last edited by 6sharky9; 07-25-2014 at 02:59 PM. |
|
| |
|
12-13-2013, 03:07 AM
| #7 |
| RCC Addict Join Date: Jul 2013 Location: Planet Earth
Posts: 1,286
|
So a fast recap of what weve already determined has improved you fairly stock scx10 !.)Aluminum lower suspension links 2.)Aluminum steering links 3.)Upgraded servo (stock or a replacement) 4.) A smaller tooth pinion gear (stock is 20T) 5.) repair your leaking shock 6.)remove the spacers on the shock shafts 7.) tune your shocks. Well..not a bad start and most definitely not a costly one for added gains in performance. But weve only just scratched the surface...So what else can be done???? In this series im going to show how to get even more from your stock shocks and improve downward travel as well as articulation on both the front and rear suspension and it not cost a single penny to do it if you have some basic material already on hand. stay tuned. Last edited by 6sharky9; 01-19-2014 at 04:57 PM. |
|
| |
|
12-13-2013, 03:07 AM
| #8 |
| RCC Addict Join Date: Jul 2013 Location: Planet Earth
Posts: 1,286
|
REAR TRAVEL MODS Ok so here we go with some mods that vastly improve your travel and articulation..The mod on the rear is more to gain downward travel and use every bit of your shocks compression...The mod on the front will increase both compression and articulation bringing it closer to what the rear has..It does still have a limit up front however as you can only compress so far before the drag link or upper steering link hits onto the front of the chassis...but the gain you receive from this mods will improve performance none the less. This is a shot of the rear being compressed fully and I want you to notice how much of your shocks compression is left unused due to a restriction from the rear x brace and stock rear truss. This is my stock SCX10 Rubicon im using for this particular picture. 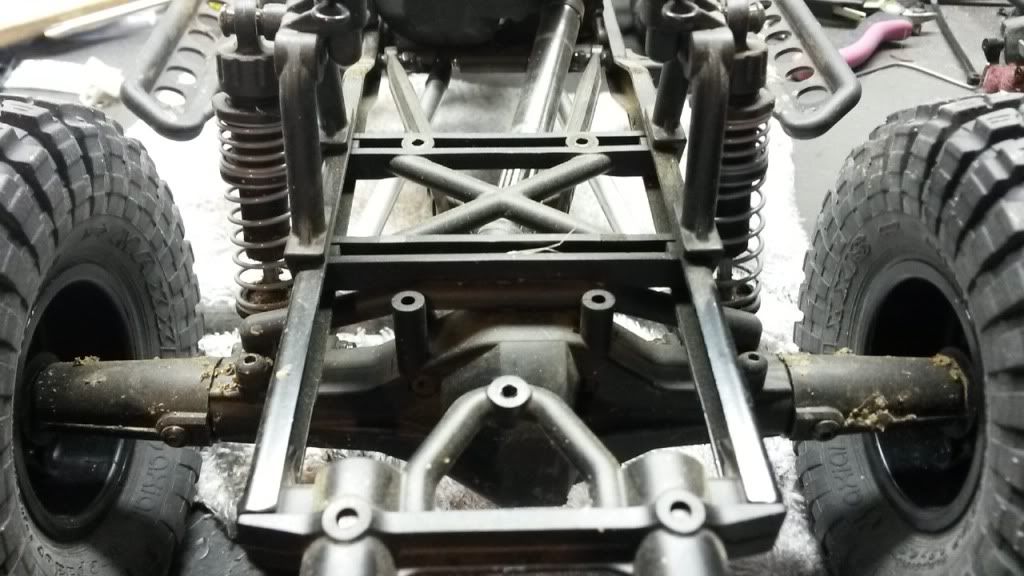 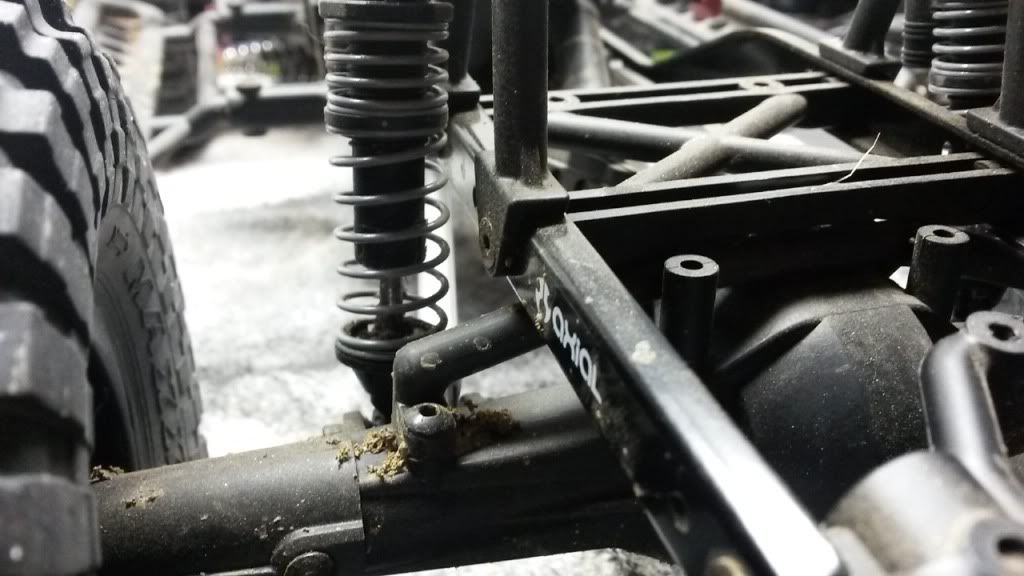 The way to resolve this issue on the rear is to first remove the x brace from the truck..you then want to cut the X from the brace leaving you with two braces 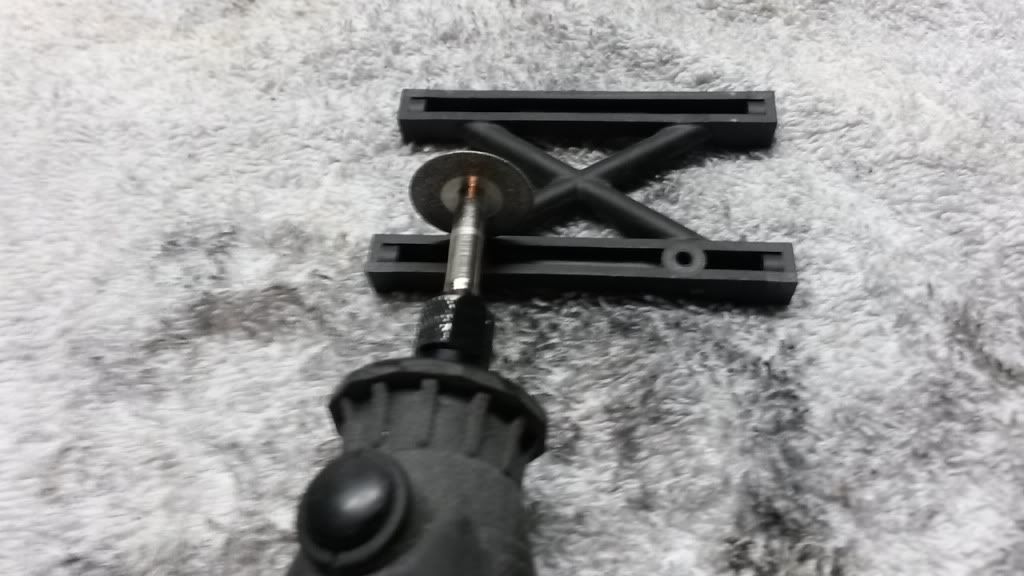 For the rear you will need to re drill a hole into the chassis to remount a brace..it is very important you do this to retain structural integrity of you chassis..its a very simple procedure. Also once the X brace is removed you will need to use machine screws and lock nuts to re attach your shock hoops as you no longer have the self tapping screws holding the shock hoop onto the x brace you just removed...you will need machine screws also to re mount the braces in the new locations. when its all done it should look like this. 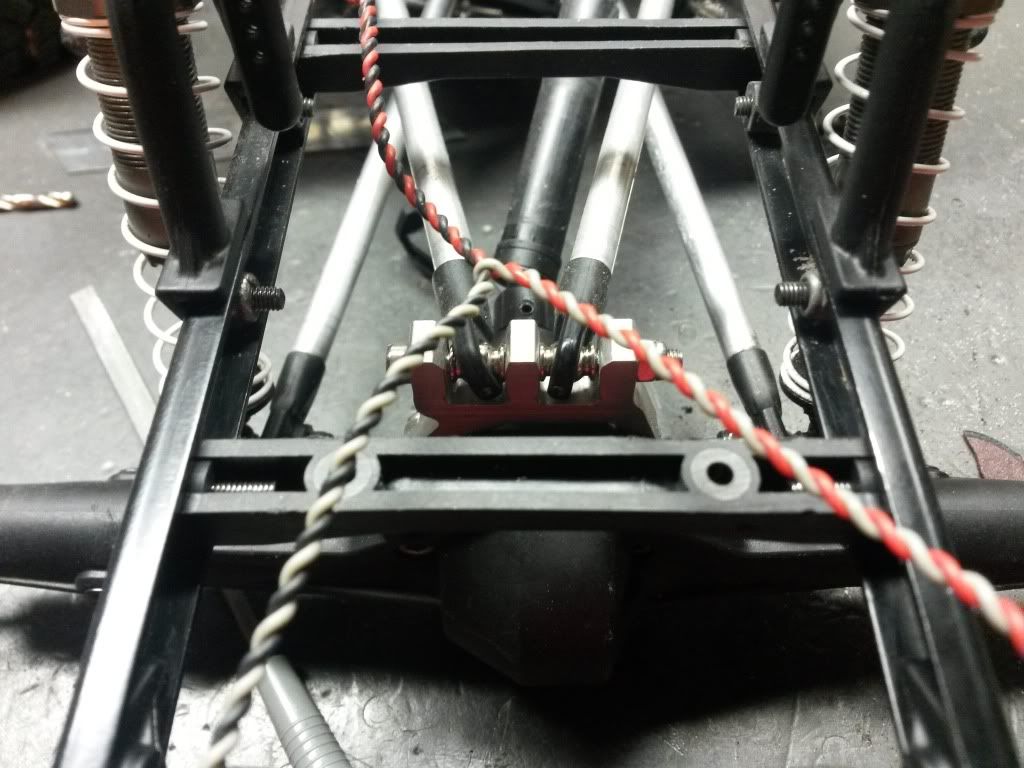 Now you have to do some cutting of the rear truss..you simply cut the ends off that extend outward onto the axle housing...or you can purchase another truss that doesn't mount as the stock one does as show in the pic...I used a level3 aluminum truss that doesn't extend outward...If you buy this truss I recommend you get the wider lower versions as this version I chose does not work on the front without a CMS kit. from this 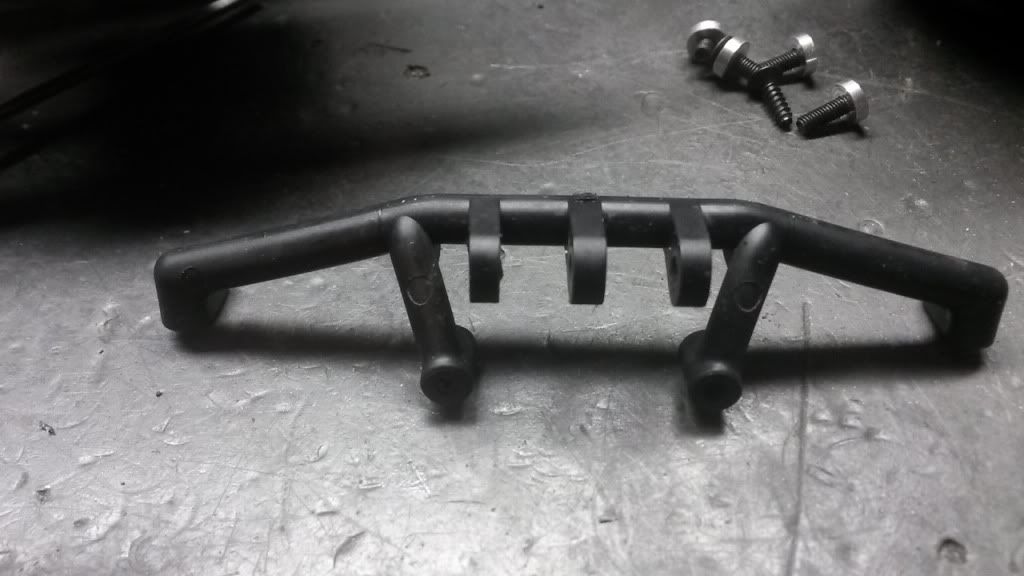 To this 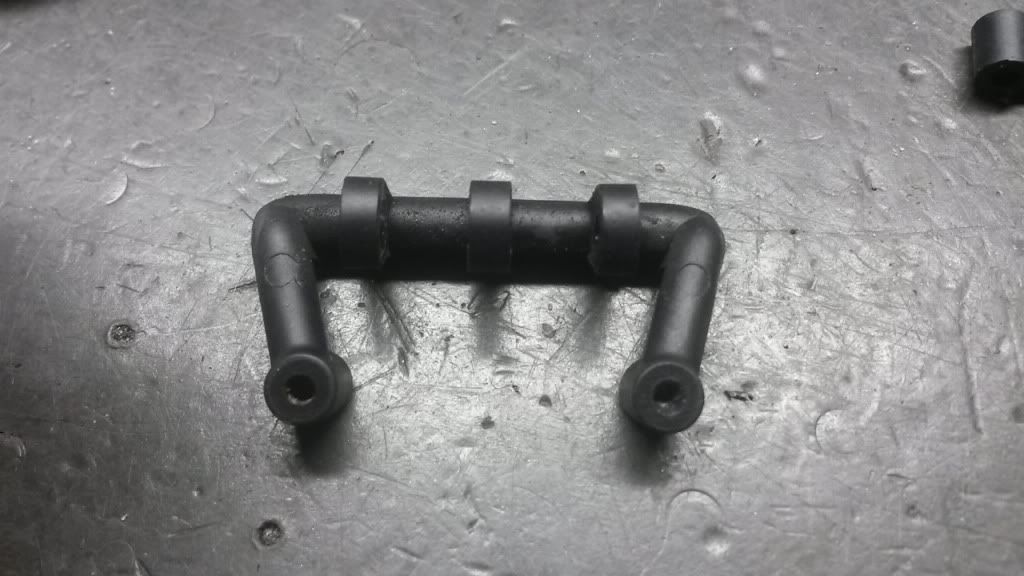 With these easy simple mods you now have a lot more travel and will be able to fully compress your shocks to there fullest potential...The benefits of a longer travel shock without raising the center of gravity or buying new shocks. You will want to fill in the holes left on the axle housing with silicone or simply screw in some small button head screws to fill them in..make sure the bolts aren't too long. I personally used black rtv silicone to fill in the holes. Here are more pics of the completed mods 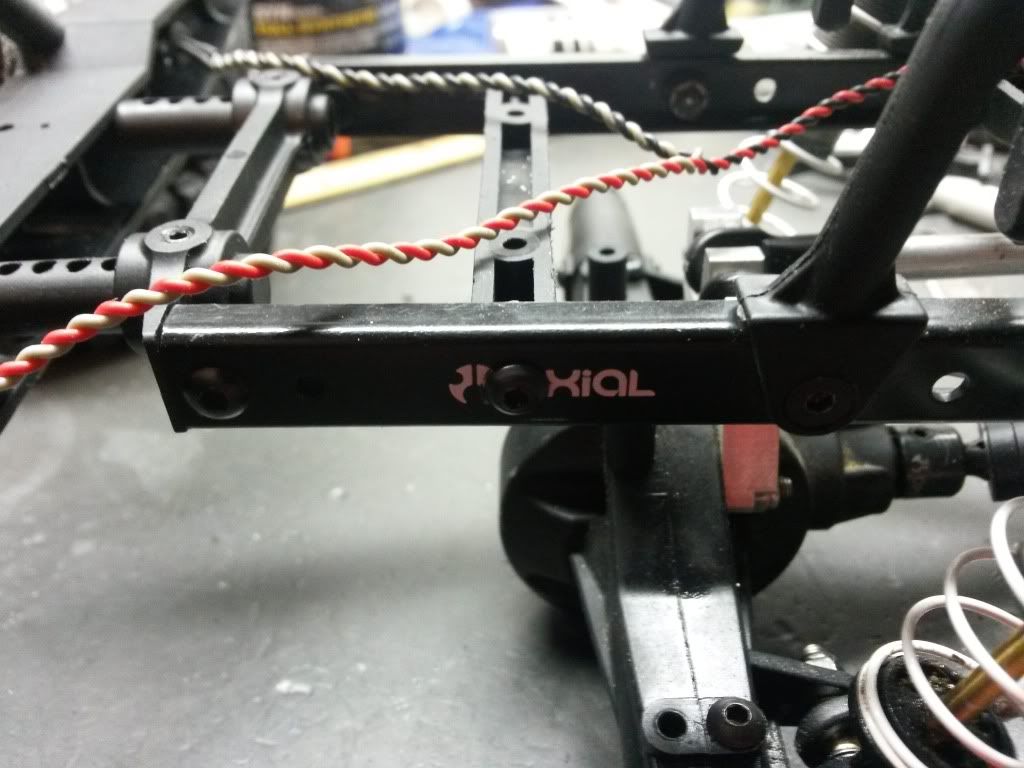 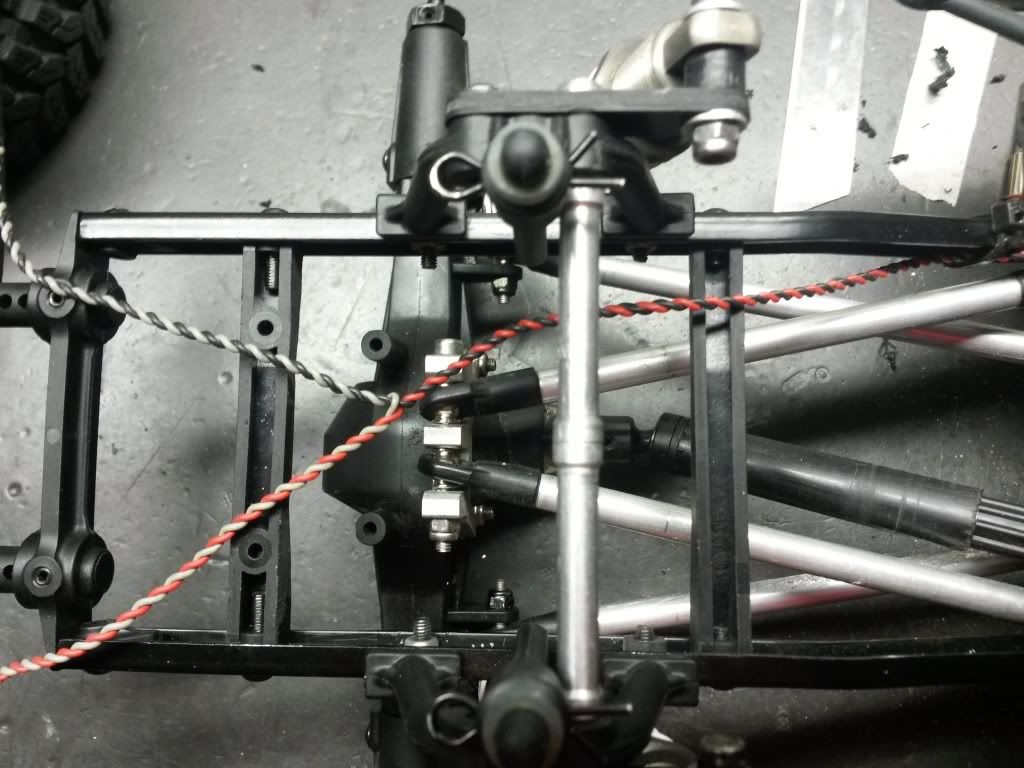 The mod for the front is coming up next..stay tuned. Last edited by 6sharky9; 01-19-2014 at 05:03 PM. |
|
| |
|
12-13-2013, 03:07 AM
| #9 |
| RCC Addict Join Date: Jul 2013 Location: Planet Earth
Posts: 1,286
|
FRONT TRAVEL AND ARTICULATION MODS For the front ; the mods are a bit more involved as you may need to relocate your battery to apply this modification...One of the problems on the front are with the servo bolt that sticks out from the upper drag link hits on the chassis brace that also helps attach your over axle front battery mount location..unless you are willing to re locate your battery this one particular mod may not be suitable for you...I will show the mod anyhow and you can decide if you chose to do this or not. I will start first with how to gain more articulation then show the other mod that helps with down travel. Pictured here you can clearly see where your servo mounts hit under articulation..If forced it will go past and allow full articulation but its not a great transition to it.,,Under some situations the angle is enough that it will not allow it to go past that point..so for full time maximum articulation this mod is what ive found to give me that. 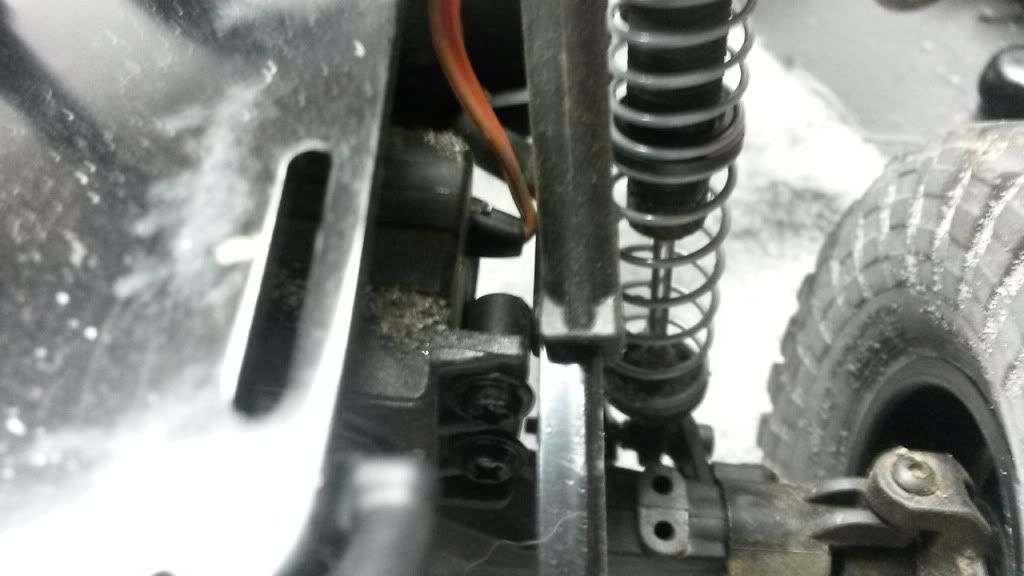 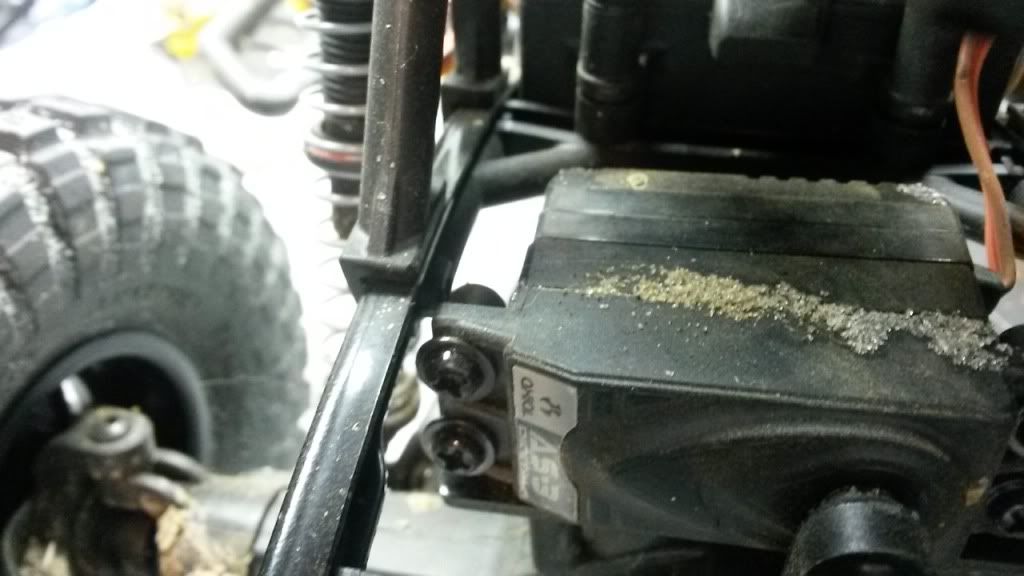 To gain more articulation you must first remove the restriction that is limiting movement of your axle on the front...This restriction would be the servo mounts hitting part of the radio box bracing that also mounts the shock hoop onto the chassis on the front mounting hole First you need to remove your battery and battery plate assembly..You need access to be able to remove the entire receiver box assembly brace and all. the assembly on the left side 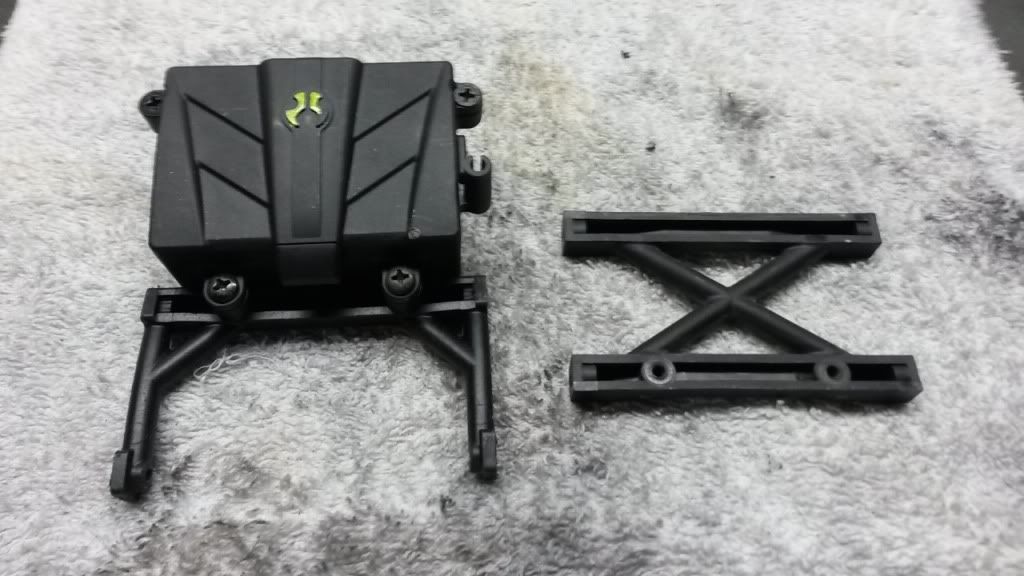 Then you simply re install everything..you will gain about 4 to 5mm of articulation on the front without having to purchase a single item. You now want to remove the box from the brace and and remove the long arms on the brace...cut off both sides flush to the brace 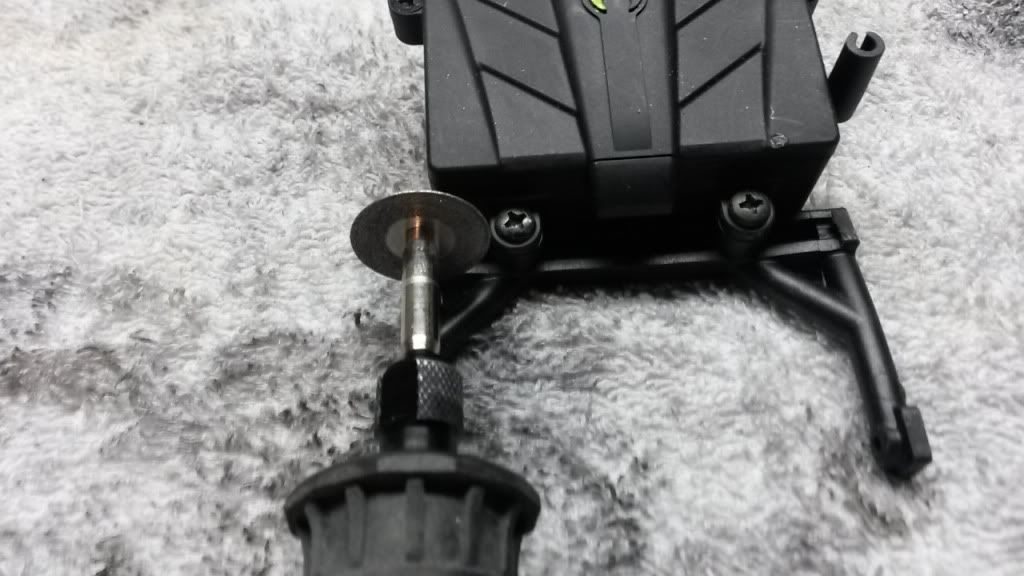 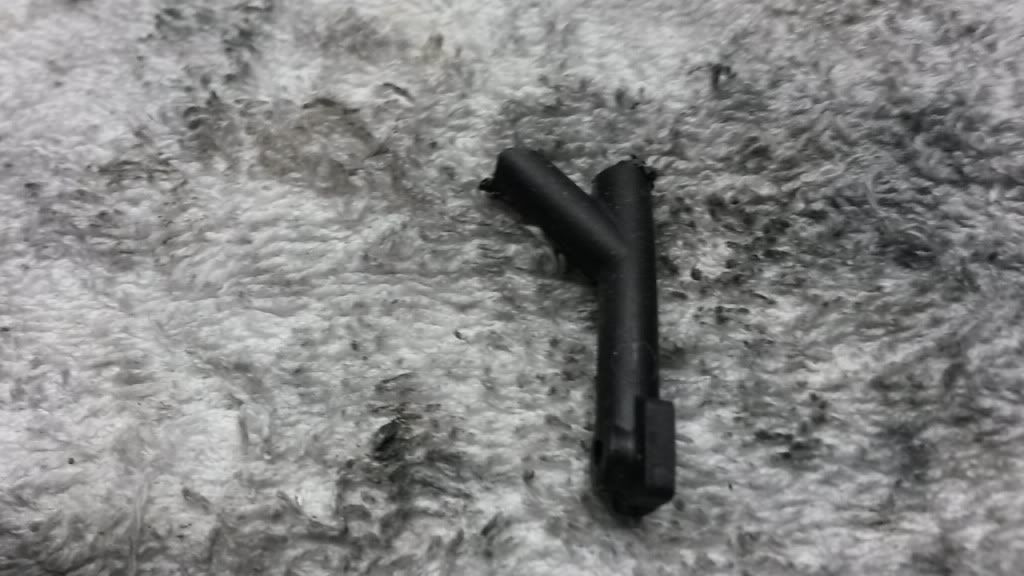 You will need 2 button head screws to remount the front section of the shock hoops...make sure you place the screw from the inside and allow the threads to go outward and not the other way.,.if you do that you have a bigger problem than you started out with....the rear mounts back as normal into the stock brace..This pic shows the correct way...focus on the shock hoop. Be sure to use a flat washer on the outside or you will damage your shock hoop and it will not tighten properly. 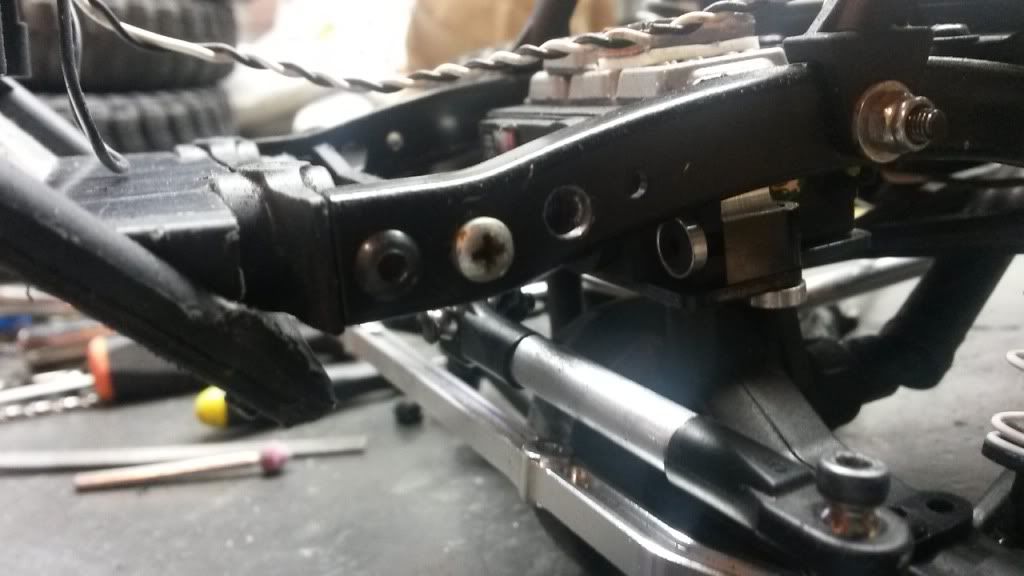 FRONT TRAVEL As mentioned above;The problem with the front brace is when you compress your suspension downward the button head screw that holds the upper steering link in on the servo horn hits this brace and limits movement leaving you with a lot of shock left that's not being compressed...Im not sure if this aided in stopping the articulation as well so stay tuned for an update. Anyway what ive done to eliminate that problem is move the brace forward just behind the front bumper mount..This will allow maximum travel at least up until your upper steering link hits the chassis on that one side...you need to cut the ears off the ends of the bumper brace and the front brace enough so you can move the brace up far enough to gain that clearance..The only problem now is you have no way to use your battery over the front axle now and need to figure an alternative placement. 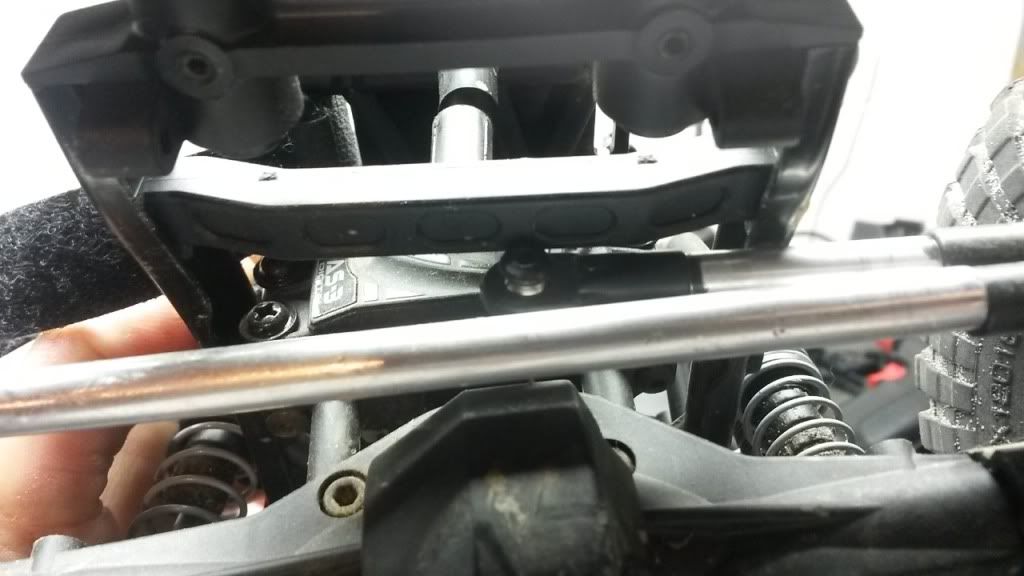 removal of ears on bumper mount,,Ive since replaced mine with aluminum bumper mounts on my honcho but this works the same with the stock mount. 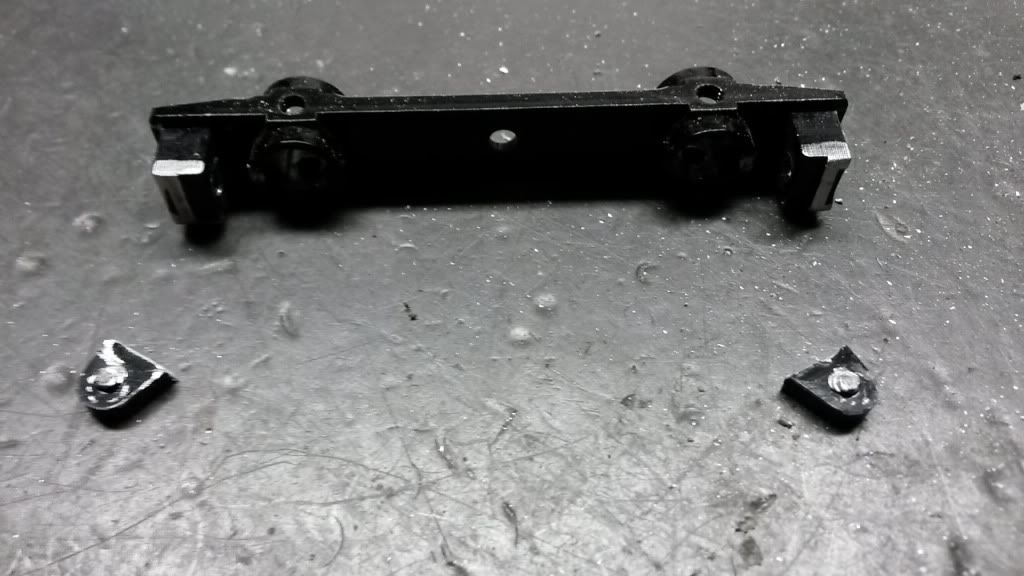 you need to trim the ears off then shape it so the brace refits inside the chassis channels straight..it is shaped a little different for it to fit in the section of chassis it was originally mounted into..Without doing so it mounts twisted. 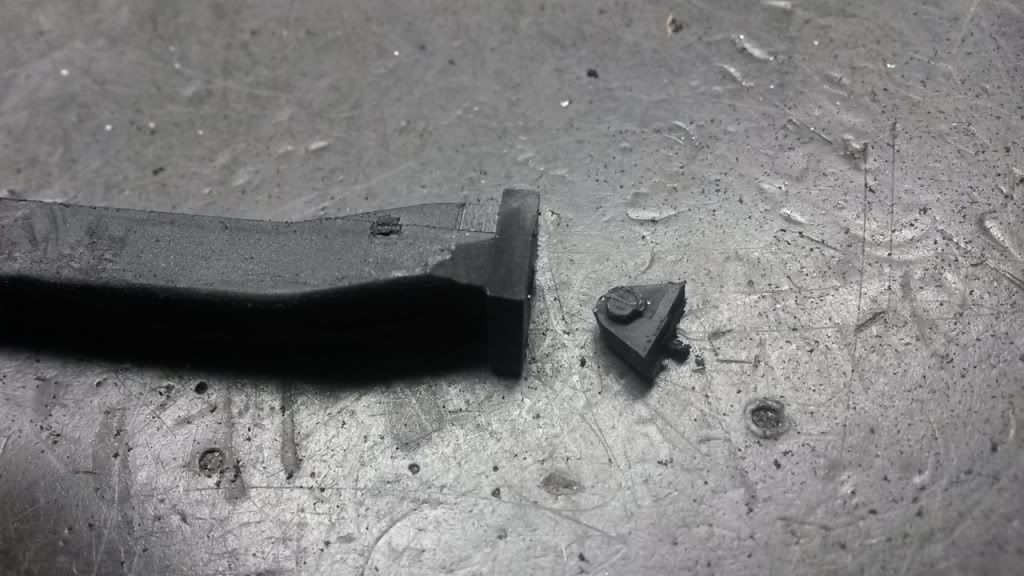 you will also need to trim any excess of the bumper posts that stick through the mount...I just eneded up cutting mine flush as I need no further adjustments from where it is at. Moved forward to clear..This also greatly strengthened the front of the chassis being closer to the ends of the rails. 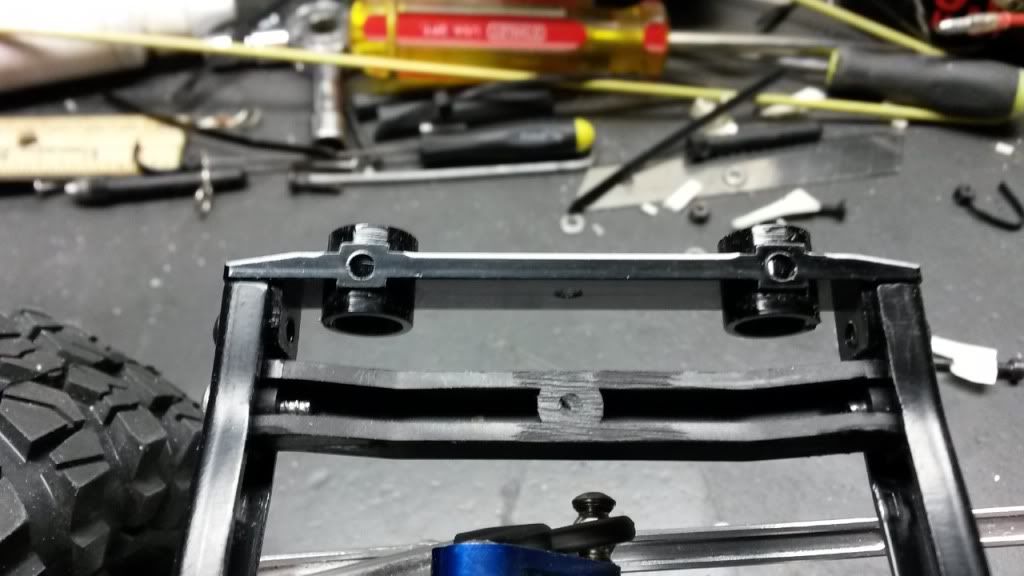 you will need two button head screws to tighten the brace into the chassis Completed pics of mod showing plenty of clearance now..you could easily use a thicker stronger servo arm should you need one and still have no issues. 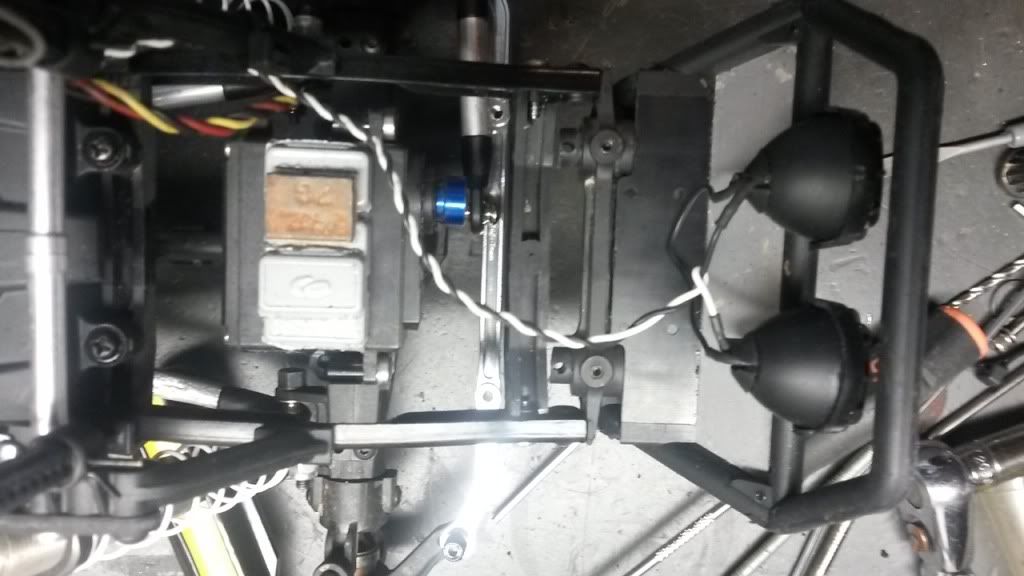 Suspension fully compressed 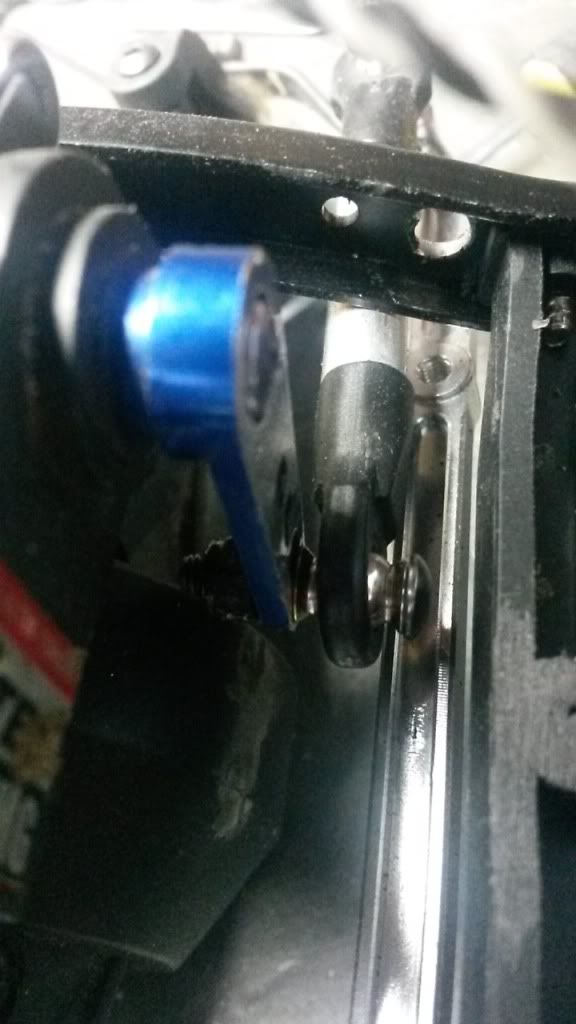 The right side now has full shock compression without interference of the bracket..however the left side is still limited as the upper steering links hits the frame before full compression 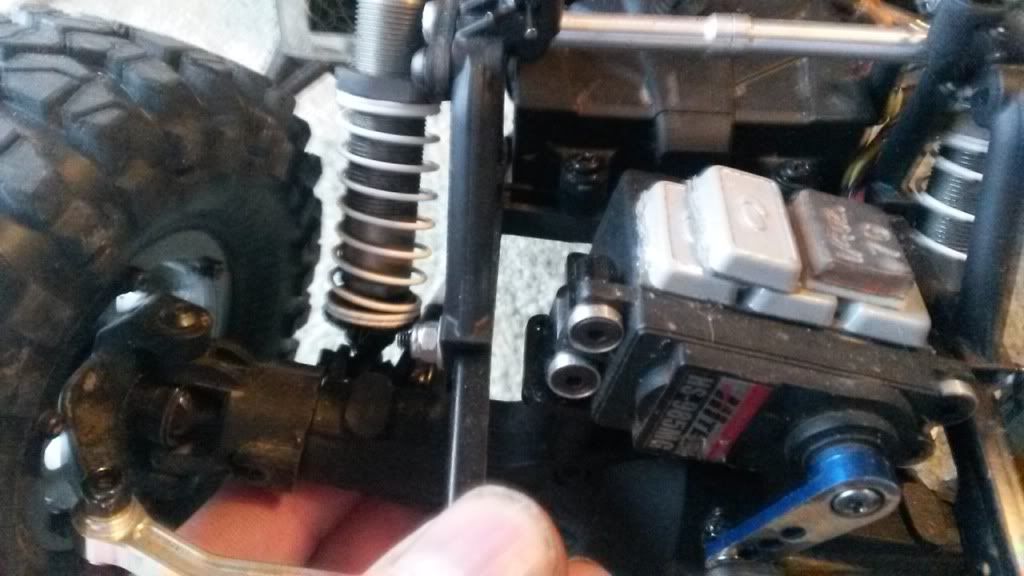 Although you cant get full travel it does still give you more without the servo mounts hitting..before I couldn't get the link to hit the frame and now it does..so you still get an improvement in travel and articulation. 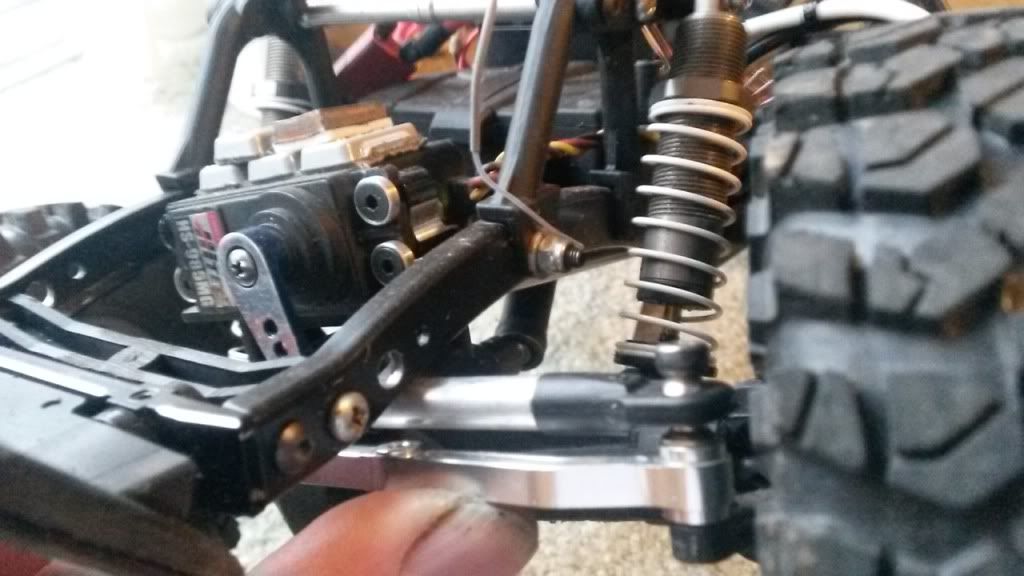 Last edited by 6sharky9; 01-19-2014 at 05:05 PM. |
|
| |
|
12-13-2013, 03:08 AM
| #10 |
| RCC Addict Join Date: Jul 2013 Location: Planet Earth
Posts: 1,286
|
STRENGTHENING YOUR SUSPENSION AND IMPROVED SHOCK PERFORMANCE What can possibly be next?..well more with the suspension needs attention..We all know how flimsy the stock shock hoops are and this will move the geometry of the shock all around and not give you the best performance from your scx10 So this is a low budget method to solving this problem...Most just buy stronger shock hoops and this is fine..But if you don't want the cost of doing so here is what you can do to solve the problem You simply make a brace between the hoops to make them just as solid as buying aluminum ones. Simple mod to do and requires a minimal amount of money to do it. you can use threaded aluminum tubing or even just simple all thread to perform this task. I had some aluminum posts off an 1/8 scale buggy to do my braces..so I had this already and it didn't cost me any extra expense from my pocket to perform. Here is a pic as shown previous but look at the brace between the shock hoops....Now I have to say this mod requires no other changes if performed using a rubicon body but it will require body modification to re use a honcho body or maybe some others..I only have the experience with the honcho body..so its up to you to figure any changes needed if using a different body. I will cover the mods needed to the honcho body. HONCHO BODY MODS NEEDED You will find you cannot remount the rear of your body as the cage will not allow you fit under the brace..You will have to cut most of the front section of the cage off underneath and trim some of the bed to allow fitment. youll need to cut this section off 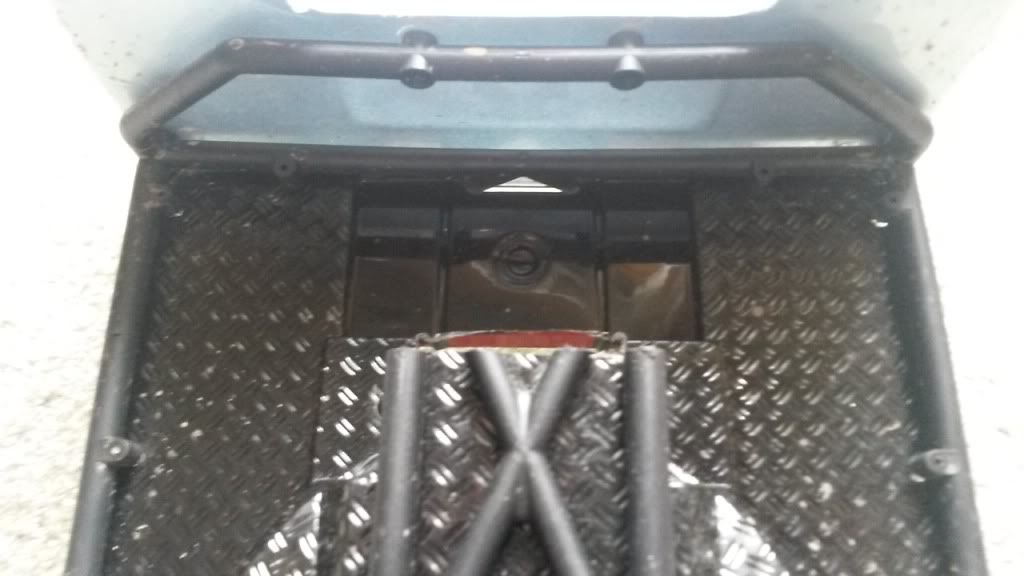 And trim part of the bed 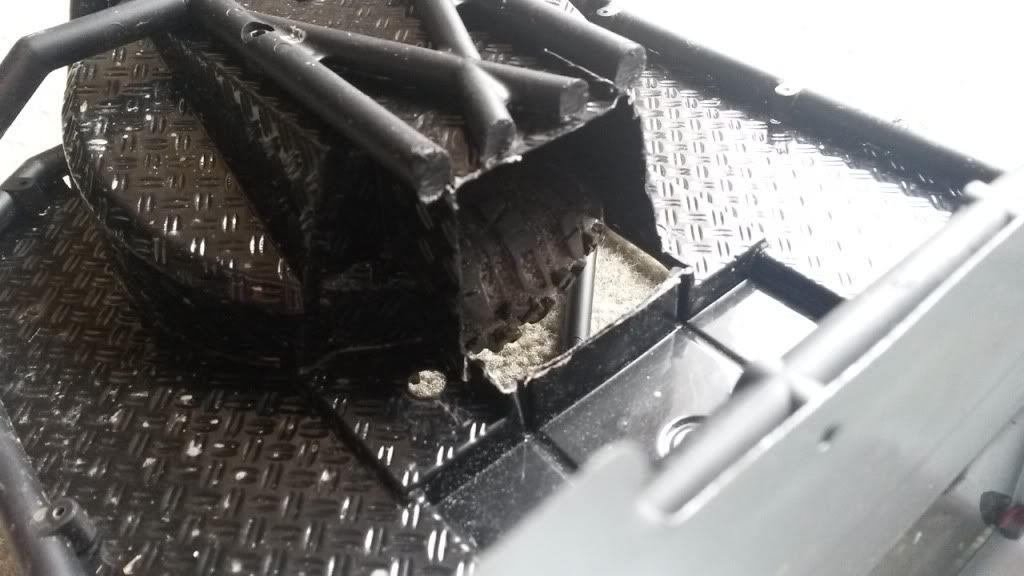 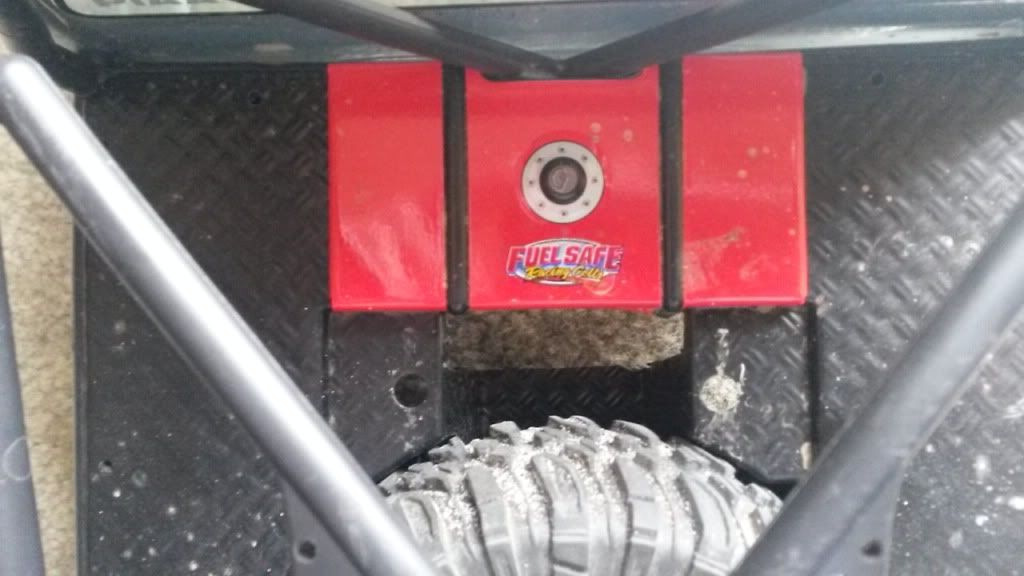 Now the body will fit back down on the chassis 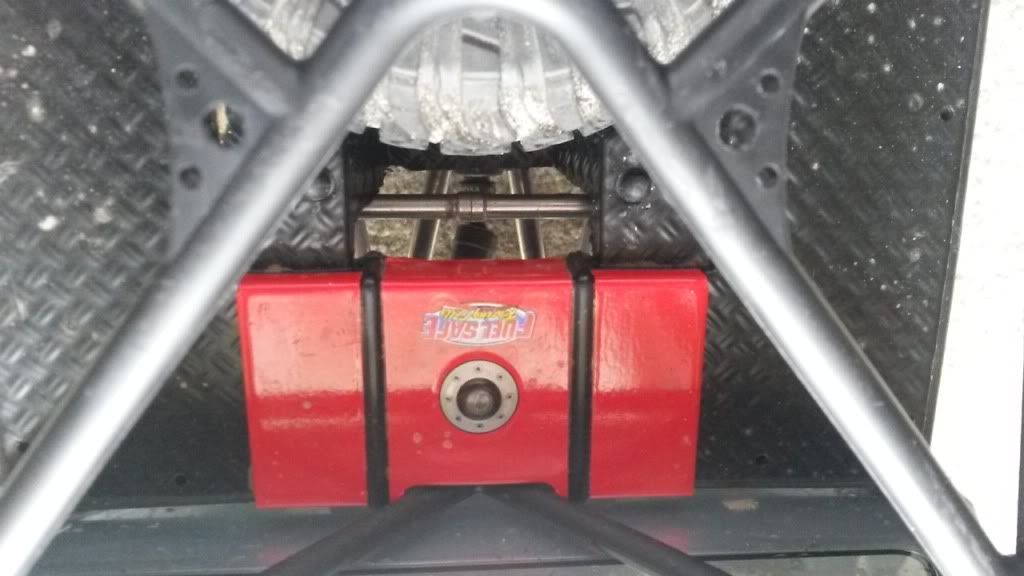 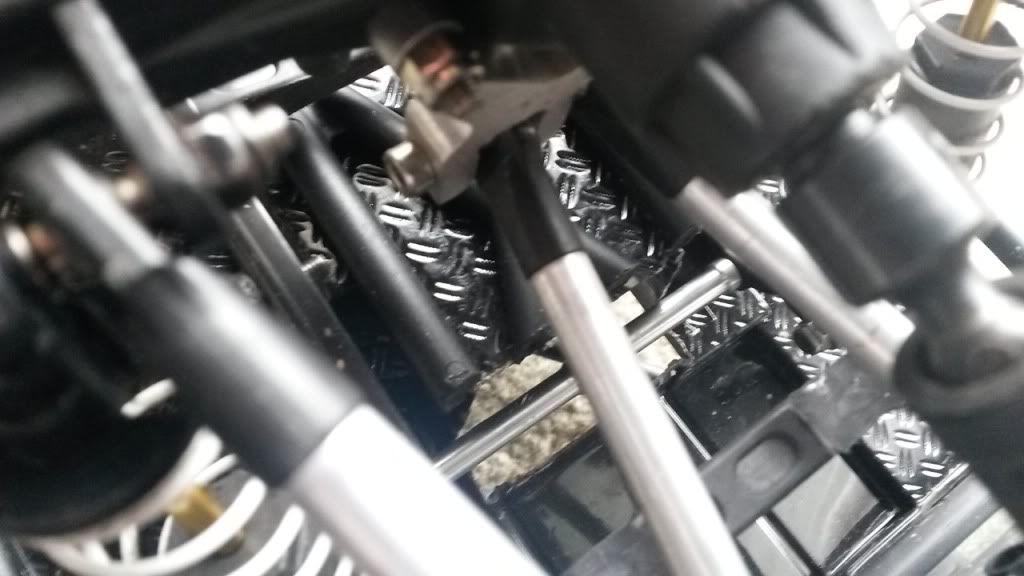 You don't have this problem with the rubicon body with the braces to the front holes on the shock hoop. So this is the low budget way of bracing your shock hoops...It does seem a lot easier to just buy stronger shock hoops but for 40 dollars id rather do these simple mods and get the same results.,,Just an option for some. IMPROVED SHOCK PERFORMANCE/WHEEL TRAVEL Id like to talk about wheel travel and how ive achieved the travel I have on my own Honcho rtr which can apply to a stock RTR So shock travel vs wheel travel is this...you get 1 inch of wheel travel for every 1 inch of shock compression if they are mounted straight up and down...So how tall is your tires?????? ?Unfortunately we will not see over 4 inches of wheel travel on an scx10 without some drastic changes like raising your trucks height a considerable amount or hacking up you newly painted body or going with smaller tires..you get the idea. A way to achieve improved wheel travel using the stock shocks is by where you mount them in the shock hoops. Moving you upper shocks to the holes leaning them towards the transmission is what I suggest for improved performance. This method of angling the shocks is whats known as ALPHA ANGLE. What this does is actually increases your wheel travel with less travel needed from your shock...So lets say for example have 2 inches of shock travel you can actually have 2-1/2 inches of wheel travel..Its on a much smaller scale with our shocks but you get the idea...The angle at which you lay the shock down effects that difference in ratio between the wheel and shock travel..More angle means less shock travel needed to gain wheel travel...We do have a problem though..the more you lay the shock down the lower your vehicle will sit ..so you have to use some common sense with chosing the angle at which you mount the shocks... longer shocks will require you to lay them down more to achieve your desired ride height and added wheel travel...Just don't take it too far..On the stock RTR the mounting holes mentioned will give you a very slight increase without it really lowering you vehicle as its a very small amount. This method has other effects though you should know about...it will make your shock act as a softer set up....so if you feel its too soft for your liking then more shock tuning will be needed to correct that. What I did on my Honcho was use custom 93mm shocks and laid my shocks down more than the supplied shock hoop mounting holes....This brought my ride height back to stock and actually improved my COG as the weight of the shocks were leaned down ..Plus I achieved the wheel travel I was after which is the maximum I can have and not have to cut the body or rear cage on the honcho model or use smaller tires or raise the truck. I will close by saying you really can only have as much wheel travel as your body and tires will allow before rubbing and destroying your body..How much that is is up to you. I have a custom scaler/crawler also but use stock RTR Honcho 90mm shocks and have well over 45 degrees of articulation because of the angle I mounted the top of the shock...I get just about 5 inches of wheel travel from shocks that are just 90mm eye to eye...Too much?...well my tires are 5 inches tall so I think its just about right for that rule of thumb. Heres some pics of the travel I have with 93mm shocks mounted in this fashion 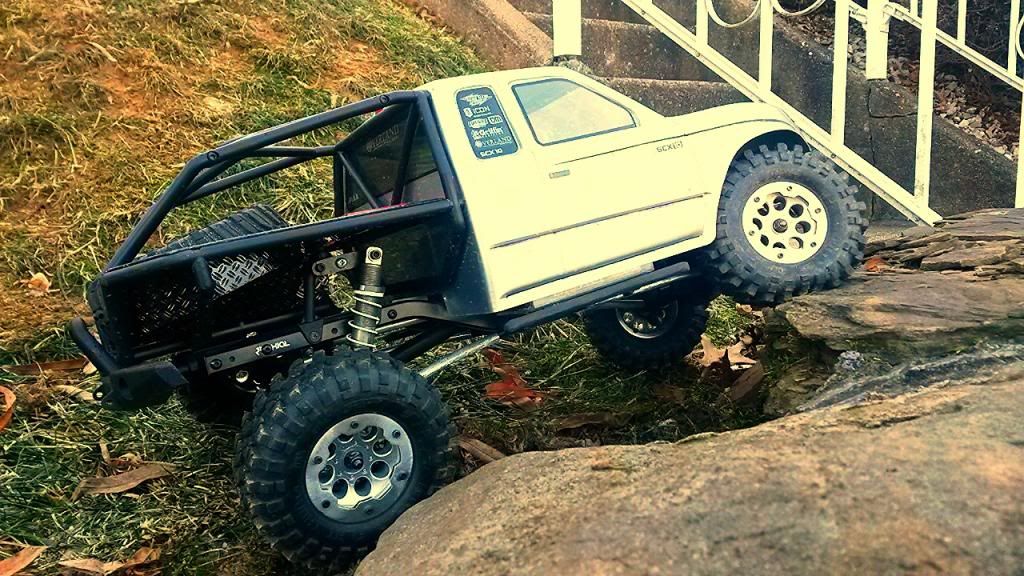 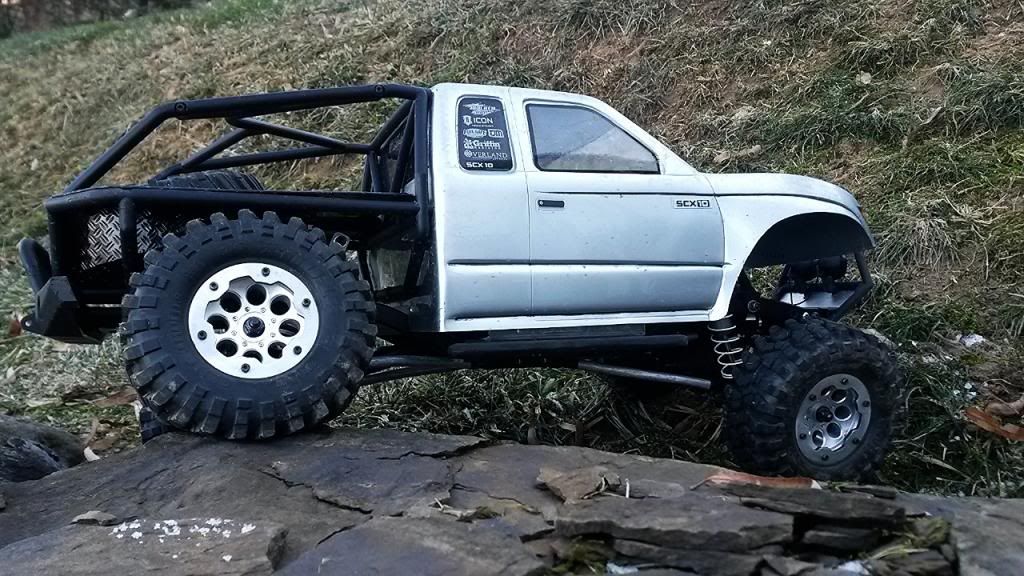 You can see the slight angles to achieve the travel as ive taken it further with mounting using my home made brackets. Where you see the shiny bolt heads is where you would want to mount the RTR shocks unless using longer shocks to move them further as I have I had to move them out as far as I did to regain my stock ride height and not raise my COG...The length of your shocks will determine how much more you have to lean them in to regain your stock height...Mine is just right for shocks being 93mm eye to eye. 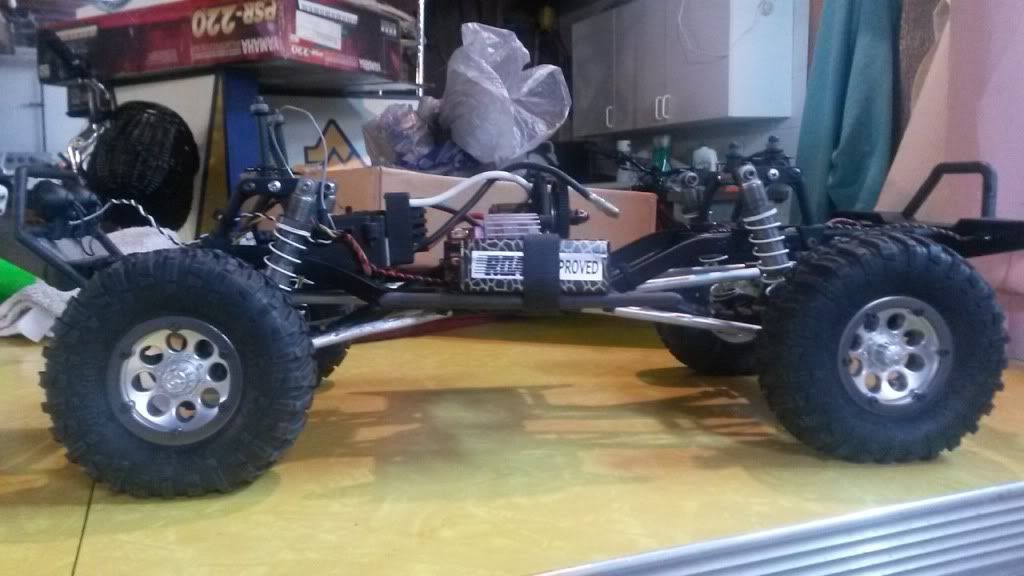 you can see the extension in this pic ive shown previously very well. Last edited by 6sharky9; 01-20-2014 at 08:19 AM. |
|
| |
|
12-13-2013, 03:08 AM
| #11 |
| RCC Addict Join Date: Jul 2013 Location: Planet Earth
Posts: 1,286
|
If you've made it this far and completed these mods or upgrades you should have a very well performing scx10 by now. So lets recap whats weve done so far. !.)Aluminum lower suspension links 2.)Aluminum steering links 3.)Upgraded servo (stock or a replacement) 4.) A smaller tooth pinion gear (stock is 20T) 5.) repair your leaking shock 6.)remove the spacers on the shock shafts 7.) tune your shocks. 8.) Gained more rear suspension travel 9.) Gained more front suspension travel and gained articulation 10.) Strengthened the shock hoops to eliminate shock flexing 11.) Relocated the upper shock mount position. You've already done more to improve your scx10 than having spent hundreds of dollars in just bolt on upgrades for the most part and it will perform a whole lot better than someone who hasn't maybe applied some of these tips and tricks we can do with our scx10 to improve it over bolt ons. Here's even more tips and tricks you can apply ADDING WEIGHT TO GAIN TRACTION Were going to talk about gaining traction from your scx10. Ive learned this on here and im sure a lot of you know of this but I would like to cover it for someone who maybe hasn't. Id like to discuss adding weights to your wheels. Pretty much any weight you can add to your rig below the chassis is known as un sprung weight...It means the shocks or springs are not having to support this weight which is a good thing..The ideal place to add weight would be on the axle but there isn't much room to do that without maybe having an issue with being less able to get through mud because you have more in the way stopping those efforts..(A snow plow effect if you will)...So where do most add the weight?..They add it to the wheels. This seems to be the most popular method but it does have some drawbacks..That draw back is your adding weight to the rotating assembly which causes more stress on your drivetrain and motor..It will just not work as efficient due to having more weight to turn..so you lose some run time and more wear and tear on the drivetrain over time. Unfortunately this is the best method for adding weight to gain traction and despite its draw backs its accepted and used as a common method...There are some other designs made to hang weight where the wheel is but not rotate it...A wonderful design but also a very costly one. I myself use the method of adding weights inside the wheels and with using stock electronics and drivetrain have not found to have any problems as of this writing and its been about 4 months into having made the change. On a 1.9 wheel you can add using 1/4oz stick on wheel weights a max of 3.5oz (more using heavier weights)...that is almost one pound of weight helping press your tires to the ground to add to traction..I have found this to be a major help and recommend it highly. For those using rtr tires and rims unfortunately you will have to boil them to break the glue seal to remove the tires and add the weight to the wheels. The best part about this is no one would suspect you've added weight using the RTR items. Most tend to replace the wheels and tires as its a lot easier to replace tires and add weight to the wheels and frankly the real beadlocks look better on the truck. But if you want sleeper status do this with the RTR wheels and tires..they will be wondering how your RTR has better traction than thiers..lol ..shhhhhh..lol 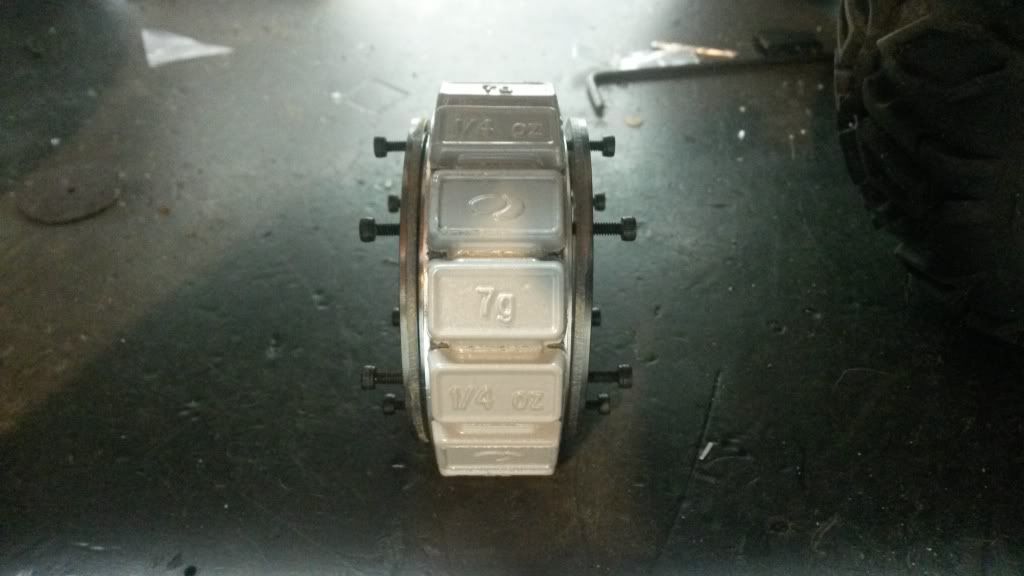 STEERING RADIUS INCREASE Id like to touch on this subject a little. Ive seen many different methods of increasing steering..anything from high steer knuckles to the XR10 mods to increase steering...I have to admit you get a lot of steering but for most users having that much steering has its consequences. If you attend competitions where most of the gates are set to a high difficulty I can see where this much steering is needed to avoid losing points having to back up once or maybe even a few times to make a sharp turn into the gates. That being said most of you may not need or even want this amount of steering. This type of steering requires some very heavy duty upgrades that are very costly..The servo you need must be very powerful and the axles you need pretty much need to best in the industry to survive the loads applied to them for this added steering advantage. Ive been working on increasing the steering radius without needing to go through the extreme measure of cost to have improved steering. It will not turn as sharp but then again most of us don't need it to begin with..My method of increasing steering (which some may have done before) will not require expensive super torque servos or expensive axles to survive the radius of turn or require purchasing other parts and modifying them to make them work. Ive only done part of the mod and will show you what ive done so far to gain steering...When I finish the mod I will show you the rest but id like to test it first and be sure before I pass it on that it doesn't create problems. First I would like to talk to you about your front axles..They are not designed to work past a certain degree of steering and will jam and break if you reach this limit..I strongly suggest a set of lower cost universal axles as ive done or if you want some costing more it will work just the same. Here is what ive done so far to improve steering..I removed the 2 button head screws that hold the front side of the c hub on and replaced then with grub screws. This has given me a slight improvement as the steering can now travel farther before bottoming out so to speak. I used grub screws that were for use with driveshafts and they are too long...so you must cut them down or find a set that aren't as long. You just want to screw it in until it is flush with the c hub..By eliminating the thickness of the button head screw that's sticks out; you gain that much more in steering radius...I have plans to add a lot more but like I said want to test it before I release it. I will risk my own axles and servo before I recommend anything to you that will cost you money. 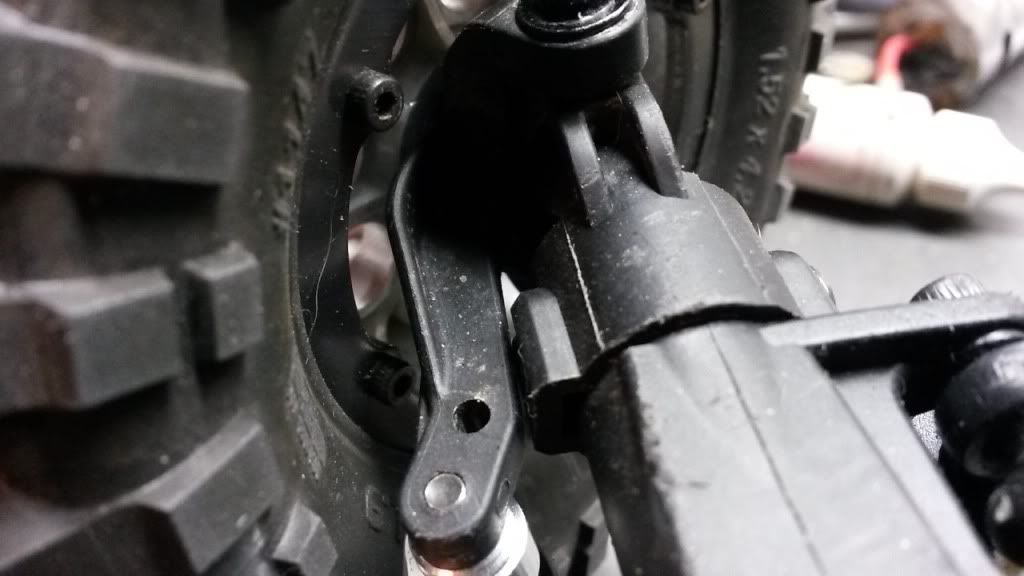 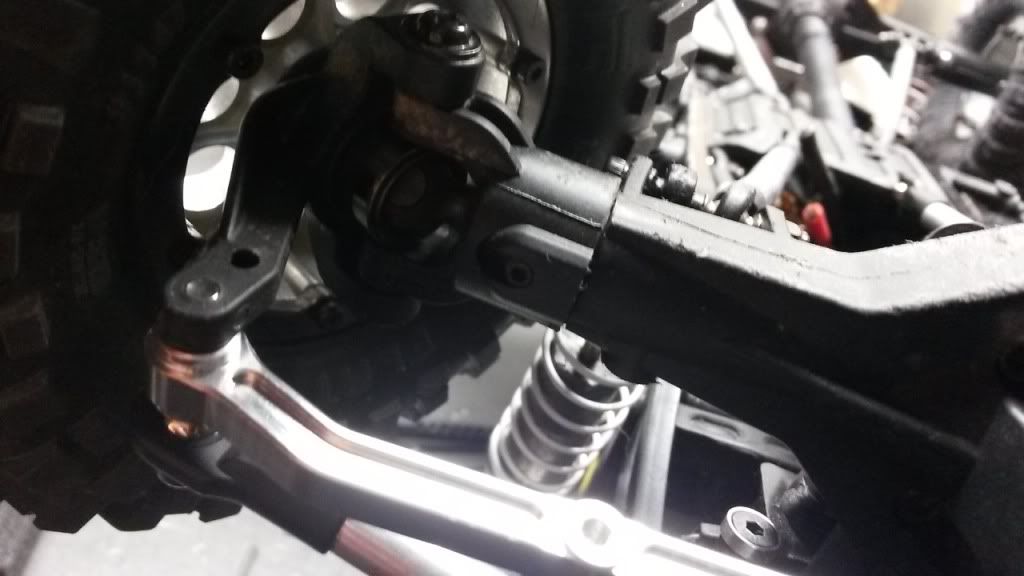 You can see here it turns more aggressive with just that small amount of gain in steering 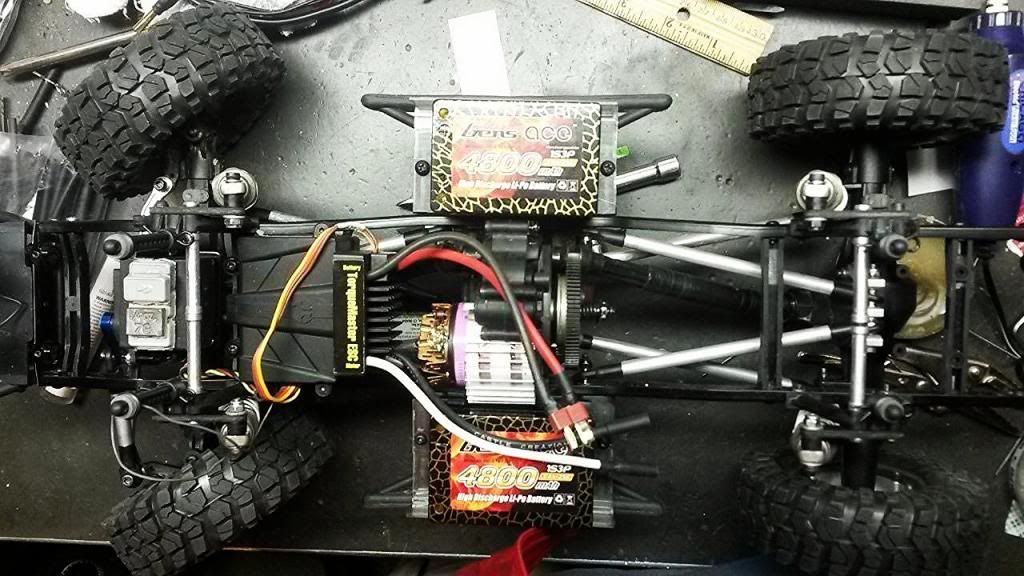 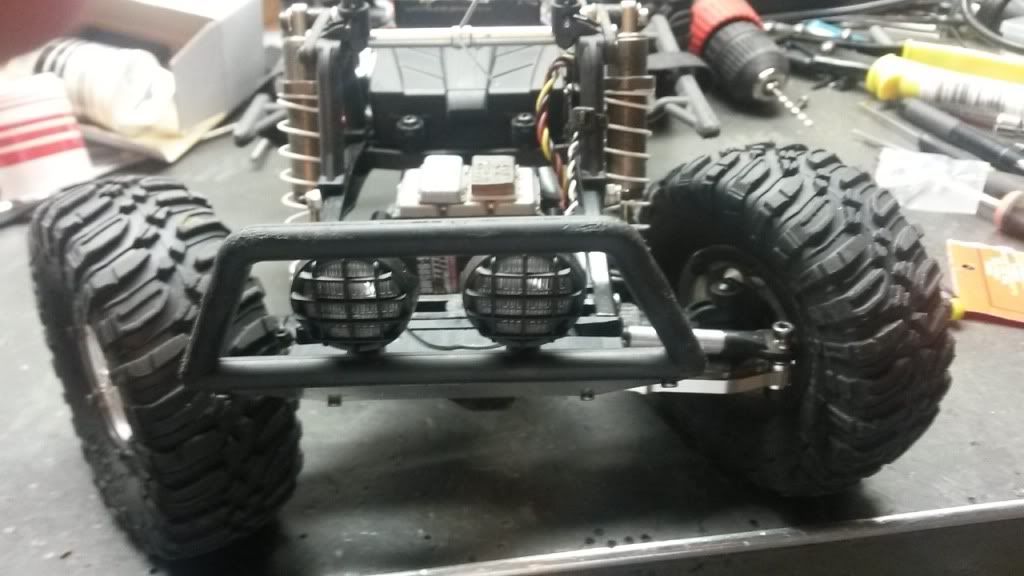 Last edited by 6sharky9; 01-19-2014 at 11:00 PM. |
|
| |
|
12-14-2013, 05:39 AM
| #12 |
| RCC Addict Join Date: Jul 2013 Location: Planet Earth
Posts: 1,286
|
TIRES AND FOAMS. In this section I would like to talk about tires and foams. Its really hard to give advice with what tire is best..There are just too many differences in terrain around this world to say this tire works better than that one unless you are in my area of the world on the same terrain I run on...So I will skip saying this tire is better over that one. I will say however Pitbull Rockbeast tires certainly are getting amazing reviews from all over the globe..These are a set of tires I will be trying myself in the near future. Now its never just a tire alone that makes them work so well...the foams we use play a huge part in that and id like to explain the best way I can in simple terms. You need to look at your tire foams and compare that to what air pressure would be inside of a real 1:1 tire..rather its on your grandpas car or your hot rod its going to be important. The rc tires are not radial tires but they react pretty much in the same manner so this is my explanation for tire foams. When you over inflate a tire with air The tires tread takes a more rounded shape to the surface not giving you a full contact patch to the road.,,We will associate this as foams to stiff or maybe too tall for the tire When you under inflate a radial tire the opposite happens and the contact patch caves in the middle; again not giving you a full contact patch..We will associate this as foams that are too soft or too short diameter wise When you have the correct amount of air in your tire the contact patch is going to be optimal giving you the best performance...We will associate this as foams that are just right...or correct for your vehicles weight. Weight has a lot to do with how much air or which foams you should put in a tire to get that optimum contact patch..A soft foam may be good on a lighter weigh vehicle as a stiffer foam would generally be needed as the weigh increases. The best way I know of how to have you check contact patch of your rc is to put the truck down on a clear piece of glass and visually look at how the tire is contacting the surface from the underside You will be able to see if its caving in or if you are just getting part of your tread to the surface. You want as flat of a contact patch as possible without going overboard in either direction. I don't have any pics to show of this being done but I will be using this method in the future to help get me the most from any tire I might use for fair testing on my terrain...So far I have only tested 1.9 ripsaws, 1.9 trepedors and 1.9 flat irons using stock foams and I know im no where near maximum performance for either tire with the stock foams..All though I will say the ripsaws have shown me the best traction so far with the stock foams but I know still is not optimal So lets recap once again what weve done so far !.)Aluminum lower suspension links 2.)Aluminum steering links 3.)Upgraded servo (stock or a replacement) 4.) A smaller tooth pinion gear (stock is 20T) 5.) repair your leaking shock 6.)remove the spacers on the shock shafts 7.) tune your shocks. 8.) Gained more rear suspension travel 9.) Gained more front suspension travel and gained articulation 10.) Strengthened the shock hoops to eliminate shock flexing 11.) Relocated the upper shock mount position. 12.) Adding weight to the wheels to gain traction 13.) Improving steering radius 14.) Choosing a tire and correct foams for maximum performance. I don't know about you but im thinking the stock scx 10 is turning into one capable truck so far. and you have barely any parts changes done to it. and what you have changed is very minimal cost. I have more later to share and taking a break for now..Thanks for watching. Last edited by 6sharky9; 01-05-2014 at 03:45 AM. |
|
| |
|
12-14-2013, 05:39 AM
| #13 |
| RCC Addict Join Date: Jul 2013 Location: Planet Earth
Posts: 1,286
|
This section will cover some of the things you can do to help you with approach on the trail as well as other improvements using the stock Items on your truck. HONCHO FRONT BUMPER: well I personally like the look of the front bumper but it has its downsides being shaped like it is..For one its very wide and mounted fairly low. This is not a good thing as you cant approach obstacles very well without getting hung up in some manner. So id like to present a simple mod you can make to the stock bumper to improve the trucks ability to get you over some obstacles. What ive done;and I saw this on here before ;was to cut the sides off the bumper so you don't need as much of an approach angle to climb up and obstacle taller than your bumper or even tire. 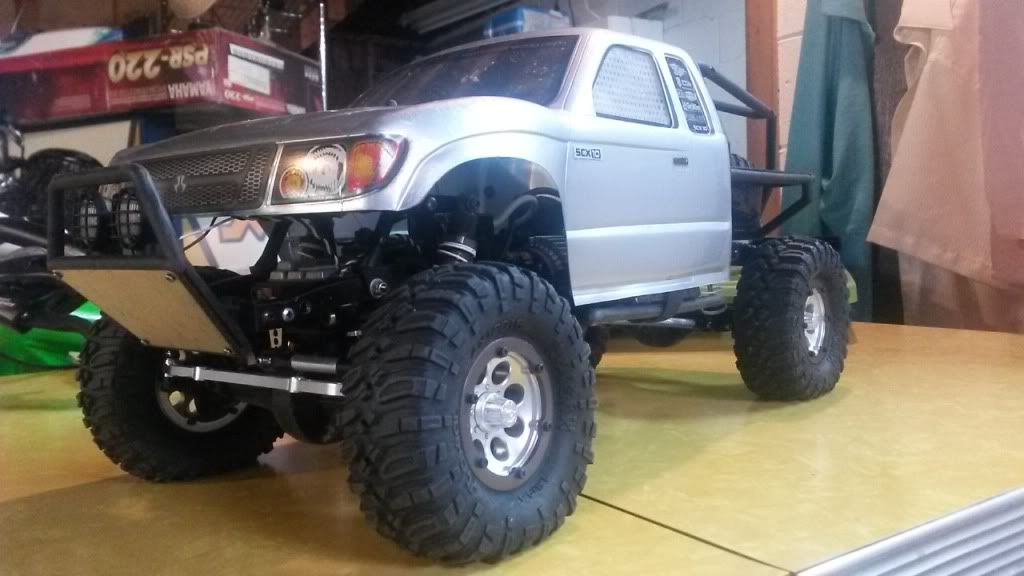 SIDE RAILS: Ive seen some heat them up and bend them up towards the body to gain clearance and ive also seen them cut then flipped upside down so you can get even more clearance ove rocks and obstacles...I chose to cut mine and flip them over as it gives the most amount of clearance. This is stock 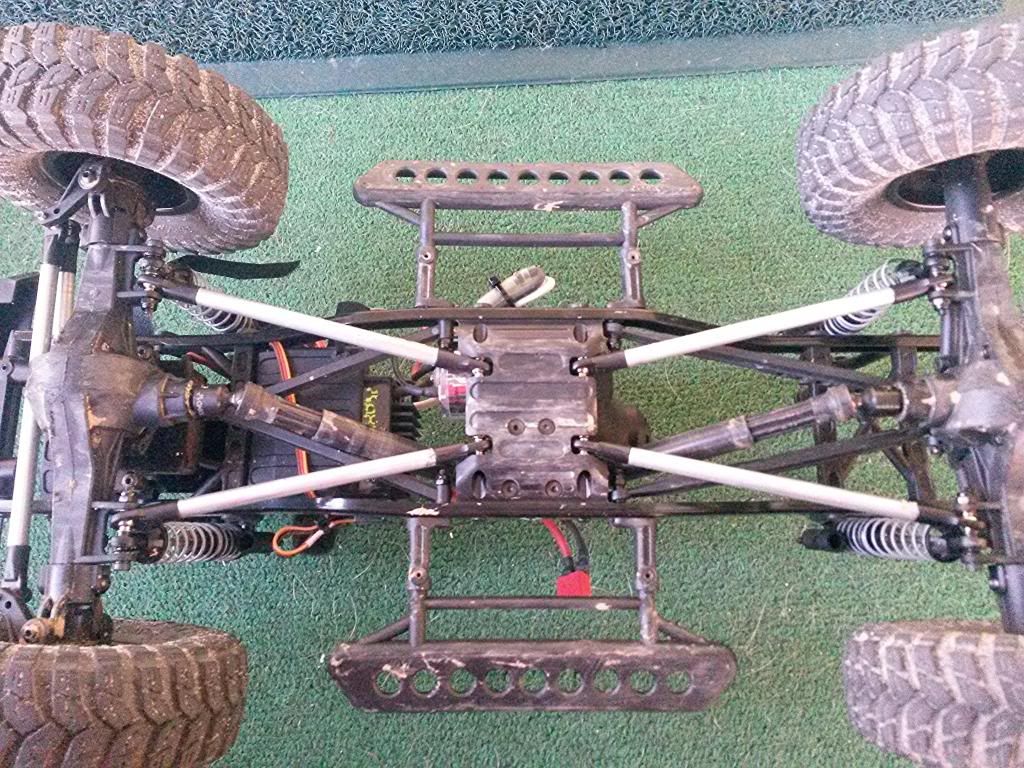 And this is cut and flipped 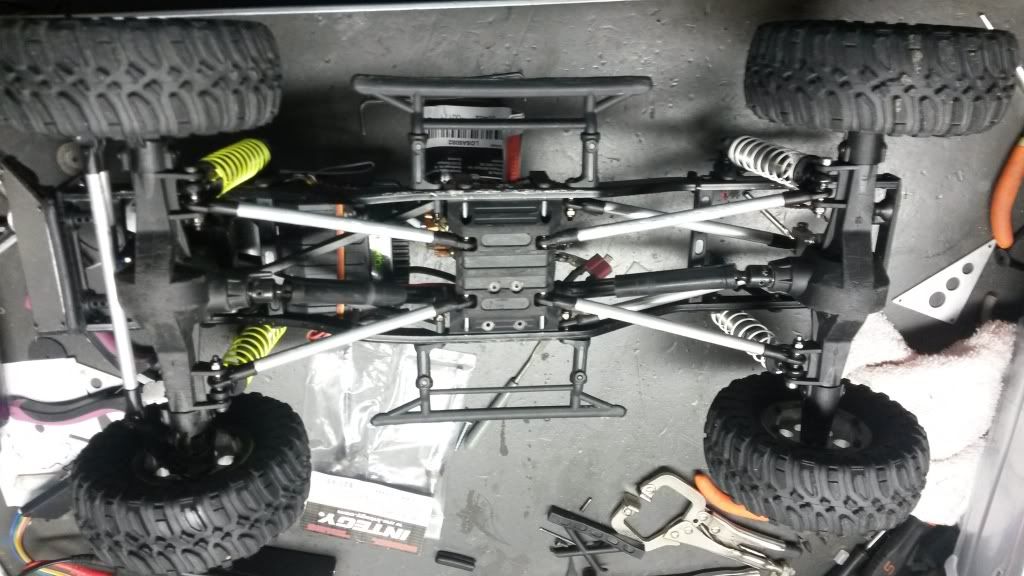 DRIVESHAFTS: There are 2 things you can do to your stock driveshafts to help with rocks and also increase strength. You will notice the driveshafts have those slider grooves or ribs on them..mounted as stock these ribs can get snagged on rocks causing damage to them as well as get hung up in some cases...You can help eliminate this problem by simply turning the driveshafts around so the ribbed part is at the top closer to the transmission..The driveshafts have an alignment mark on them..if they are not aligned properly you will have very bad vibrations and the truck will basicly ride like crap..so make sure the marks are lined up. 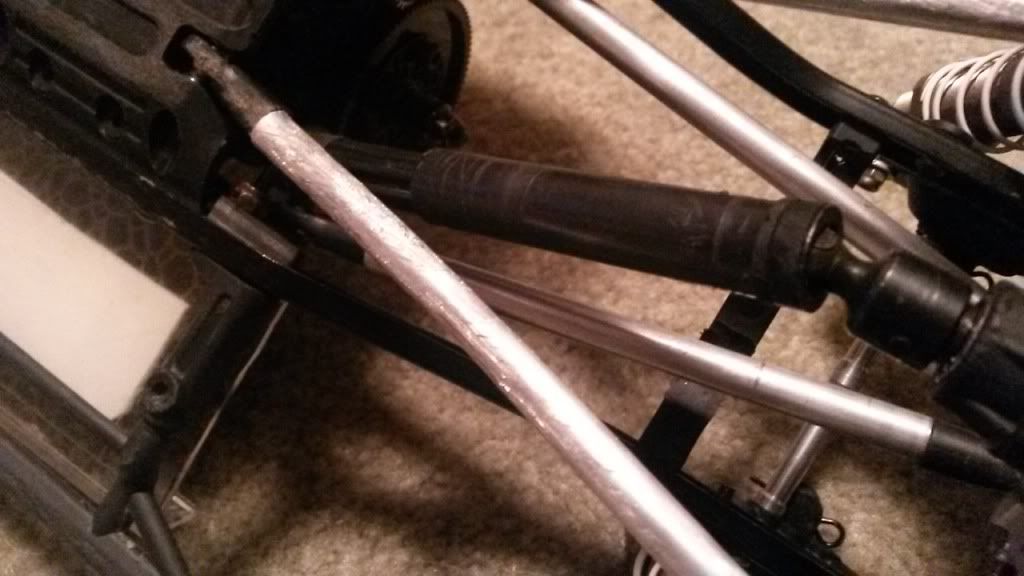 Another thing I would like to mention is pinion angle...this is the relationship between the axle and the driveshaft..from the factory it is not set up with a desirable pinion angle..You don't want too much of an angle or you will break your driveshafts easily and wears the drivetrain at a much faster rate as it creates more stress on the driveshaft joints, the transmission lower bearings and the pinion bearings in the axles...you want the anlge to be as straight as possible and to do this you change the length of you upper links..longer will raise the angle and shorter will lower it..I don't have a before and after pictures of this just yet but I will add them when I get a chance to. A trick to strengthen the stock driveshafts are to slide an aluminum tube or a bolt inside the male end (ribbed section) to strengthen it and be capable of handling more power such as a 3s battery...sorry no pic of this yet. So once again a recap. !.)Aluminum lower suspension links 2.)Aluminum steering links 3.)Upgraded servo (stock or a replacement) 4.) A smaller tooth pinion gear (stock is 20T) 5.) repair your leaking shock 6.)remove the spacers on the shock shafts 7.) tune your shocks. 8.) Gained more rear suspension travel 9.) Gained more front suspension travel and gained articulation 10.) Strengthened the shock hoops to eliminate shock flexing 11.) Relocated the upper shock mount positions. 12.) Adding weight to the wheels to gain traction 13.) Improving steering radius 14.) Choosing a tire and correct foams for maximum performance. 15.) Gained better approach angles on obstacles 16.) Gained more clearance over obstacles 17.) Decreased chances of snagging on sharp rocks 18,) Improved driveshaft/drivetrain reliability. lets look at maybe a round about cost so far Suspension and steering links..(used maybe 35-40 dollars) Stock servo bearing upgrade..(lets say 10 with shipping.) pinion upgrade.(lets say 8 dollars shipped) repairing the leaky shocks ( ie.. seals and maybe Teflon tape..(Lets say 10 dollars) set of upper shock springs and some 15wt oil...lets say 15 dollars.) for the rest misc.nuts and bolts if you don't already have them..maybe 10 dollars at local hardware store for stainless hardware at that. Possible need for universal front axles..(lets say less than 25 for Integy axles such as I have) So if im not mistaken youve spent just over 100 dollars on your truck in upgrades and modifications. I know ,its horrible isn't it...You've spent all that money to gain performance well exceeding that of a just a bolt on rig...Shame on you...lol Now this takes us to the questions of do I want more ???...do I need more????....well this may be an answer of yes for some and for others a no. There are still many changes that can be made to improve performance but you have an advantage now from the start with your truck. Lets take away the upgrades such as the aluminum links and steering links and even the pinion gear but lets leave the rest of what was done in this series. Do we still have an advantage over an out of the box truck or even some bolt on trucks that haven't done the little things as weve covered???..You bet you do and on any level of bolt ons you will always have this advantage...from mild to wild stages..So embrace what you've done and keep a smile on your face because you've earned your added performance....But heres the fun part..were still not done yet.  Last edited by 6sharky9; 01-19-2014 at 06:33 PM. |
|
| |
|
12-14-2013, 05:40 AM
| #14 |
| RCC Addict Join Date: Jul 2013 Location: Planet Earth
Posts: 1,286
|
Id like to discuss a liitle more on motors..The stock 27T is a basic sealed can throw away motor...Much to my surprise it was quite powerful but you cant compare it to a well built quality rebuildable motor..So id like to talk about some options for replacement when the stock motor does finally burn up. These sealed can motors are great for bashers who like to drive around in lots of mud and water and sand because they simply are cheap motors and not much care would go into them..You can clean them out after a day in the mud but the mud has already done damages to this motor and you cant take that back but you keep running it until it quits working or goes up in smoke..For less than 20 dollars you just pop in a new one and off you go. Now we have a choice into rebuildable motors..These can go through mud and water just the same as the sealed can motor but when something goes bad you can simply rebuild it and re use most of the parts..its not really that much more for such type motor and the performance is much greater than any sealed can motor..So now we have many choices to chose from with the most common being either a 27T or a 35T. So whats the difference you might ask..well the number of turns collaborate with how much speed or torque a motor may produce..In general a motor with a lower wind such as the 27T will produce more speed ;where a 35T will produce more low speed power with a reduction in speed. Speed can be a friend on the trails but torque can as well..so now we have to compromise between the 2 to get what we are after. As one can tell even the stock 27T has enough torque to pull the trucks weight with what I consider ease...Its not a torque monster or even a super speed demon but it does get the job done..In my experience with the stock 27T I have never been in a situation where I felt it didn't have enough torque or speed to get me through my obstacles..Not that one may not can use more speed or even more torque but im just using this as an example. Ive since replaced my stock motor while it was still in good operating condition and I can honestly say the change was night and day in the control and speed department despite my going with just a different 27T motor..I chose to build my own motor using parts from motors I purchased on ebay. They are fully rebuildable and has the ability to change timing if needed ...To give more of an example..My stock rubicon still uses the factory gearing of 87T spur and a 20T pinion..With my motor change to the honcho using the same 87T spur gear but with a much lower pinion gear of 16T ; my honcho flat out leaves that rubicon in the dust speed wise as well as overall power/control..So its not that you don't have power because you use a 27T but its more the quality of motor you use that can increase performance in those areas..And personally a quality 27T on a 2s is more than I expected ...Maybe im missing out not trying a 3s but for now I don't feel im missing out on anything..I simply don't need more power or control at this time to meet my needs. Now a quality 35T motor has whats considered a lot more low speed control over a 27T and may be what you need for rock crawling or a heavier truck to get you over the obstacles but this comes at a price to pay in the speed department..Sometimes wheel speed is very important in helping you up a stubborn hill or through that mud or even some truck pulling for that matter. So where is this compromise to have the best of both worlds?..the answer is a simple one but it also changes a game plan with how you up grade you truck. A 3s battery produces a lot more voltage( +3.4 volts) which is going to create more power and torque no matter what motor you use. The only drawback for us stock scx10 owners are the trucks ability to handle that much more power reliably and not constantly break things. Our trucks do come with a slipper clutch that can be adjusted so it slips before possibly breaking something but in doing so are you really benefitting from extra power if you have to limit it???..I personally don't think you are..Most tend to tighten the slipper clutch so you can get all the power you can even from a 2s battery...I do the same thing but I haven't experienced anything breaking so far and frankly I like that concept. A 3s does have other advantages like longer run times from even batteries with less capacity than a 2s and I personally see no problems with that myself. I currently get just over 1 hr using a 4800mah 2s battery where as someone with a 3000mah 3s battery may experience well over one hour..Time ultimately depends on how you are using your trucks power, and a 3s uses power more efficiently. With this being said and known already by many ;its not a bad thing to use a 3s battery but you must be prepared to spend a bit more on your project so it can handle it to its fullest potential..The stock driveshaft mod ive described has been know to handle a 3s in most cases but most choose to purchase steel driveshafts..Its a bit more to do so but it seems to be the popular choice..You also have other areas to worry about using a 3s..The transmission is not engineered to handle the power of a 3s nor are the stock axle gears and maybe the axle shafts.. even though some do get by with it..Take the gamble if you can afford the upgrades is all I can recommend; or do pretty much the same thing on a 2s and save some money...Choice is yours. I haven't personally used a 3s and not sure when or if I even will ;but all I will say about using 3s power or more is not to be surprised if you end up having to spend more on upgrades to handle it. Now comes a difference in how you must gear the truck for using a 3s...Well in all honesty I really cant comment much on that because I have zero experience with gearing for a 3s ...but most gear so you have the same wheel speed you had with a 27T on a 2s battery but have the benefit of the added low speed control. So ill leave this up to the user what they want to power their trucks with. For those with an RTR AE-2 ESC you can use a 3s battery providing you purchase an exteranal bec to do so safely...your servo will also be more powerful as it will increase voltage to it as a side benefit rather you use 2s or 3s Well only 2 more pages left to cram in all im wanting to cover ..Im thinking the last page I will show a little more on my own personal Honcho as Im extremely proud and impressed with its performance..Ive done all the tips and tricks i mentioned here and since then have advanced even further with it...I guess my only true comparison of improvements has been putting it up against my stock rubicon with the same challenges and Ive based my improvements on the honcho flat out performs much much better than the stock rubicon in all areas...I left the rubicon stock for that purpose for so long to have something to compare to...Now I guess I need more of a challenge with some competitions but unfortunately its not present in my area to do that. Thanks for watching. Last edited by 6sharky9; 01-19-2014 at 06:54 PM. |
|
| |
|
12-14-2013, 05:40 AM
| #15 |
| RCC Addict Join Date: Jul 2013 Location: Planet Earth
Posts: 1,286
|
Center of gravity and balance
Last edited by 6sharky9; 12-16-2013 at 10:04 AM. |
|
| |
|
12-14-2013, 05:40 AM
| #16 |
| RCC Addict Join Date: Jul 2013 Location: Planet Earth
Posts: 1,286
|
A look at my personal Honcho RTR that I have applied these tips and trick to as well as went farther with some upgrades...Some maybe helpful and some not really but just wanted it. Inside 6sharky9's SCX10 Honcho RTR Last edited by 6sharky9; 01-05-2014 at 03:51 AM. |
|
| |
|
12-14-2013, 12:31 PM
| #17 |
| Quarry Creeper Join Date: Nov 2010 Location: Canada
Posts: 383
|
Please explain to me why axial put the limiters on the shocks in the first place. Also the 3s vs 2s debate. Set the slipper and gear way down and you wont break anything. You will just have more speed, torque and control. Like you said, its how you set it up and use it. |
|
| |
|
12-14-2013, 01:02 PM
| #18 | |
| RCC Addict Join Date: Jul 2013 Location: Planet Earth
Posts: 1,286
| Quote:
Youre right..the slipper is there for a reason and can save you from breaking something even if you want to use a 6s battery...My slipper is locked down and have had no issues to date with anything breaking with 2s power...but im not writing this up to debate this versus that.,This is based on my almost 30years of rc experience and my current experiences with the scx10 thus far.,,Im sure you will find I will cover using a 3s at some point and some more changes one should consider if doing so as precautions to the added power as well as added benefits to using a 3s. | |
|
| |
|
12-14-2013, 03:46 PM
| #19 |
| Pebble Pounder Join Date: Dec 2013 Location: yakima
Posts: 120
|
Sub'd.
|
|
| |
|
12-14-2013, 08:21 PM
| #20 | |
| RCC Addict Join Date: May 2008 Location: Southern,WV
Posts: 1,136
| Quote:
| |
|
| |
|
 Stock SCX10 Performance Tech. - Similar Threads
 | ||||
| Thread | Thread Starter | Forum | Replies | Last Post |
| Vanquish Currie axle vs stock performance | uclabruins89 | Axial SCX-10 | 3 | 07-05-2013 01:18 AM |
| Does angling the shocks on scx10 help with performance | raiders32 | Axial SCX-10 | 4 | 11-17-2011 08:46 PM |
| Stock RTR Honcho Performance*Questions. | Bryan732 | Axial SCX-10 | 7 | 07-04-2010 06:21 PM |
| Stock Bully ARTR Kit Performance Question | Paul97 | RC4WD Bully | 11 | 01-28-2010 02:08 PM |
| stock cr-01 tire performance | Defender | Tires and Wheels | 1 | 06-18-2008 09:08 AM |
| |


 Linear Mode


