| |
 11-28-2010, 07:10 PM
| #61 |
| Pebble Pounder Join Date: Aug 2010 Location: Chattanooga
Posts: 112
|
ALMOST FORGOT... I made my license plate. I used a base of Styrene, then a printed out photo of my Tennessee tag, then the last (top) layer is the frame. A final couple coats of clear and voila! I'm pretty happy with the result.  |

|  |
| Sponsored Links | |
| | |
|
11-29-2010, 08:10 AM
| #62 |
| Pebble Pounder Join Date: Aug 2010 Location: Chattanooga
Posts: 112
|
Opinions needed! I'm at a crossroads here. It has to do with my roof rack lights. I currently have the wiring going to a small box secured to the roof rack that houses the excess wiring, on/off switch and battery power. I am considering removing the box and running the wiring under the rack and through the sunroof where I could velcro the battery inside the body and place the switch somewhere else. The reason is so that I can run without anything "strapped" to the roof rack. Or... Leave the wiring inside a NEW box that looks more scale as seen in the photo in the above post (used to prop the body up in the photo). Any thoughts or opinions? Thanks, -Steven |
|
| |
|
11-29-2010, 08:57 AM
| #63 |
| Quarry Creeper Join Date: Jul 2007 Location: Dallas, TX
Posts: 441
|
I vote for the NEW box that looks more scale as seen in the photo in the above post.
|
|
| |
|
11-29-2010, 09:10 AM
| #64 |
| '08 2.2 National Champ  Join Date: Nov 2006 Location: UTRCRC
Posts: 5,585
|
This this is easily one of my favorite builds on the site! I love the attention to detail.
|
|
| |
|
11-30-2010, 06:08 AM
| #65 |
| Rock Stacker Join Date: Oct 2008 Location: midland
Posts: 62
|  that all i can say,I'm speechless that all i can say,I'm speechless
|
|
| |
|
11-30-2010, 07:01 AM
| #66 |
| Pebble Pounder Join Date: Aug 2010 Location: Chattanooga
Posts: 112
|
Due to overwhelming response ;) I'm going with putting the wiring in the new box instead of running through the sunroof into the body. Got it all run and placed. The new scale Pelican style case is secured to the roof and I have another coming in the mail to set next to it. Waiting on my new wiring set ups from Bill's RC Lighting for my main running lights as well as my bumper off road lights and rock spotter lights that will be on the chassis. Stay tuned! Cheers, -Steven |
|
| |
|
11-30-2010, 07:32 AM
| #67 |
| RCC Addict Join Date: May 2010 Location: The heart of the south
Posts: 1,138
|
Gotta say you do amazing work. I just have a couple points of advice from my experience. As cool as you HiLift Jack mount looks and works, we have to face the fact that our scalers roll over a LOT more than our real ones and that jack won't survive many of them. I would also get you winch hook off the front by either taking it up to the roof rack like a lot of people do in prep for using it or at least to the top of your bumper. I have lost 2 Kongs and broked 2 cheapies by leaving mine either dangling of attached to the lwer bumper. SInce I moved mine to the top and moved my HiLift inside, not a broken or lost one. 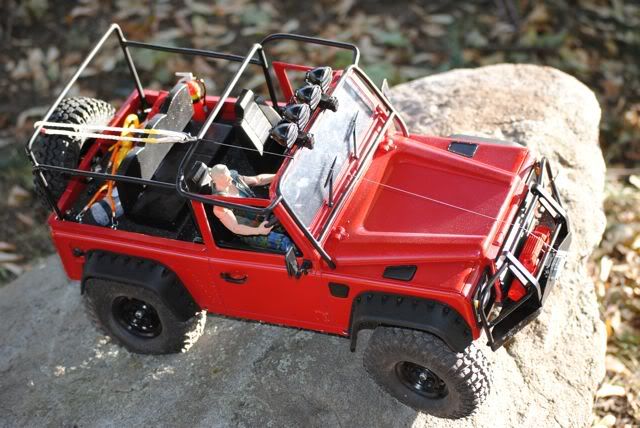 |
|
| |
|
11-30-2010, 07:43 AM
| #68 | |
| Rock Crawler Join Date: Oct 2009 Location: SO CAL
Posts: 598
| Quote:
It's clear that you are an amazing craftsman, and this is an awesome build with insane detail and precision! I love it, minus the zebra | |
|
| |
|
11-30-2010, 08:03 AM
| #69 | |
| Pebble Pounder Join Date: Aug 2010 Location: Chattanooga
Posts: 112
| Quote:
Tell me more about why to move the winch from the bumper. You do not recommend even attached to the recovery point on the bumper like in the photo below. In full size, I would never have my winch out of reach... but this is not full size... I ask all these questions because this IS my first project, and I built it to resemble a real truck.  | |
|
| |
|
11-30-2010, 08:32 AM
| #70 |
| RCC Addict Join Date: May 2010 Location: The heart of the south
Posts: 1,138
|
As my D90 was for me. As for the hook, if you look at your approach angle, you will typically hit the rocks first with your front bumper and if the hook is dangling or attacked to the swivle, it is going to hit first. I now go over my nose on all of my winches or at least to the stinger if there is one. |
|
| |
|
11-30-2010, 08:35 AM
| #71 | |
| Pebble Pounder Join Date: Aug 2010 Location: Chattanooga
Posts: 112
| Quote:
| |
|
| |
|
11-30-2010, 09:33 AM
| #72 |
| Quarry Creeper Join Date: Dec 2009 Location: Brentwood
Posts: 341
|
amazing work! good painting skills, so much detail and looks just like the real one! good job! |
|
| |
|
11-30-2010, 08:39 PM
| #73 |
| Pebble Pounder Join Date: Aug 2010 Location: Chattanooga
Posts: 112
|
I got my undercarriage spotting lamps from Stefan. They will be perfect. These will be mounted to the chassis aiming down. On my 1:1 I use these for night runs and it helps my spotter to see where the obstacles are. I have just painted the insides silver. Will mount soon as my LEDs arrive.  I went to the LHS and got another package of tiny bolts so that I could finish up the roof rack. It is FINALLY DONE!!! All 8 brackets are in place and rack is for the most part a permanent fixture of the body.  The 99¢ Office Depot boxes for the roof rack have been replaced by new wicked cool Pelican style hard case (made for 12" GI Joe). I have modified it for the roof rack lighting set up and is bolted to the roof rack. I have another that goes right next to this one. It will not be bolted on.   Here is just a couple shots of the rear end for the heck of it.   And then there is the obligatory flex shot.  Thanks for looking! Cheers, -Steven |
|
| |
|
11-30-2010, 10:11 PM
| #74 |
| Rock Crawler Join Date: Jan 2006 Location: Dallas
Posts: 606
|
Insane skills! The attention to detail is outstanding! Cant wait to see more. Trost |
|
| |
|
11-30-2010, 10:39 PM
| #75 |
| Pebble Pounder Join Date: Oct 2010 Location: Dunedin FL
Posts: 146
|
Just an awesome build man, great detail. I bet if you put it next to your 1:1 at the right angle it would be pretty toough to tell which one was the real one...
|
|
| |
|
12-01-2010, 10:45 AM
| #76 |
| I wanna be Dave Join Date: Dec 2006 Location: Where the sheep run scared.
Posts: 3,008
|
I am a jeep guy but damn this is nice! |
|
| |
|
12-01-2010, 11:40 AM
| #77 |
| RCC Addict Join Date: May 2010 Location: The heart of the south
Posts: 1,138
|
Send me your address and I will send you a short piece of black wire loom for the wires in your roof rack. Really adds a nice touch. Here is what it looks like: Split woven wire loom material |
|
| |
|
12-01-2010, 03:41 PM
| #78 |
| Rock Stacker Join Date: Apr 2010 Location: De Soto, Ks
Posts: 82
|
Just wow..... subscribed, but I need a tutorial on the soldering. Are you just soldering it like normal wire? Thats just amazing. |
|
| |
|
12-01-2010, 03:56 PM
| #79 | |
| Pebble Pounder Join Date: Aug 2010 Location: Chattanooga
Posts: 112
| Quote:
| |
|
| |
|
12-01-2010, 03:57 PM
| #80 | |
| Pebble Pounder Join Date: Aug 2010 Location: Chattanooga
Posts: 112
| Quote:
Good luck! http://www.youtube.com/watch?v=NwVautBltfU | |
|
| |
 |
| |


 Linear Mode


