| |
 01-19-2007, 09:17 AM
| #41 |
| RCC Addict Join Date: May 2006 Location: California
Posts: 1,361
|
Thanks a lot for the quick response. Ill get the steel ones later once i get the integy motor. Ill have some pics and i should get moving on this after tonight.
|

|  |
| Sponsored Links | |
| | |
|
01-19-2007, 03:28 PM
| #42 |
| Newbie Join Date: Oct 2006 Location: Northampton
Posts: 7
|
this looks like a nice build im still waiting to get my hands on a tranny jus to get mine to a runner keep up the nice work |
|
| |
|
01-19-2007, 03:50 PM
| #43 |
| RCC Addict Join Date: May 2006 Location: California
Posts: 1,361
|
Thanks. If you don't have the part #'s i can geve em to you. Or tell you what you need if you want. Thanks for the compliment.
|
|
| |
|
01-19-2007, 06:03 PM
| #44 |
| RCC Addict Join Date: May 2006 Location: California
Posts: 1,361
|
I have a question on a better way to put the bottom steering link. I have seen people run it so it doesn't affect the approach angle. This is the way i have it now. They aren't the best pics but they should get the point across. And again does anybody know what type and size of tubing to use to cover the links so they don't bend? Thanks. 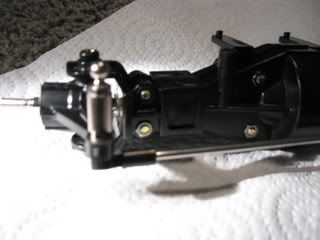 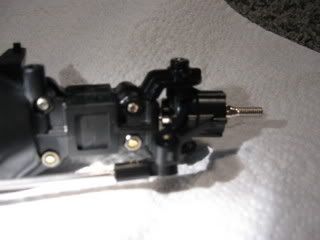 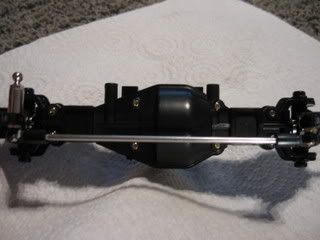 |
|
| |
|
01-19-2007, 06:28 PM
| #45 | |
| Rock Crawler Join Date: Jun 2006 Location: Oak Lawn, Illinois
Posts: 817
| Quote:
Move it up the the top istead of on th bottom | |
|
| |
|
01-19-2007, 06:53 PM
| #46 |
| RCC Addict Join Date: May 2006 Location: California
Posts: 1,361
|
I need the long one on the left for the steering also though.
|
|
| |
|
01-19-2007, 11:07 PM
| #47 |
| RCC Addict Join Date: May 2006 Location: California
Posts: 1,361
|
I went to the hobby store and got the jeep body, JB Weld for the tranny, and the screws to hold the tranny in place. I still need a slipper clutch and plastic drive yokes. I'll get them off the internet. Ill post some pics in the morning because im tired now.
|
|
| |
|
01-20-2007, 01:10 AM
| #48 |
| Pebble Pounder Join Date: Dec 2006 Location: Peoria, AZ
Posts: 162
|
I wouldn't bother with the slipper. Just use the slipper eliminator. http://www2.towerhobbies.com/cgi-bin...1p?&I=LXJK67&P= |
|
| |
|
01-20-2007, 07:10 AM
| #49 | |
| Pebble Pounder Join Date: Aug 2006 Location: Next door to Louisville, KY
Posts: 103
| Quote:
DE | |
|
| |
|
01-20-2007, 08:15 AM
| #50 |
| Pebble Pounder  Join Date: Apr 2006 Location: Pleasant Grove
Posts: 103
|
Yes, run a slipper. I went through too many axles without the slipper.
|
|
| |
|
01-20-2007, 08:56 AM
| #51 |
| RCC Addict Join Date: May 2006 Location: California
Posts: 1,361
|
Ok do you know where i can get one and how to adjust it? Thanks.
|
|
| |
|
01-20-2007, 11:23 AM
| #52 |
| Pebble Pounder Join Date: Apr 2006 Location: Pleasant Grove
Posts: 103
|
HobbyTown in Roseville has the parts for the new style slipper. You have to make them look for it though. It's the same slipper that fits one of the Traxxas nitro trucks. I don't remember wich one . PM 1tom2go on this board, he just bought one yesterday.
|
|
| |
|
01-20-2007, 12:53 PM
| #53 |
| RCC Addict Join Date: May 2006 Location: California
Posts: 1,361
|
I was just there yesterday and he said that they have no parts for the new stamped yet. I have to get all of the little metal parts too. The whole slipper clutch package. They are all out of a bunch of traxxas parts too. Like the yokes.
|
|
| |
|
01-20-2007, 06:54 PM
| #54 |
| RCC Addict Join Date: May 2006 Location: California
Posts: 1,361
|
Here's the jeep body. It's kinda hard to see. And i found a way to put the steering link up higher. 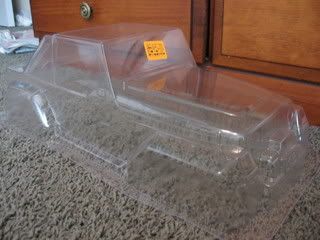 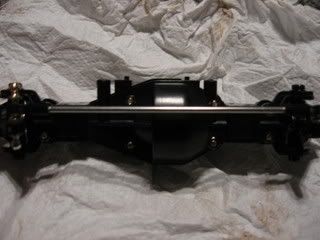 I have a question too. What screws do i use to attach the silver link mount to the little silver thing. I tried this screw but it was too long. 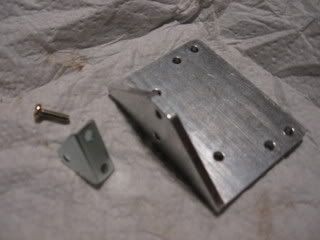 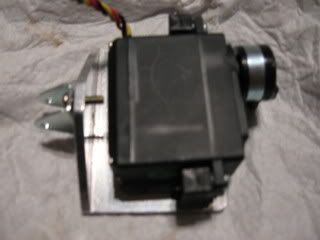 |
|
| |
|
01-20-2007, 06:56 PM
| #55 |
| 2006 2.2 National Champ   Join Date: Dec 2004 Location: Big Bear Lake
Posts: 8,328
|
You can flip the screw around and put the nut on from the axle bracket side. Everything should still clear with the upper links.
|
|
| |
|
01-20-2007, 08:20 PM
| #56 |
| Quarry Creeper  Join Date: Jan 2007 Location: damascus
Posts: 209
|
nice build so far, i like the rims.  |
|
| |
|
01-20-2007, 08:32 PM
| #57 |
| RCC Addict Join Date: May 2006 Location: California
Posts: 1,361
|
Thanks for the tip BENDR and thanks for the compliment shocker. The rims are hpi black spike wheels. I just tried it and it worked. I got the whole front axle together. Last edited by Norcal crawler; 01-20-2007 at 08:54 PM. |
|
| |
|
01-21-2007, 01:46 PM
| #58 |
| Nor-CalRCRC  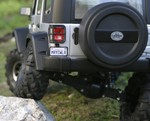 Join Date: Dec 2006 Location: Monterey Peninsula
Posts: 745
|
In the pic of the front axle it shows a way to gain a little more clearance with limited parts needed. Another "My first crawler thread" I used parts that come with the tlt kit as well as a couple of 3mm screws and some stainless steel tubing found at the local hardware store. If you look closely,,, you will see the small aluminum spacers used to raise everything up. The spacers came with the kit. I also used the rod ends and the threaded rods that come with the kit. I found them to be the correct length and no modifications were necessary. I cut the stainless tubing to fit between the rod ends with a tight fit. I used stainless because I felt that any additional weight would be about as far forward as possible along with being pretty low. The stainless will also hold up better than aluminum. I found this setup to be about as high as I could run everything and still have it below a sufficiently long servo horn. The horn is plenty long and i have full throw +. I hope this helps. |
|
| |
|
01-21-2007, 03:00 PM
| #59 |
| RCC Addict Join Date: May 2006 Location: California
Posts: 1,361
|
Yes it helps a lot. Thanks for the info.
|
|
| |
|
01-22-2007, 08:47 AM
| #60 | |
| Newbie Join Date: Oct 2006 Location: Northampton
Posts: 7
| Quote:
how much 'roughly' does one of the trannys come to wen done with the seperate part numbers tho? | |
|
| |
 |
| |


 Linear Mode


