| |
 10-09-2008, 12:20 PM
| #221 | |
| I wanna be Dave Join Date: Aug 2007 Location: santa monica
Posts: 3,687
| Quote:
On my hilux crew cab I already have rock rash on it... wind blew them over when the paint was drying, lol... | |

|  |
| Sponsored Links | |
| | |
|
10-09-2008, 12:22 PM
| #222 |
| Sinking with the ship   Join Date: Mar 2005 Location: El Capitan...sole survivor and sinking fast
Posts: 8,864
|
Hit MOcrawler (Terry) up for a Canback, problem solved  |
|
| |
|
10-09-2008, 12:45 PM
| #223 | |
| RCC Addict Join Date: Dec 2007 Location: London
Posts: 1,950
| Quote:
Thats cheating I was thinking something like this?  I could learn to sew | |
|
| |
|
10-09-2008, 12:55 PM
| #224 |
| Rock Crawler Join Date: Jun 2007 Location: Great Britain
Posts: 935
|
Oh and not rebuilding the roof isn't cheating? Come on pull your finger out and do it properly |
|
| |
|
10-09-2008, 01:01 PM
| #225 | |
| RCC Addict Join Date: Dec 2007 Location: London
Posts: 1,950
| Quote:
Can't be arsed. Although a little part of me can | |
|
| |
|
10-09-2008, 04:13 PM
| #226 |
| RCC Addict Join Date: Dec 2007 Location: London
Posts: 1,950
|
Right i hope he doesn't mind me posting this, But i have just recieved some great information by Private message from member 'Sebring MGB' 'Quote' Ive got this ref image... this was my "bible" if you will.... Im not sure if youre past this point yet:  THe problem with my referance images, is Mike's truck is bright white, so with the glare i actually missed a bunch of stuff... I had it to what i thought was "Done" then saw his truck again in person and thought "WHat the hell man... Did you add all this extra detail to the body of your truck last week? It isnt in my pictures!" So really most of my Referance came from looking at the 1:1 then googling 87 4runner pictures and looking at the same part on different colour trucks. I ONLY used pictures of 87 4runners... Just to be sure. Then, i could sometimes see the detail on the pictures i took of his truck.... The only real benefit they had, was i took the pictures at full zoom to minimize distortion. So i could see where detail A was in relation to detail B sort of thing.... Regarding the canopy strenthening.... Ill send you some pics to your email of the inside of it.... Basically, the whole thing is double-wall .060 styrene... So .12... (3mm for you lucky bastards who arent forced to use the TERRIBLE American measuring system day to day) Then basically the back wall, and front wall of it are solid .25 (6.5mm) styrene frames. I added another frame in the middle for a little extra support. the lower frame of the canopy window is .1" (2.5mm) to give the Glass area some support too.... Hopefully that makes sense... or the pictures will help explain better.... A paintfull tip, would be enact the "drop test" if you plan on running this thing... Ive dropped mikes truck, and parts of it a hundred friggin times. Both accidentally and intentionally. If it cant withstand that kind of abuse, its going to crumble under the weight of an upsidown crawler.... Since its Far easier to fix stuff, and reinforce before youre done, dont be afraid to give it the odd test... Drop it, rap it with your knuckles, twist it, bend it... Kind of passivly try to break it as you build... It saves you the painfull realization a certain hjount wasnt strong enough AFTER paint is on. Im not saying push your whole assembled truck off the table and keep fixing it till it doesnt break... But try to make something you dont feel like you have to be "carefull when you hold it"... Gussets also help A LOT. If you have a butt jount that you are kinda scratching your head about, wondering how itll hold up..... Put a couple little triangular gussets along the seam... Most of the load will then transmit to those, and they will prevent the seam from flexing enough to allow it to split. Im not sure how framiliar you are with general building techniques, but strategically assembling stuff is a big deal too... For instance, youll probably want to glue the top edges of the wall panels to the underside of the roof panel, not roof edges to the inside of the walls.... That way when the load of the truck in on the roof, the load is forcing the roof onto the walls, if you build it the other way, you are just relying on the sheer strength of the connection you made... the walls wont support the roof, and its more likely the roof panel will "pop in". Its possible to miter joint that connection, but the chances of getting the approprate angles without gaps is lower... so i dont see how it would be stronger unless you are CERTAIN your cuts are exact. Also, try to make as few connections as you possibly can. A solid, cut peice of styrene is always stronger than a jointed one. Ill email you some pics in a second here... I hope you find some of this helpfull! :thumbsup: A huge thank you from me for all of this info regarding joining and strengthening Styrene. You didn't have to do this but you took the time to explain to me the in's and outs. I really appreciate it hence my reply in the thread as opose to a PM. Thanks Matey i'm going to give it a good go now. neil |
|
| |
|
10-09-2008, 05:10 PM
| #227 | |
| I wanna be Dave Join Date: Aug 2007 Location: santa monica
Posts: 3,687
| Quote:
The 4runner he's working on is unbelievable... I know it will inspire you to great things Neil. | |
|
| |
|
10-09-2008, 06:03 PM
| #228 |
| RCC Addict Join Date: Jan 2008 Location: www.rccrawler.com
Posts: 1,113
|
I need to be on heroin to be as patient Very nice mate !!! The older photos the grill reminded me of the old Ford Cortina for some reason .... |
|
| |
|
10-10-2008, 02:49 AM
| #229 |
| Newbie Join Date: Jul 2008 Location: Glendale
Posts: 6
|
My pleasure. ... I hope its a help to you... Im not real good at explaining things with these stupid WORDS. . The way i did the edges of the canopy in that thread is unnescissary for the 4-runner top though, as the corner is sharp enough that if you use thick styrene, you can fillet that edge to get the required curve. Looking foreward to seeing this thing done man.. Its looking real good! Looks like everything else took the fall off the workbench in stride. :nice: And now, I'll return to my hiding spot. |
|
| |
|
10-10-2008, 11:26 AM
| #230 |
| RCC Addict Join Date: Dec 2007 Location: London
Posts: 1,950
|
Well i have started to fab up the new topper, I had to really Got the basic shape, time to start sanding the round profile and then add the window moulding details. It should be alot stronger thanks to Ben for the info Also chucked a coat of primer at the shell and thats looking good now to. Couple of little spots that need attention but no real dramas to worry about. 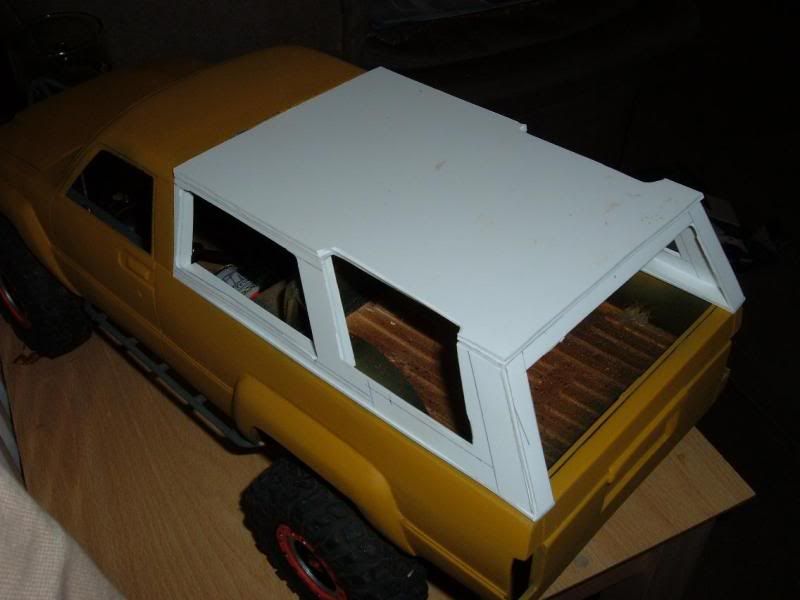 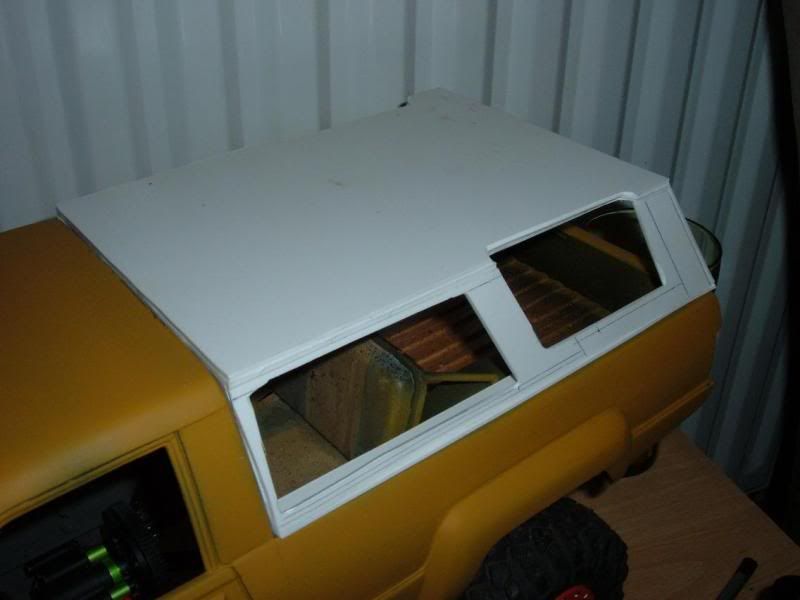 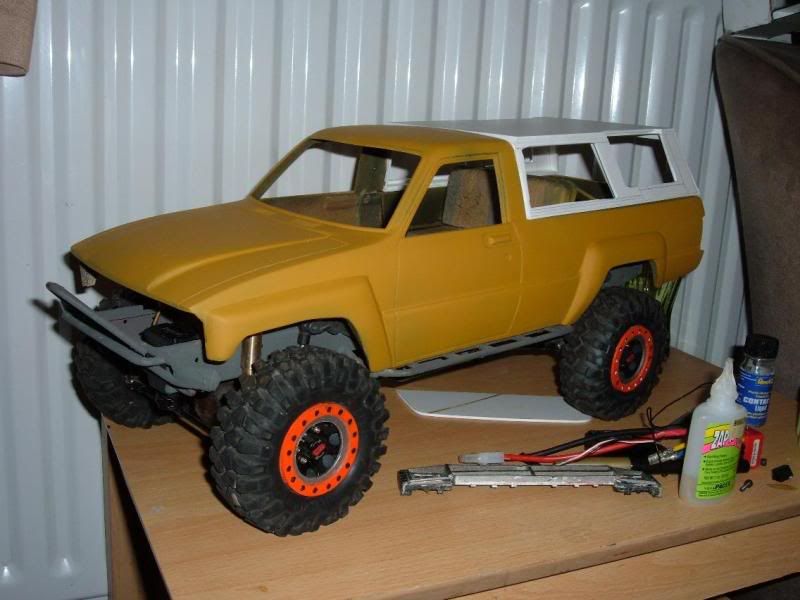 |
|
| |
|
10-10-2008, 01:26 PM
| #231 |
| RCC Addict Join Date: Dec 2007 Location: London
Posts: 1,950
|
Got the Frames round the window and threw some primer at it. I'm impressed now and Happy again. Its not fixed to the rest of teh body yet because i need to tidy the rear seats and floor are first. Hopefully get the top coat on it this weekend. 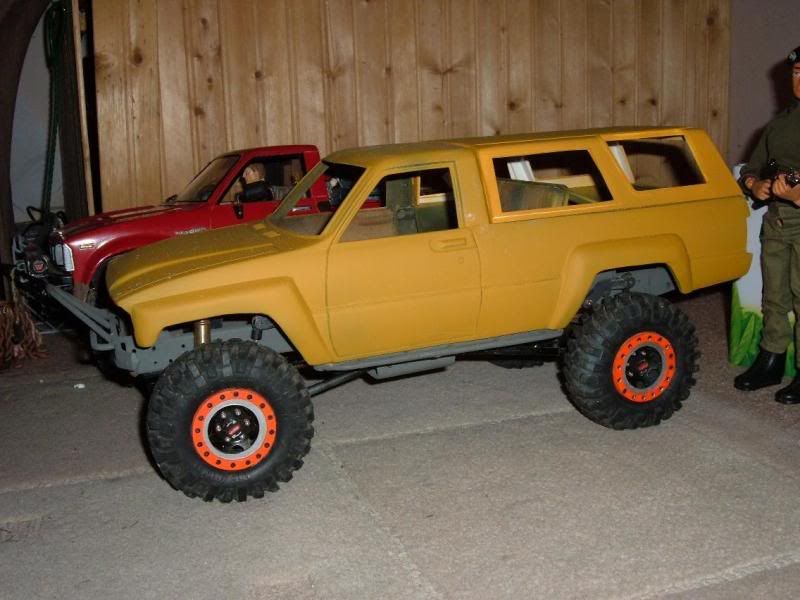 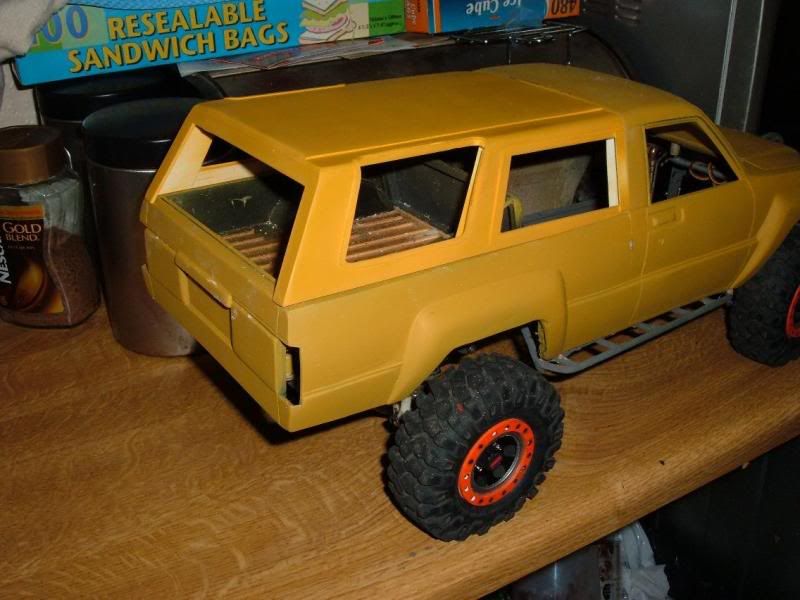 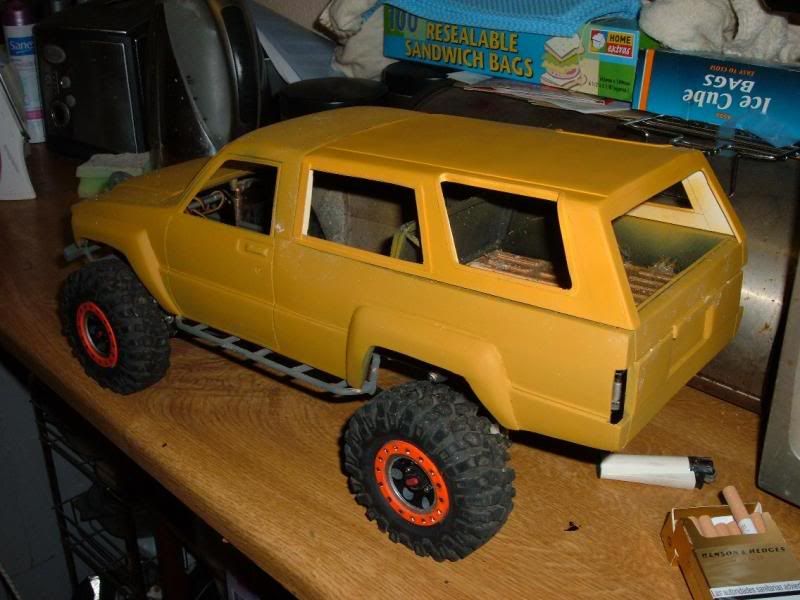 Was having a tidy up earlier and found my old action man from 1978! He can stand guard for now  |
|
| |
|
10-10-2008, 01:52 PM
| #232 |
| I wanna be Dave Join Date: Aug 2007 Location: santa monica
Posts: 3,687
|
quick recovery! Looks fantastic!
|
|
| |
|
10-10-2008, 01:58 PM
| #233 | |
| RCC Addict Join Date: Dec 2007 Location: London
Posts: 1,950
| Quote:
Been Busy | |
|
| |
|
10-10-2008, 02:04 PM
| #234 |
| Rock Crawler Join Date: Jun 2007 Location: Great Britain
Posts: 935
|
Oi stop playing with your truck and make my dash board I the new top looks really good. I'm trying to decide if I should use a new Toyota tundra or a 4runner to tow my hilux around when it's done. You really should make a trailer to tow around some of your other yotas around with this. |
|
| |
|
10-10-2008, 02:09 PM
| #235 |
| Quarry Creeper Join Date: Jun 2008 Location: Portsmouth UK
Posts: 391
|
Looking neater and more solid Neil. Quick work! i would still be sitting looking at it |
|
| |
|
10-10-2008, 02:12 PM
| #236 | |
| RCC Addict Join Date: Dec 2007 Location: London
Posts: 1,950
| Quote:
Just getting some more practise before i tackle your dash And i just couldn't leave it sitting there staring at me. You know how it is. I bought the Paint for the top coat today. I couldn't find a descent Toyota Grey metallic so i had to go with a Ford Colour instead. Should look pretty sweet all the same. | |
|
| |
|
10-10-2008, 02:15 PM
| #237 | |
| RCC Addict Join Date: Dec 2007 Location: London
Posts: 1,950
| Quote:
Only took about 4 Hours to make the Top Part from scratch. I still have a couple more strengthing pieces to glue inside yet but i was itching to get some paint on itto see what it looked like. I tested all those elctrics you sent me last night and they all work a treat. Thanks again for that Al | |
|
| |
|
10-10-2008, 04:14 PM
| #238 |
| Rock Crawler Join Date: Aug 2007 Location: usa
Posts: 593
|
your are not from this planet neil |
|
| |
|
10-10-2008, 08:54 PM
| #239 |
| Rock Stacker Join Date: Mar 2008 Location: socal rock garden
Posts: 80
|
Great job on the top looking like its plenty strong as well |
|
| |
|
10-11-2008, 04:04 PM
| #240 |
| RCC Addict Join Date: Dec 2007 Location: London
Posts: 1,950
|
One Word. MEAN! This thing has come out so much better than i thought it would. I didn't think i had it in me. Got the Top coat on good choice in my eyes. Will take some outdoor shots tommorow my camera doesn't cut it indoors.  It's not perfect but it aint far off it. I'm in a Quandry now because i said i'd sell it to she who must be obeyed but after seeing it painted i'm liking it even more than my other Hilux. So i either Keep em both and take the Wroth or sell the other Hilux? |
|
| |
 |
| |


 Linear Mode


