| |
 03-28-2011, 12:38 AM
| #41 |
| Quarry Creeper Join Date: Feb 2011 Location: Vancouver Wa, USA
Posts: 209
|
Done ! I just so happen to have some of those extra parts ( thanks igrind808 ) and I like the body mounts on top too !  Thanks for the ideas ! Keep 'em coming ! Thanks for the ideas ! Keep 'em coming ! Last edited by XtrmTJ; 03-28-2011 at 10:09 AM. |

|  |
| Sponsored Links | |
| | |
|
03-28-2011, 12:13 PM
| #42 |
| RCC Addict Join Date: Jan 2011 Location: Wheat Ridge
Posts: 1,315
|
Lookin great so far man! Totally diggin all the mods and it looks like it handles well on the rocks. I "borrowed" your dual servo mount design and got my rig set up and some new shoes too |
|
| |
|
03-28-2011, 01:06 PM
| #43 | |
| RCC Addict  Join Date: Mar 2010 Location: Colorado Springs, Co
Posts: 1,441
| Quote:
| |
|
| |
|
03-28-2011, 05:29 PM
| #44 |
| Rock Stacker Join Date: Mar 2011 Location: Parker
Posts: 82
|
Heres My Torque Im new to crawling and bought a torque.. Then I took it all apart and this is what happened 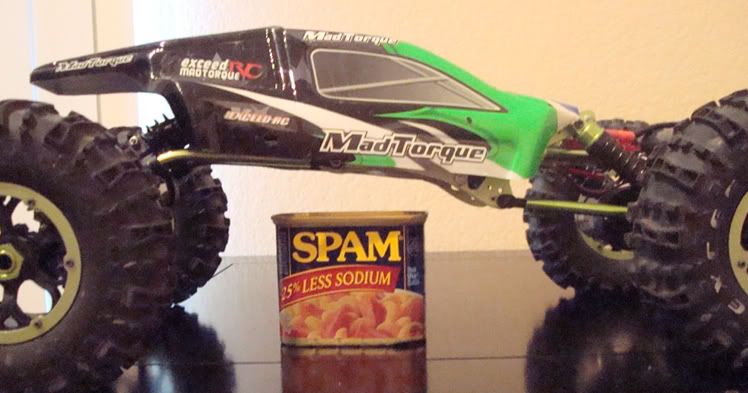 Enjoying your thread.. Keep up the good work.. Maybe I'll see you around here in Colorado |
|
| |
|
03-28-2011, 08:16 PM
| #45 | |
| RCC Addict Join Date: Mar 2010 Location: Colorado Springs, Co
Posts: 1,441
|
Nice, can I see a picture of the chassis naked please  I wanna see how you cut the chassis, looks crey clean. Now all you need is some 3.c wheels and some IMX rubicons and you could comp with it... I wanna see how you cut the chassis, looks crey clean. Now all you need is some 3.c wheels and some IMX rubicons and you could comp with it... Quote:
| |
|
| |
|
03-28-2011, 08:33 PM
| #46 |
| RCC Addict Join Date: Mar 2010 Location: Colorado Springs, Co
Posts: 1,441
|
After having her out on the rocks I was noticing serious issues with the power the wheels put down to the rocks and the wheels seam to bounce and just be really slugish... I couldn't quite peg it down what the issues was... Well I got it in my head that a 16in Track and a 17in WB didn't seam to be so great... so I found these on e-bay for $10... Notice how much shorter they are... this brought my track width into 14 3/4 inches with the axial 40 series wheels.  Lets do a comparison... you will notice how much closer the wheels look together. Looks nicer I think... well I slapped a battery in it and drove around the house a touch and my jaw almost hit the floor... it was alto more stable, and didn't feel like a boat. The wheels no longer hop and jitter on the traction board and for some reason I've got all the power I need now. After thinking about it the longer down a shaft you have to travel on a rotating mass the more torque you loose so by removing about 3/4 of and inch on each end of the axle this helps to increase the motor efficiency if I remember high school physics correctly. Another benefit - the narrower track will give less axle drag on rock edges. Last huge benefit --- those 2 $15 exceed servos feel like 1 - $100 hitech servo... again, moving the wheel closer to the pivot point will require less torque to move the wheels left to right... Before -  After -  New shots with the body and stickers...   Next up is an experimental dig that I'm working on... In theory and according the the research I did today, it should give me exactly the holding power I need in the rear and even give me some new features... (Crab Walk on a budget) Till Next time. Almost forgot, my order from Crawler Inovations showed up... humm... this might be the project for this weekend as I've never done this before...  Last edited by Abavuso; 03-28-2011 at 08:45 PM. |
|
| |
|
03-28-2011, 10:16 PM
| #47 |
| RCC Addict Join Date: Mar 2010 Location: Colorado Springs, Co
Posts: 1,441
|
I need to pick someone's brain to finish this up... my test worked but I can't figure out the last part... Basically I'm using the switch to rout the current through the POT to physically slow the current the the rear motor at the preset speed persay... What i also want to happen when the switch is set is for the current to switch the rotation of the motor. So in theory, use the POT to dial down the power to the rear motor when the DIG is enabled spinning rear ward to hold your wheels locked. It would take some playing with to make it work correct but this is what I would like to do. So how do I reverse the current?  |
|
| |
|
03-28-2011, 10:56 PM
| #48 | |
| Rock Stacker Join Date: Mar 2011 Location: Parker
Posts: 82
| Quote:
Well shes kinda shy when ya lift her skirt... 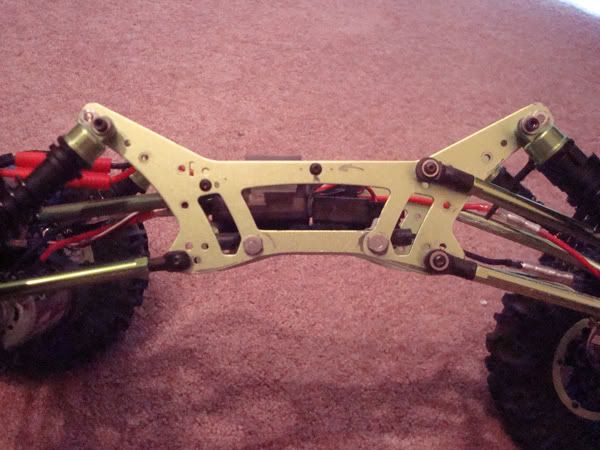 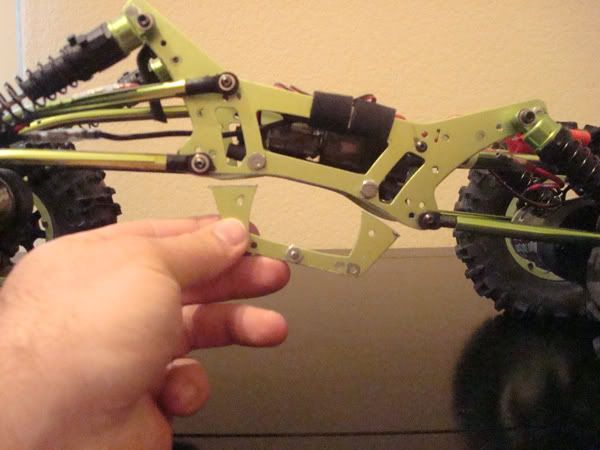  | |
|
| |
|
03-29-2011, 07:47 AM
| #49 |
| Newbie Join Date: Apr 2008 Location: McKees Rocks,PA
Posts: 3
|
Is there any way to get a link for those? I don't like how wide mine is either! Well I got it in my head that a 16in Track and a 17in WB didn't seam to be so great... so I found these on e-bay for $10... Notice how much shorter they are... this brought my track width into 14 3/4 inches with the axial 40 series wheels. |
|
| |
|
03-29-2011, 08:15 AM
| #50 |
| RCC Addict Join Date: Mar 2010 Location: Colorado Springs, Co
Posts: 1,441
|
[QUOTE=huffbagwell;3014053]Is there any way to get a link for those? I don't like how wide mine is either! Serpent Cobra S811 811 17mm Wheel Nuts and Hex Set - search this in ebay. You will need to make some sort of spacer as they are for an 8mm shaft and the madtorque has a 5mm shaft. I used one ove those plastic pegs you use to put walmart shelves together. Perfect diameter for a snug fit and just needed to drill out the center to 5 mm. Worked perfect. |
|
| |
|
03-29-2011, 06:38 PM
| #51 |
| RCC Addict Join Date: Mar 2010 Location: Colorado Springs, Co
Posts: 1,441
|
Well, here's what i decided on for my Dig, Crab setup. The only issue I'm having is finding a switch to reverse the pole of the motor. I have the dig working. And I need to change the 2POS switch on CH3 on my 4TQ to a 3POS but I don't know how to do that.  Heres a shot of what I have done. This is just the Dig. Now I have 4WS and DIG... just have to figure out the crab now.  |
|
| |
|
03-29-2011, 10:52 PM
| #52 |
| RCC Addict Join Date: Mar 2010 Location: Colorado Springs, Co
Posts: 1,441
|
I think she's almost ready for her first comp... after the movers leave tomarrow, I should have time to start narrowing the wheels and cutting me some panthers to super size... I'm still debating if I'm going to use the moab side walls or if I'm going to narrow the moab's as well. Almost forgot, I've got a BEC that I need to hook up to. So much to do, so little time. It's gotta be done by the 10th for the next GSRCRC comp |
|
| |
|
03-30-2011, 04:08 PM
| #53 |
| RCC Addict Join Date: Mar 2010 Location: Colorado Springs, Co
Posts: 1,441
|
So today after the movers left i got out the old drill and ran a boly through the wheel so i can narrow them down. Then i cut a strip put of the moads added some sedona foams and now the tyres actualy seam to work early well. Not like rovers but better than before. Im going to run these for a while, then use the sidewalls with the panthers. I just dont want to wast most of a new set of moabs. Any how i used q-bond to hold the wheels together while the 2 part epoxy was setting up and i wraped the wheel with plastic tape to force epoxy through any cracks to get a good solid bond. This wasnt as hard as i thought it would be. I got two done in 2 hours then ran out of epoxy. Check it out so far.       Last edited by Abavuso; 03-30-2011 at 04:11 PM. |
|
| |
|
03-30-2011, 07:54 PM
| #54 |
| RCC Addict Join Date: Mar 2010 Location: Colorado Springs, Co
Posts: 1,441
|  |
|
| |
|
03-31-2011, 01:07 PM
| #55 |
| RCC Addict Join Date: Jan 2011 Location: Wheat Ridge
Posts: 1,315
|
Diggin the redone tires and wheels man, good work on the cut n shut job |
|
| |
|
03-31-2011, 01:53 PM
| #56 |
| Quarry Creeper Join Date: Nov 2008 Location: The Darkside is strong with this one!
Posts: 204
|
For a dig switch set-up check out this thread. DIY dig switch When you kill power to which ever motor the swith also connects the motor poles together giving you drag brake. Hope this helps. Last edited by Psychomonkey RC; 03-31-2011 at 01:56 PM. |
|
| |
|
03-31-2011, 02:47 PM
| #57 | |
| RCC Addict Join Date: Mar 2010 Location: Colorado Springs, Co
Posts: 1,441
| Quote:
Once i get another HH BRXL i wont have issues with that any longer. | |
|
| |
|
03-31-2011, 03:10 PM
| #58 |
| Quarry Creeper Join Date: Nov 2008 Location: The Darkside is strong with this one!
Posts: 204
|
You could also try heavier springs on the motor brushes. |
|
| |
|
04-01-2011, 12:28 PM
| #59 | |
| RCC Addict Join Date: Mar 2010 Location: Colorado Springs, Co
Posts: 1,441
| Quote:
| |
|
| |
|
04-01-2011, 01:22 PM
| #60 | |
| Newbie Join Date: Apr 2006 Location: in france
Posts: 5
| Quote:
A good regular pot is made to handle 1W of power maximum before burning ! (1/4W for cheap pots) the idea is not bad, but you will need a high power resistance, not a pot. For reversing the current, you need a dual inverter switch for example : http://search.digikey.com/scripts/Dk...ame=CKN1409-ND Last edited by N.Master; 04-01-2011 at 01:31 PM. | |
|
| |
 |
| |


 Linear Mode


