| |
 01-28-2013, 07:59 AM
| #41 |
| Rock Crawler  Join Date: Oct 2009 Location: OUT THERE
Posts: 496
|
Very nice build Trey  it looks like a beast next to your c1. Can't wait to see it with the body mounted up. Keep up the good work! it looks like a beast next to your c1. Can't wait to see it with the body mounted up. Keep up the good work!
|

|  |
| Sponsored Links | |
| | |
|
01-28-2013, 08:08 AM
| #42 |
| Rock Crawler Join Date: Nov 2011 Location: Sin City
Posts: 820
|
Thanks man! Yeah it's pretty big! The ESC and Motor should arrive from RPP today. When I was reading the instructions I came across a note that said, "Only install the motor that is provided with the kit." Hahahahahaha.  I need to start painting the body. It's just been so cold outside and the garage isn't heated. I'm sure it would be fine, I just worry a little about the cold affecting the spray paint. There's a secret dungeon room in my basement, I may try painting it in there. I just don't want my entire house to smell like paint...ahh, who am I kidding, I don't really care. Ha. |
|
| |
|
01-28-2013, 08:23 AM
| #43 |
| Scale Detail Engineering Join Date: Apr 2010 Location: Turtle Island
Posts: 5,573
|
For winter painting, I let the paint can sit on the radiator for about 15 mins to heat the paint up. (could also use a pan of hot water) Then run outside and quickly lay down a coat and then put the body on the radiator to dry. |
|
| |
|
01-28-2013, 08:36 AM
| #44 |
| Rock Crawler Join Date: Nov 2011 Location: Sin City
Posts: 820
|
That's not a bad idea either. I used to do that some at my last place when I was doing lexan bodies. I don't have radiators at my new place though. I may just have to change the name of the dungeon room to the paint booth! The basement is kinda crudy anyway. A little paint on the floor might be an improvement! I've got an old barrel I paint on top of. I'll just drag it down there and go to town.
|
|
| |
|
01-28-2013, 09:10 AM
| #45 | |
| Moderator   Join Date: Jan 2004 Location: chicago
Posts: 2,814
| Quote:
good thing you didnt listen to all the HATERS. | |
|
| |
|
01-28-2013, 09:12 AM
| #46 | |
| Moderator Join Date: Jan 2004 Location: chicago
Posts: 2,814
| Quote:
i'd say today or tomorrow will be the time to paint with it supposedly going to be in the 60's. gonna try to get my yota body finished up and painted as well. | |
|
| |
|
01-28-2013, 09:23 AM
| #47 | |
| Scale Detail Engineering Join Date: Apr 2010 Location: Turtle Island
Posts: 5,573
| Quote:
Last edited by johnnyh66; 01-28-2013 at 04:24 PM. | |
|
| |
|
01-28-2013, 11:09 AM
| #48 | |
| RCC Addict  Join Date: May 2010 Location: Midwest
Posts: 1,917
| Quote:
Well, now that Trey showed it off to us.. It indeed looks cool and worth it! I'd like to get my hands on one someday. | |
|
| |
|
01-28-2013, 12:48 PM
| #49 | |
| Moderator Join Date: Jan 2004 Location: chicago
Posts: 2,814
| Quote:
| |
|
| |
|
01-28-2013, 02:56 PM
| #50 |
| Rock Crawler Join Date: Nov 2011 Location: Sin City
Posts: 820
|
Okay so I'm sitting here thinking about wiring...I am going to need a hell of a long sensor wire to run from the brushless motor all the way into the electronics box. The one that came with the motor is like 6 inches long. There's no way that will work. The longest one I've seen online after looking for a few minutes is about 11 inches. Thats not even long enough! The motor attaches to the front of the transmission and extends below the front body stay. The sensor connection on the motor will be on the end closest to the front of the rig. By the looks of this photo, that's in front of the front axle a little. It then needs to snake it's way all the way back into the electronics box and site almost directly above the rear axle. The wheel base is 11.3 inches. Add an inch for the front end and factor in probably a 20% slop and clean routing factor and I need one that's about 15 inches long. I'd rather not have an extension...and I'd rather not relocate the ESC. Have you guys run into this before?  |
|
| |
|
01-28-2013, 03:24 PM
| #51 |
| Rock Crawler Join Date: Nov 2011 Location: Sin City
Posts: 820
|
Okay so after a little more diggint I figured out an answer to my question. Novak makes a 9" extension for this very thing. Problem solved! That's still a long way from the ESC, hopefully I don't have any timing issues.
|
|
| |
|
01-28-2013, 03:27 PM
| #52 |
| Moderator Join Date: Jan 2004 Location: chicago
Posts: 2,814
|
you gonna relocate the steering servo trey? thats the one obvious issue i can see with the stock setup. sensor wire extension, prolly other types and lengths, this one i just googled real quick. Brushless Motor Sensor Harness Extension- 9 [#S5358] - $6.85 : Novak Electronics: Products, Novak or Nothing! |
|
| |
|
01-28-2013, 03:38 PM
| #53 |
| Rock Crawler Join Date: Nov 2011 Location: Sin City
Posts: 820
|
Yep, that's the one I found too! Just ordered it. Yes I'll probably relocate the steering servo. I'm going to finish the kit with it in the stock location and see how it does. I really like how it's completely enclosed in the electronics box...but there's a lot of slop in it and I doubt it will leave it there.
|
|
| |
|
01-28-2013, 03:42 PM
| #54 |
| Moderator Join Date: Jan 2004 Location: chicago
Posts: 2,814
|
i'm gonna have to get me a couple of the sensor extensions as well...
|
|
| |
|
01-28-2013, 03:44 PM
| #55 |
| Rock Crawler Join Date: Nov 2010 Location: south prairie
Posts: 548
|
Wow that thing is big! The price tag alone is why I haven't bought one yet...that and I'm planning to get a 1:1 this year so eventually. It looks like a very fun kit to build! I'll be sure to intrude on your thread with pics of it whenever I get one since you don't seem to mind...but it'll be awhile :thumbup: sent from a mobile device dumber than me. |
|
| |
|
01-28-2013, 03:50 PM
| #56 |
| Rock Crawler Join Date: Nov 2011 Location: Sin City
Posts: 820
|
Yeah man, feel free! There aren't too many Bruiser builds on here so go right ahead! I don't care if people chime in on my builds!
|
|
| |
|
01-28-2013, 04:23 PM
| #57 | |
| RCC Addict Join Date: May 2010 Location: Midwest
Posts: 1,917
| Quote:
What else does he need those extensions for? | |
|
| |
|
01-28-2013, 11:13 PM
| #58 |
| Newbie  Join Date: Sep 2011 Location: Vernon Hills
Posts: 35
|
looking good so far. I want one!!!!!!!!!!!
|
|
| |
|
01-29-2013, 12:34 AM
| #59 |
| Oppan Gangnam Style   Join Date: Jun 2005 Location: Shingle Springs
Posts: 5,164
|
Looking like a sweet build so far. It's bringing back so many fond memories of my first OG Hilux. I was 13 and travelling with my parents, hanging out in a hotel Hong Kong for vacation. I had saved a bunch of money and my parents chipped in the rest to buy me one for Christmas. I spent the entire night building it, paying attention to every detail in the instructions manual. I started building around 4pm and had the chassis all together by 7am the next morning. Body was painted black with paint pens. Thanks for sharing and bringing those memories back up from the archives. BTW, looking at this picture you posted, it looks like the front drive idler gear setup is better with the gear on a post with bearings instead of a steel sleeve like the original. 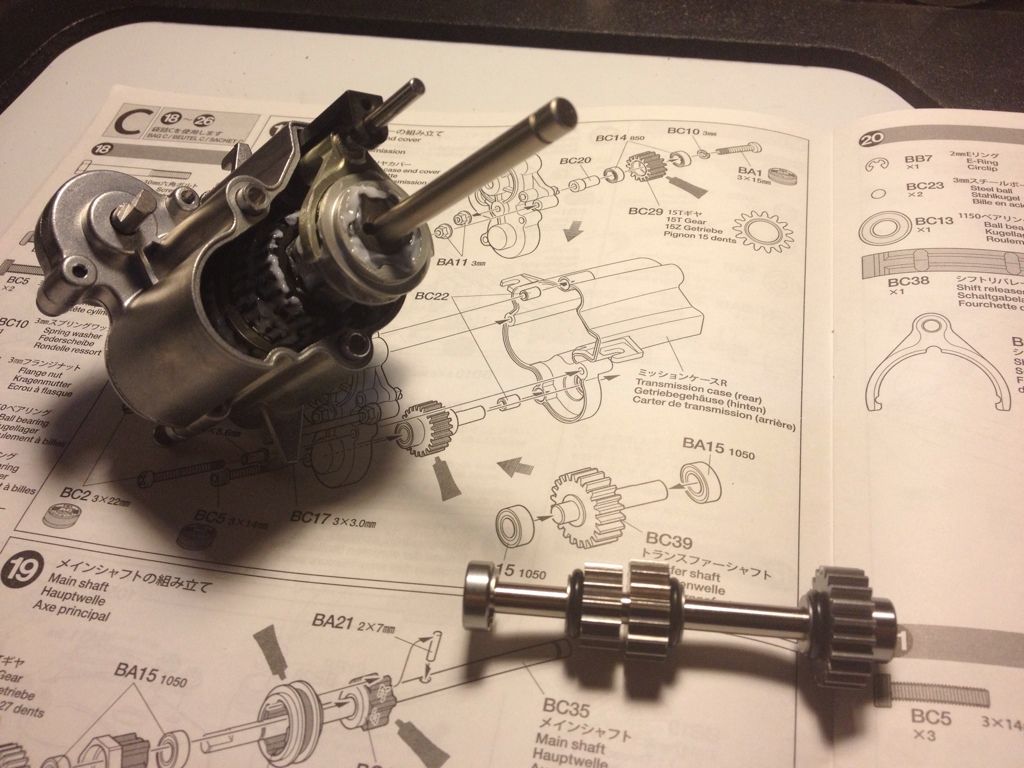 I'm curious to see how well it holds up. I know the case is of better material too so should be much better. The original design kept coming loose, I made a sheetmetal bracket for mine to support the other side of the idler gear. Damn, I need one of these.... |
|
| |
|
01-29-2013, 07:43 AM
| #60 |
| Rock Crawler Join Date: Nov 2011 Location: Sin City
Posts: 820
|
Ha, that's an awesome story! It must have been a big deal for you to remember it that well! This is the first Tamiya kit I've ever had! I'm really enjoying it and a lot of that comes from how different it is than all the Axial, Traxxas and Losi rigs I've built. Like I said before it's got a retro look but it's really well thought out. The quality and fit has been perfect. I can't wait to try it out!
|
|
| |
 |
 JHTreyIII's Bruiser Build - Similar Threads
 | ||||
| Thread | Thread Starter | Forum | Replies | Last Post |
| JHTreyIII's Class 1 Build - 1981 Chevy Pickup | JHTreyIII | 1.9 Scale Rigs | 321 | 11-18-2015 09:52 AM |
| JHTreyIII's 'Big Metal Bitch' Wraith Build | JHTreyIII | Axial Wraith | 141 | 04-18-2014 06:42 PM |
| JHTreyIII's Jeep Brute | JHTreyIII | 1.9 Scale Rigs | 22 | 12-04-2012 12:58 PM |
| JHTreyIII's '72 Chevy C10 Build | JHTreyIII | Axial SCX-10 | 83 | 10-29-2012 05:05 PM |
| NIRC Polar Series JHTreyIII's Class 2 run | johnnyh66 | Scale Videos! | 4 | 03-26-2012 01:38 PM |
| |


 Linear Mode


