| |
 04-09-2010, 10:26 PM
| #41 |
| SCALE PERFORMANCE PARTS   Join Date: Oct 2007 Location: Cedar Park
Posts: 5,453
|
Small update ... http://www.lockeduprc.net/tech/super300.php 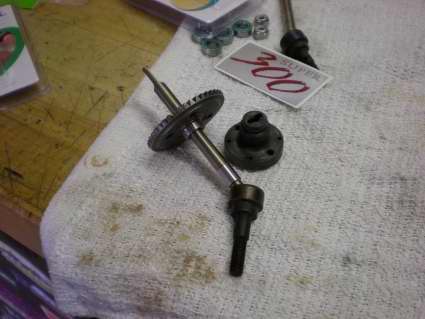 We have a tough truck competition coming up and I'm planning on installing a puller for it. So, I had to bulk up the drivetrain. I hope to get the puller in tomorrow. Last edited by Locked Up; 11-13-2013 at 08:13 PM. |

|  |
| Sponsored Links | |
| | |
|
04-09-2010, 10:50 PM
| #42 |
| Rock Stacker Join Date: Mar 2010 Location: Milwaukee
Posts: 51
|
I was thinking about getting the Black H2 body. i think this thread sold me on it, I love how it looks. |
|
| |
|
04-09-2010, 11:09 PM
| #43 | |
| SCALE PERFORMANCE PARTS Join Date: Oct 2007 Location: Cedar Park
Posts: 5,453
| Quote:
 | |
|
| |
|
04-12-2010, 05:49 PM
| #44 |
| SCALE PERFORMANCE PARTS Join Date: Oct 2007 Location: Cedar Park
Posts: 5,453
|
With the overdrive gears gone in the front it steers like poo. I didn't realize how much of a difference that made... So I have been doing some work on the steering. A lot of work. First thing I wanted to do was to raise my tie rod above the knuckles on both sides. As it is the tie rod limits the steering because it bottoms out on the diff. I already have Vanquish high steer knuckles but I had to put the tie rod on the bottom of the knuckle because if I don't the steering acts as a bumpstop when the servo horn hits the tie rod. And since they are the regular knuckles the ackerman is all messed up. Which means that although one tire is turning more, it limits the amount of throw I get out of both tires in one direction because the CVDs max out on one side. So .... I put the high steer zero ackerman vanquish arms I have on and the CVDs now max out equally. Unfortunately they are too long in the steering arm department. Even with the slightly wider stance from the super 300 hubs the tires were getting eaten by the rod ends. This is only because of the way the zero ackerman knuckles stick out. Proper ackerman knuckles would probably be worse. So I cut the end off and went with the inside hole. But then the end of the drag link was up into the tire and rubbing. So I drilled another hole and moved the drag link in. But then the drag link got caught up in the tie rod when it tried to turn. So I raised the drag link just enough to clear the tie rod. And then I had zero power in the rocks and it would barely steer when in a bind. So then I shortened the servo horn. Then I had too little throw ... and the rod ends were still in the tires so I shortened the balls to almost flat. And it went on and on until I arrived at two conclusions: -I need a better servo. More power and greater throw. -I need to totally rethink my steering For the servo, I ordered a brand new HiTec 7950th. I am gonna run that bad boy at 7.2v so I should have 486 in/oz available. FWIW, I am already running a CS170 in here so I should be at about 333 in/oz. Part of the draw of the hitec is that they can be programmed to have more throw, which will help me in my situation. It may already have more throw then I have now, we'll see. For the steering configuration I thought about it as I was falling asleep and I came up with a stupid but brilliant idea. I need to have the drag link mount to the "new" outside hole so I have some leverage. I also need a place to mount the tie rod but if I mount that on the outside hole and the drag link on the inner it all gets bound up and/or I have no power. So, I decided on "inverted Y" steering. Yes ladies and gentleman, I decided to make the H2 steering akin to the steering setup that most Jeep owners would like to toss in the trash. ... And it is actually working exactly as I wanted it to. Even without the new servo, I am able to use a slightly longer servo horn for more throw and I still have better power then the other options. And of course, it is all up nice and high now. I'm excited to see how awesome it is with the new servo. The only drawback I have come up with in my head is that the drag link is weaker because I now have a hole drilled through it. But, I figure if I can get this all to behave, I'll have Solomon make me one out of cromoly and I'll call it done. I'll get some pics up later and you will all see how tight things are up front with these arms, and why this was such a PITA. Till then you can just wonder about how insane I am for putting Jeep style steering on in place of the nice histeer setup I had before. Last edited by Locked Up; 04-12-2010 at 05:52 PM. |
|
| |
|
04-13-2010, 09:04 AM
| #45 |
| SCALE PERFORMANCE PARTS Join Date: Oct 2007 Location: Cedar Park
Posts: 5,453
|
gallery as promised ... http://www.lockeduprc.net/tech/steering/steering1.htm You'll see the difference in the knuckle, how I shortened them, how the ends are up in the tires, etc, etc. At the end you'll see the steering setup with the dark links. It inly actually required a custom drag link. The tie rod is the stock one, which is good. So I'm gonna order up some metal and make a draglink out of 4130 ... or see what Solomon will charge me for one. I don't wanna try tapping steel with the crappy M3 taps I have but we'll see. So up next will be some spare parts and then I'm going to make a new trackbar mount on the axle side. Mine is starting to wear on the housing because of the way I cut it. Still, considering the hell I have put it through I'm happy with it's durability so far. Last edited by Locked Up; 11-13-2013 at 08:14 PM. |
|
| |
|
04-13-2010, 07:04 PM
| #46 | |
| RCC Addict Join Date: Nov 2008 Location: Frederick
Posts: 1,286
| Quote:
| |
|
| |
|
04-13-2010, 08:02 PM
| #47 |
| Newbie Join Date: Dec 2009 Location: Montreal, Canada
Posts: 33
|
The way your waterproofed the radioshack box is genius! I have that box myself with my electronics in there but I'm using it's splashproof in my case since I make holes near the top for the wires to exit. Could you write about what you did in a bit more detail? What parts you used and maybe something you would do differently if making it again? Awesome truck btw, I hope my TR will be just as capable some day! |
|
| |
|
04-13-2010, 08:42 PM
| #48 | ||
| SCALE PERFORMANCE PARTS Join Date: Oct 2007 Location: Cedar Park
Posts: 5,453
| Quote:
Quote:
Go back to radio shack and grab some small eyelets (for #6 screws). Cut each wire and put an eyelet on the end. For a servo to pass through the "wall" you need 6 eyelets (3 per side). You put an M3 stud in there, cinch it down with some small flat nuts, then put the eyelets on there and clamp them down. Do the same for every wire you have and then seal it all up with liquid electrical tape. Does that help? If not, let me know and I can try to be more precise. Last edited by Locked Up; 05-25-2011 at 01:08 PM. | ||
|
| |
|
04-13-2010, 11:09 PM
| #49 |
| Newbie Join Date: Aug 2009 Location: wyoming mich
Posts: 35
|
you don't waste your time when you make a work of art a labor of love hope you put some light on it lots of great ideaes like the wheel well and a lot more |
|
| |
|
04-14-2010, 02:14 PM
| #50 | |
| SCALE PERFORMANCE PARTS Join Date: Oct 2007 Location: Cedar Park
Posts: 5,453
| Quote:
There are lights all over it. headlights, tail lights, rock lights ... | |
|
| |
|
04-16-2010, 08:48 AM
| #51 |
| Quarry Creeper Join Date: May 2007 Location: Brenham, Tx
Posts: 495
|
glad i found this thread! I am running an scx with the exact same body and i like your front body post setup! I am going to do that on mine tonight. I can't run the interior because i have the summit tranny and 14T puller installed and i am running the body as low as possible to still allow for full articulation. I put the proline powerstroke shocks on it and they are shorter than the stockers so that bought my ride height down as well.
|
|
| |
|
04-17-2010, 07:25 AM
| #52 | |
| SCALE PERFORMANCE PARTS Join Date: Oct 2007 Location: Cedar Park
Posts: 5,453
| Quote:
Do you want an Axial Transmission? I have one I can sell you for stupid cheap. I say that because the interior ends up making it look a billion times better and I think you'd be really happy with it. PM me in you are interested and I'll make you a deal on it. | |
|
| |
|
04-17-2010, 07:41 AM
| #53 |
| Quarry Creeper Join Date: May 2007 Location: Brenham, Tx
Posts: 495
| Trail rig build the summit tranny was a core part of the build. I can deal without the interior since i'm not too crazy with the scale stuff. As long as it isn't a lexan crowd pleaser body its cool with me |
|
| |
|
09-07-2010, 11:45 AM
| #54 |
| SCALE PERFORMANCE PARTS Join Date: Oct 2007 Location: Cedar Park
Posts: 5,453
|
Got some new shoes on the SCX10. Proline Swampers. They look very good. We are in the middle of a tropical storm or I'd be out testing them.  I also got my new Futaba RX in there. It just barely fits, even with the sidewinder in there. I had an FXR I was going to put in there but since it all fits I'll probably stick with the sidewinder. While installing the new RX, I found out my winch controller is dead. Apparently my CC BEC wigged out and now allows full battery power through it. I ordered a replacement controller and a spare. I'm starting to wonder if I should get a traxxas waterproof speed control and mount that outside the electronics box. I really would like to get one of the RC4wd winches as well but I think they are too big for my bumper setup and I don't feel like messing with it right now. In other news, I have decided to go back to my previous steering setup. I'm just not happy with the way it is working with the shortened knuckles. It definitively lost steering power and I think I;d prefer the power over the gain in clearance. I'm also going to change out the body. Right now I'm trying to decide if I should stick with yellow or go with a black one I have. I need to add my copilot as well.  Last edited by Locked Up; 09-07-2010 at 11:52 AM. |
|
| |
|
09-07-2010, 11:51 AM
| #55 |
| I wanna be Dave Join Date: Aug 2008 Location: Austin, TX, USA
Posts: 4,273
|
Love the new tires. When I get around to building another 1.9 rig, that's what I plan on running, too. Let us know how they perform. Hopefully you can locate some good wheelin' spots in the Bryan/College Station area! I'd say try the black H2 out for a change. I'm up in the air on what my next 1.9 body will be. Leaning toward a Toyota Hilux or a 4 door JK. |
|
| |
|
09-07-2010, 12:04 PM
| #56 |
| SCALE PERFORMANCE PARTS Join Date: Oct 2007 Location: Cedar Park
Posts: 5,453
|
I'll probably be up for some testing at Balcones once I get it all back together.
|
|
| |
|
09-07-2010, 12:28 PM
| #57 |
| I wanna be Dave Join Date: Aug 2008 Location: Austin, TX, USA
Posts: 4,273
|
Sounds like a plan. Hopefully in the next couple weeks I'll have the Bronco put back together and we can schedule an informal GTG for scalers.
|
|
| |
|
09-12-2010, 03:58 PM
| #58 |
| SCALE PERFORMANCE PARTS Join Date: Oct 2007 Location: Cedar Park
Posts: 5,453
|
I didn't get around to adding the copilot, but I did get some work done on the H2 this weekend. I got a new controller in for the winch and ti now works fine. I'm starting to look for some other ESCs I could use instead of the 3 Racing one as it seems to be a weak point and this is my 3rd one in <15 uses. It's all a tight fit in the control box but it fits with the new Futaba RX. If I went to an FXR I'd have more space but I'm not sure there would be any less heat. 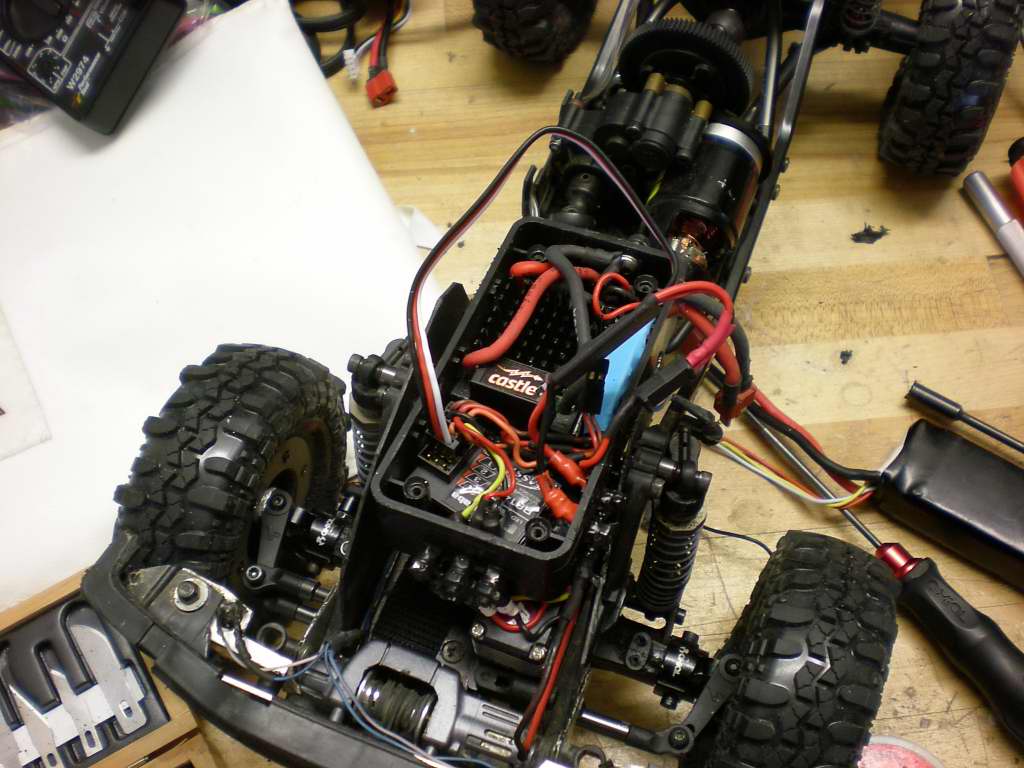 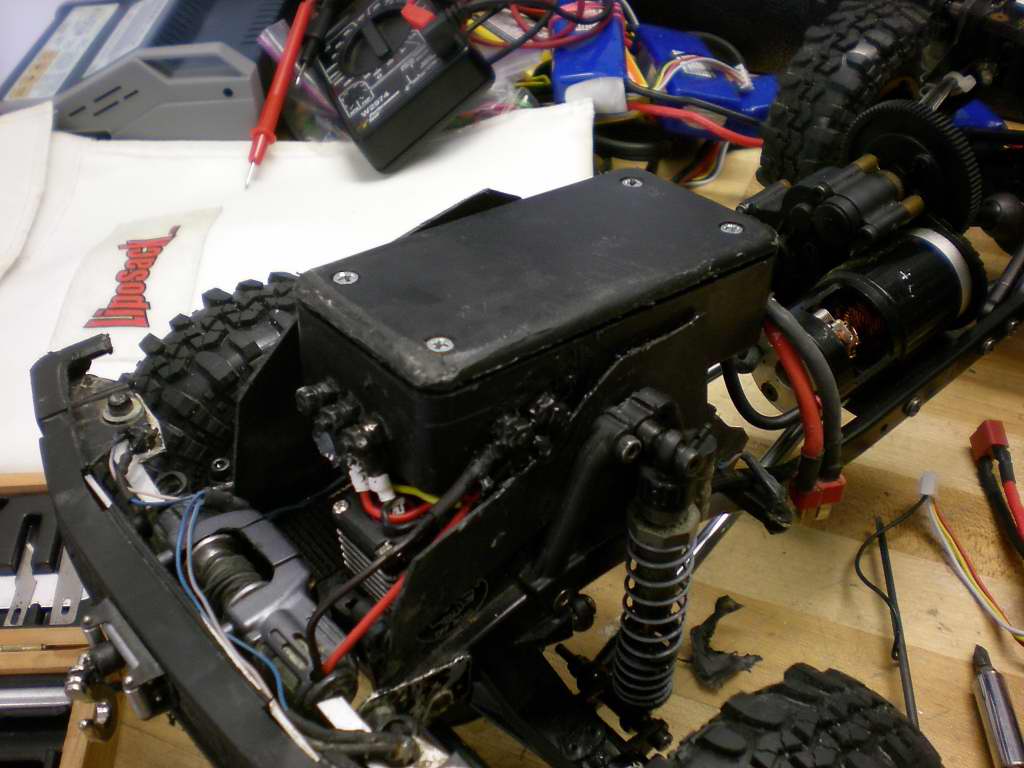 I also got some new bent links on in the rear. Because the lowers came up so high I actually had to make bent uppers as well. 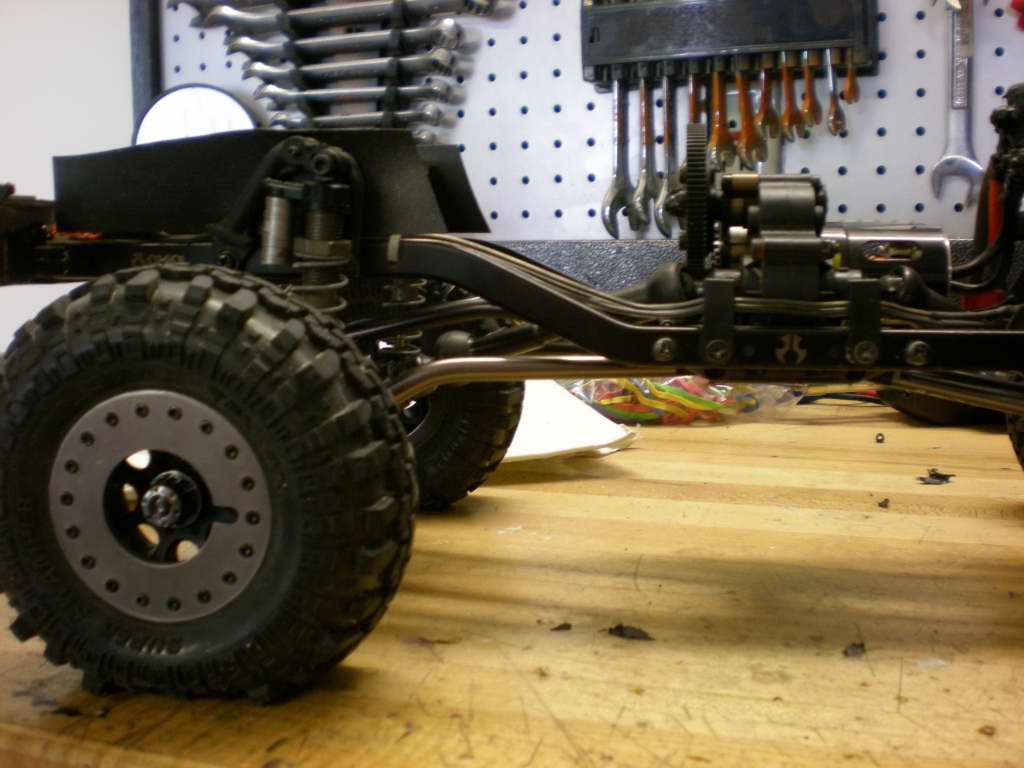 And the big project was swapping the body. I had actually done a lot of he work in advance so it wasn't too bad. 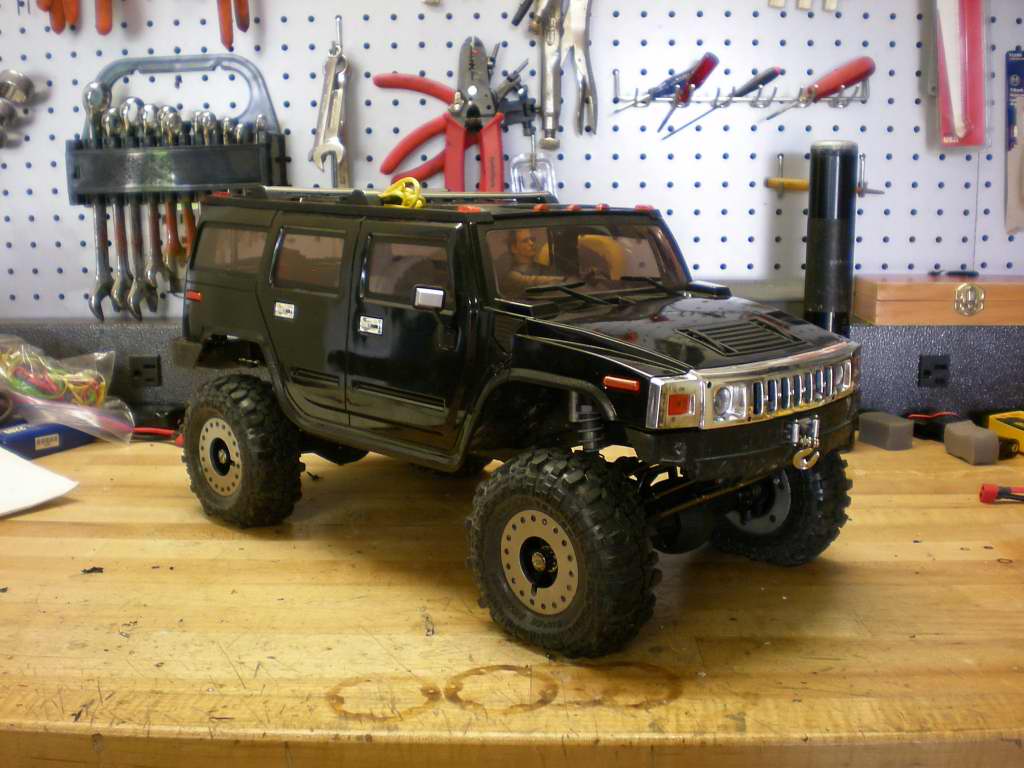 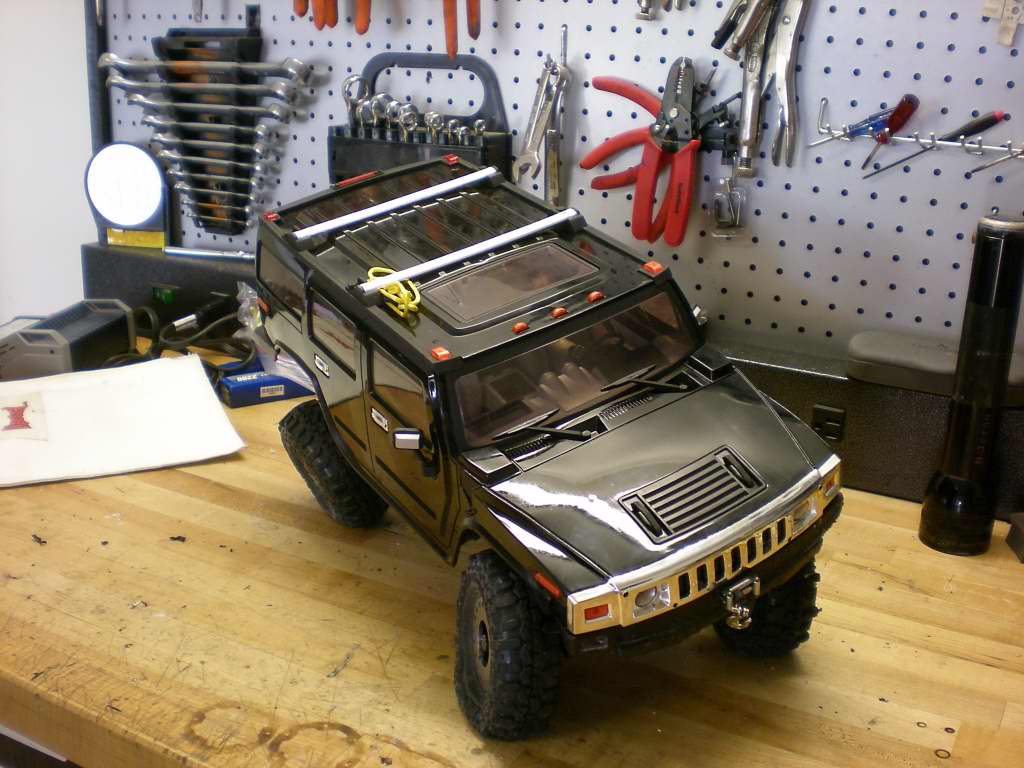 Copilot will go in next time. I'm gonna do an internal cage, possibly some sliders and I think I'm going to put the brush guard back on. Last edited by Locked Up; 11-13-2013 at 08:15 PM. |
|
| |
|
09-12-2010, 09:00 PM
| #59 | |
| I wanna be Dave  Join Date: Jan 2006 Location: Corruptifornia
Posts: 12,107
| Quote:
| |
|
| |
|
09-13-2010, 03:15 AM
| #60 |
| Quarry Creeper Join Date: Nov 2008 Location: N. California
Posts: 424
|
Turned out sick!
|
|
| |
 |
| |


 Linear Mode


