| |
 09-22-2008, 06:34 PM
| #1 |
| 20K Club   Join Date: Jul 2004 Location: Sending illegals home one Hayabusa at a time.
Posts: 22,981
|
I will use this thread as a help to anyone using the 4PK. I was given a 4PK by Futaba and as part of I am going to lend support to anyone I can. If anyone has any questions feel free to post them and I will answer as soon as I can. And if anyone else has any tips or you want to list your setup then go right ahead! UPDATED 4/20/10 Click the following links to take you to the setup instructions: The Ultimate 4PK setup for 2.2 MOA's <--RECOMMENDED! 4PKS programming modification to eliminate "PMIX ON" Issue on main screen Wiring Diagram For The Ultimate 4PK setup for 2.2 MOA's Video showing Dual ESC capabilities Shipping address for Hobby Services Losi Crawler Super Class Setup #1 With VIDEO Super Class Setup #2 Super Class setup video demonstartion Super Class wiring diagram Rear Steer DNA/R2D/TCS-RC4WD 3 position dig setup Set your timer Proportional Winch MOA - Dual ESC using 3 channels 4PK using 3 Channels or 3PK video demonstration This setup is now outdated, please refer to the Ultimate setup, the 3PK now has full functionality for MOA control including front and rear dig controlled by the trigger. MOA dig setup with Punk Dig (or microswitches) and 1 ESC 4 Dry Cell Install by Sarge Range Comparison test by Killer RC Last edited by Harley; 04-22-2011 at 06:49 PM. |

|  |
| Sponsored Links | |
| | |
|
09-22-2008, 06:38 PM
| #2 |
| 20K Club Join Date: Jul 2004 Location: Sending illegals home one Hayabusa at a time.
Posts: 22,981
| Winch Setup ****Attention Stage3 winch owners****** You must change your servo mode to "normal" instead of the default "high speed" to control the Stage 3 winch!!!! This thing is very adjustable and can run a winch in many different ways. I would program one of the dials to a multi step adjustment. The more you have the finer detail you will be able to adjust in spool speed. I would personally set it between 20 and 50 step rate. Here is how I would do it: Go to the Systm menu and set DISP-SEL to SRV-VIEW Go to the *MENU-T option and change your menu type to "Level3", make sure to go down and select the EXEC function so that it applies the changes. Next go to the DIAL menu and set one of the dials to channel 3 (or 4). For this example I will say DL3 to CH3 (this is the dial on top of the remote). Then scroll over and change DL3 from "2 / NOR" to "30 - NOR" (this is the where I was saying the 20-50 range) Now your winch will have variable speed Good luck  Last edited by Harley; 06-21-2009 at 12:50 PM. |
|
| |
|
09-24-2008, 09:47 AM
| #3 |
| Rock Crawler  Join Date: Aug 2005 Location: Illinois
Posts: 809
|
Great information here Harley. Thanks J |
|
| |
|
09-24-2008, 07:28 PM
| #4 |
| 20K Club Join Date: Jul 2004 Location: Sending illegals home one Hayabusa at a time.
Posts: 22,981
| Set your Timer! If your club is anything like mine then competition is tight and you don't want to lose track of the clock while you are running. This is a super easy task but here is a quick step by step: For quick access, set up your Direct Select menu so you can access the Timer menu in two quick button taps. First press and HOLD the "DIR" button Now select one of the positions 1-8 (I chose 1) Now when on the home screen you can just hit DIR and then button 1 and you are looking at your timer. Once in your Timer menu: Set the Type to "UP TIMER" Set the alarm for 1 min less than your course time limit, this may change from course to course or comp to comp but it is easy to adjust. To start the timer scroll down to "RST" and press both the + and -, now as soon as you hit the trigger or wheel the timer will start. For more noticable alarm go to the "VIBRA" menu and set the "TIMER-UP" to any value you like, I chose PT5. Last edited by Harley; 09-24-2008 at 07:31 PM. |
|
| |
|
09-24-2008, 07:33 PM
| #5 |
| Rock Crawler Join Date: Dec 2005 Location: Tulsa, Oklahoma
Posts: 857
|
I don't have a 4PK, but there is definitely some good info in there, for the 4PK owners. Thanks. |
|
| |
|
09-24-2008, 08:46 PM
| #6 |
| 20K Club Join Date: Jul 2004 Location: Sending illegals home one Hayabusa at a time.
Posts: 22,981
| VF/DNA Dig, RC4WD R2D Transmission, or TCS/RC4WD Dig for Axial Transmission Doesn't get much easier than this, this is just one method of doing this though, there are many possible ways. For easier understanding first go to the SYSTM menu and change DISP-SEL and set it to "SRV-VIEW". The Servo View gives a very clear bar graph style view of what every channel is doing. Go to the *MENU-T option and change your menu type to "Level3", make sure to go down and select the EXEC function so that it applies the changes. First go to the EPA menu and set the EPA levels on 3C UP and DWN to a very low level, say 5 for this example. Now go to the Dial menu. Scroll to the switch you want to control your dig, I chose DT3 which is in front of the wheel near where my pointer finger rests (this can be set to any of the dials you like). Change the dial value to CH3, then scroll over and make the values read: 100/NOR (this means that the dial will act as a 3 position switch). Now hook up your servo to your dig. Make sure that when the servo is centered that it is in the neutral position (for this method). Open the EPA menu again. Gradually adjust your EPA's up while turning the drivetrain (either by hand or by using the throttle). Once they engage check the amount of contact if possible and adjust to an amount you feel comfortable with. Repeat this step for the other direction. Test over and over while spinning the tires while off the ground before driving the truck. This will help in not burning up a shift servo, make sure to check the servo temp while doing this. OPTION If you want you can program one of the push buttons to be an automatic dig button. It will go right from 4WD to Dig as long as you HOLD the button down. To do this go to the SWTCH menu Select a switch that is easiest for you, I selected PS1 which is right underneath the steering wheel. Set it to CH3 THATS IT! Now when ever you press and hold this button the transmission will automatically go strait to lock (as soon as you release the button it will go back to 4wd even if you had it in freewheel before). The SRV-VIEW will help illustrate exactly what is happening Last edited by Harley; 10-01-2008 at 04:30 PM. |
|
| |
|
09-24-2008, 10:10 PM
| #7 |
| 20K Club Join Date: Jul 2004 Location: Sending illegals home one Hayabusa at a time.
Posts: 22,981
| Berg/OCM or Clod electronic dig (Micro Switch) For easier understanding first go to the SYSTM menu and change DISP-SEL and set it to "SRV-VIEW". The Servo View gives a very clear bar graph style view of what every channel is doing. Go to the *MENU-T option and change your menu type to "Level3", make sure to go down and select the EXEC function so that it applies the changes. This how-to does not cover the wiring of the micro switches. Here are a couple of links that may be helpful though: First go to the EPA menu and set the EPA levels on 3C UP and DWN to a very low level, say 5 for this example. Now go to the Dial menu. Scroll to the switch you want to control your dig, I chose DT3 which is in front of the wheel near where my pointer finger rests (this can be set to any of the dials you like). Change the dial value to CH3, then scroll over and make the values read: 100/NOR (this means that the dial will act as a 3 position switch). Now hook up your servo that will activate the micro switch. Make sure that when the servo is centered that it is not hitting either of the switches. Open the EPA menu again. Gradually adjust your EPA's up until they activate the micro switch. Repeat this step for the other direction. This method will help in not burning up a servo, make sure to check the servo temp while doing this. OPTION Add a 2nd servo to add lock and freewheel to both front and rear dig. This diagram show the second switch only hooked up to the rear motor, but it can be wired to both for the most options. 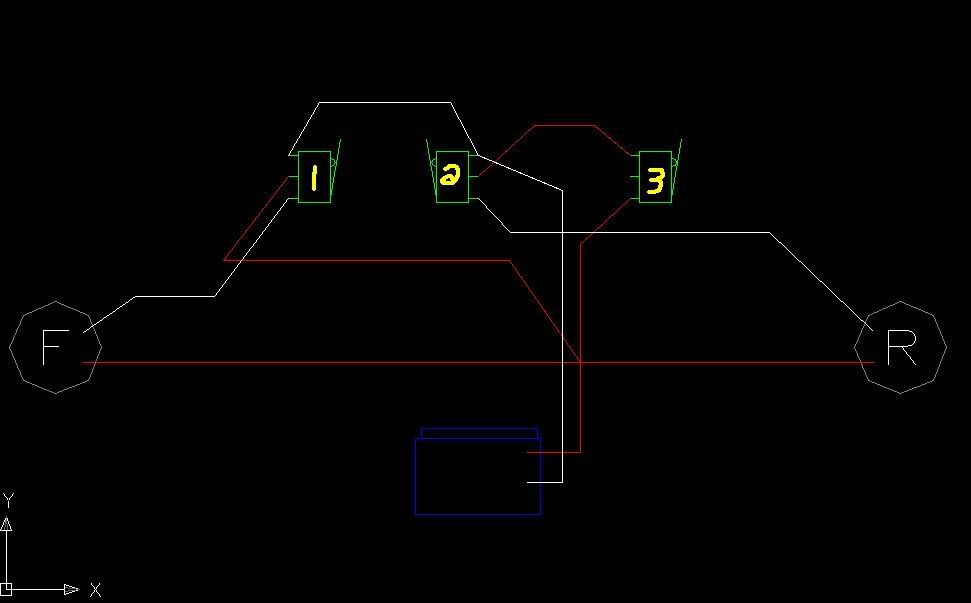 First go to the EPA menu and set the EPA levels on 4C UP and DWN to a very low level, say 5 for this example. Now go to the Dial menu. Scroll to the switch you want to control your dig, I chose DT2 which is in behind the wheel near where my thumb rests (this can be set to any of the dials you like). Change the dial value to CH4, then scroll over and make the values read: 100/NOR (this means that the dial will act as a 3 position switch). Now hook up your servo that will activate the micro switch. Make sure that when the servo is centered that it is not hitting the switch. Open the EPA menu again. Gradually adjust your EPA's up until they activate the micro switch. Last edited by Harley; 10-01-2008 at 04:30 PM. |
|
| |
|
09-30-2008, 12:13 PM
| #8 |
| 20K Club Join Date: Jul 2004 Location: Sending illegals home one Hayabusa at a time.
Posts: 22,981
| Rear Steer There are number of different way to run rear steer. On this radio it mostly depends on how you run the other channels. If you are not mixing any channels already then you can mix the front and rear steering two ways to five you fully proportional steering. If you are already mixing channels, such as using dual esc's then Option 2 will be for you. Option 1 Fully Proportional Plug your rear servo in to the channel 4 slot for this example. For easier understanding first go to the SYSTM menu and change DISP-SEL and set it to "SRV-VIEW". The Servo View gives a very clear bar graph style view of what every channel is doing. Go to the *MENU-T option and change your menu type to "Level3", make sure to go down and select the EXEC function so that it applies the changes. Now on main menu screen 1 you should see PMIX1 and PMIX2 Go to PMIX1 and adjust it as follows: LEFT: -100 RGHT: -100 MST: ST SLV: CH4 MODE: ACT OFST: 0 MXMD: MIX What you just did was setup a traditional rear steer, when you steer the front wheels left the rear wheels will steer right. Now go to the main menu screen again and select the SWTCH menu Change PS1: to "PROG MIX1/ ALT" Now when you press the PS1 button (located under the wheel) you will activate or deactivate the rear steer. Next go to PMIX2 and adjust it as follows: LEFT: +100 RGHT: +100 MST: ST SLV: CH4 MODE: ACT OFST: 0 MXMD: MIX What you just did was setup a crab walk rear steer, when you steer the front wheels left the rear wheels will steer left. Now go to the main menu screen again and select the SWTCH menu Change PS2: to "PROG MIX2/ ALT" Now when you press the PS2 button (located on the pistol grip) you will activate or deactivate the crab walk rear steer. Something to note. You need to keep track of when you have the mixing activated. If you have BOTH activated then they cancel each other out, make sense? Option 2 Manual When you are running a rig that is already using the mixing funtions then you need to handle your rear steer another way. For easier understanding first go to the SYSTM menu and change DISP-SEL and set it to "SRV-VIEW". The Servo View gives a very clear bar graph style view of what every channel is doing. Go to the DIAL menu Select DT1 and set it to "CH4 : 50 / NOR" What these settings mean are that Dial DT1 (located above the wheel) will move the rear servo 50 steps (out of 100 each direction, 200 total, yielding a 5 position switch) per press. Thats it! Now when you hit the DT1 button it will move your servo 50% of its throw in each direction. Very easy to use. You can adjust the amount of "steps" by increasing or decreasing the 50 in the DIAL menu. You can also set up another Dial to have finer control as well (2 or more switches controlling the rear steer). |
|
| |
|
09-30-2008, 01:26 PM
| #9 |
| I wanna be Dave Join Date: Feb 2004 Location: on a Big Rock
Posts: 7,837
| Good stuff! Can't wait to try it at Crawlapalooza |
|
| |
|
10-01-2008, 09:47 AM
| #10 | |
| RCC Addict  Join Date: Oct 2005 Location: Trussville, AL
Posts: 1,762
| Quote:
| |
|
| |
|
10-01-2008, 09:54 AM
| #11 |
| 20K Club Join Date: Jul 2004 Location: Sending illegals home one Hayabusa at a time.
Posts: 22,981
| Dual ESC's - UPDATED 6/20/09 Video http://www.youtube.com/watch?v=uwu-Wm3dRhw This setup does not work in conjunction with Throttle expo.[/color] Setup: 2x - Tekin FXR 2x - Holmes Hobbies 35t Handwounds Berg Axles Castle BEC Futaba BLS152 Futaba 4PK 3s MaxAmps 1100 Setup: Channel 1: Steering Servo (Wheel obviously) Channel 2: Front ESC Channel 3: Rear ESC Channel 4: Open for optional accessories such as winch down or 4ws on a super class crawler One of the first things I did was go into the SYSTM menu and change DISP-SEL and set it to "SRV-VIEW". This is very similar to the DX3R's "Monitor" function except the DX3R does not allow you to set it as the main screen which I always wished it would. The Servo View gives a very clear bar graph style view of what every channel is doing. This allowed me to do all of my experimenting without having to wire everything up, what an awesome feature! 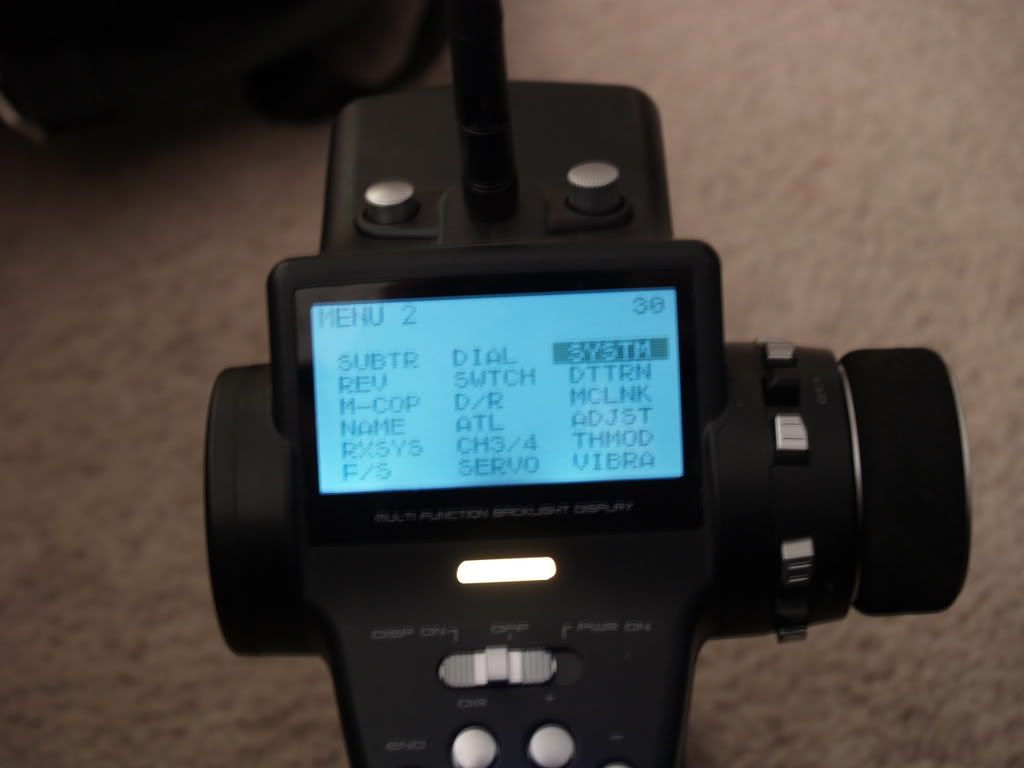 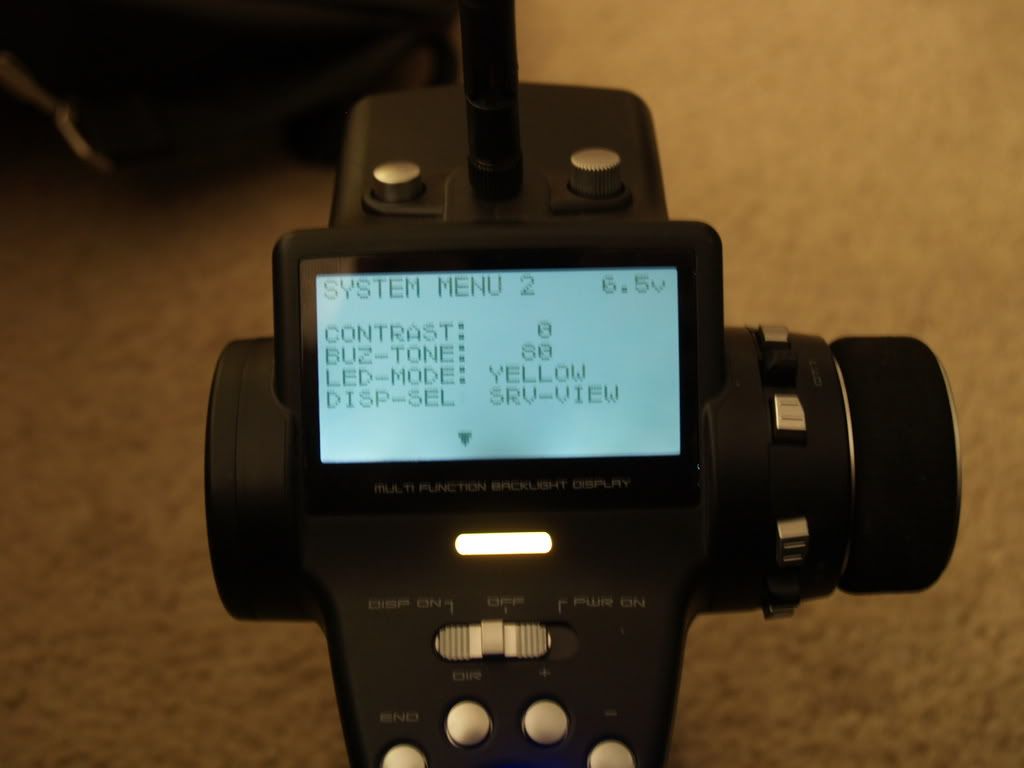 Go to the *MENU-T option and change your menu type to "Level3", make sure to go down and select the EXEC function so that it applies the changes. 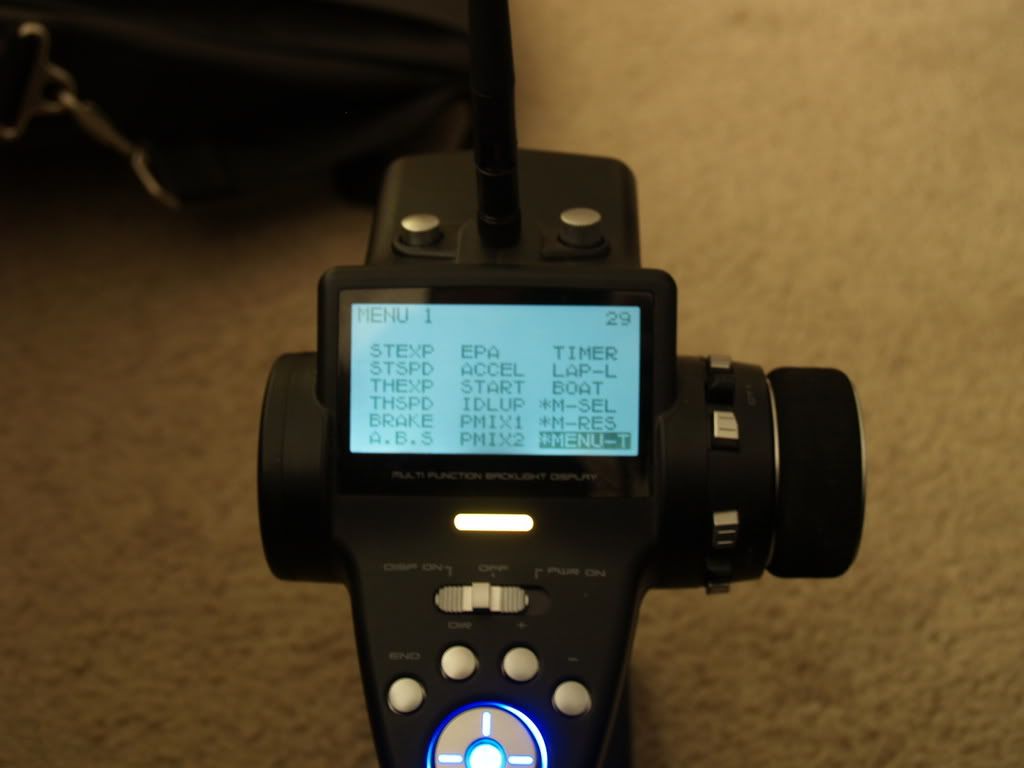  To control the two ESC's I setup PMix1 and PMix2 (program mix 1 & 2). PMIX1 FWRD: -100 BRAK: -100 MST: TH SLV: TH MODE: ACT OFST: 0 MXMD: MIX TRIM: OFF PMIX2 FWRD: -100 BRAK: -100 MST: Th SLV: CH3 MODE: ACT OFST: 0 MXMD: MIX TRIM: ON I set PMix1 on PS1 which is on the bottom of the wheel, it feels very natural to hit the button it is a fantastic spot. I set PMix2 to PS2, which is on the grip but and easily activated/deactivated by your middle finger.. To do this go to the SWTCH menu. Set PS1 to PROG MIX1 / ALT Set PS2 to PROG MIX2 / ALT You can flip PS1 and PS2 depending on what you feel most comfortable using when it comes to activating your front and rear dig. 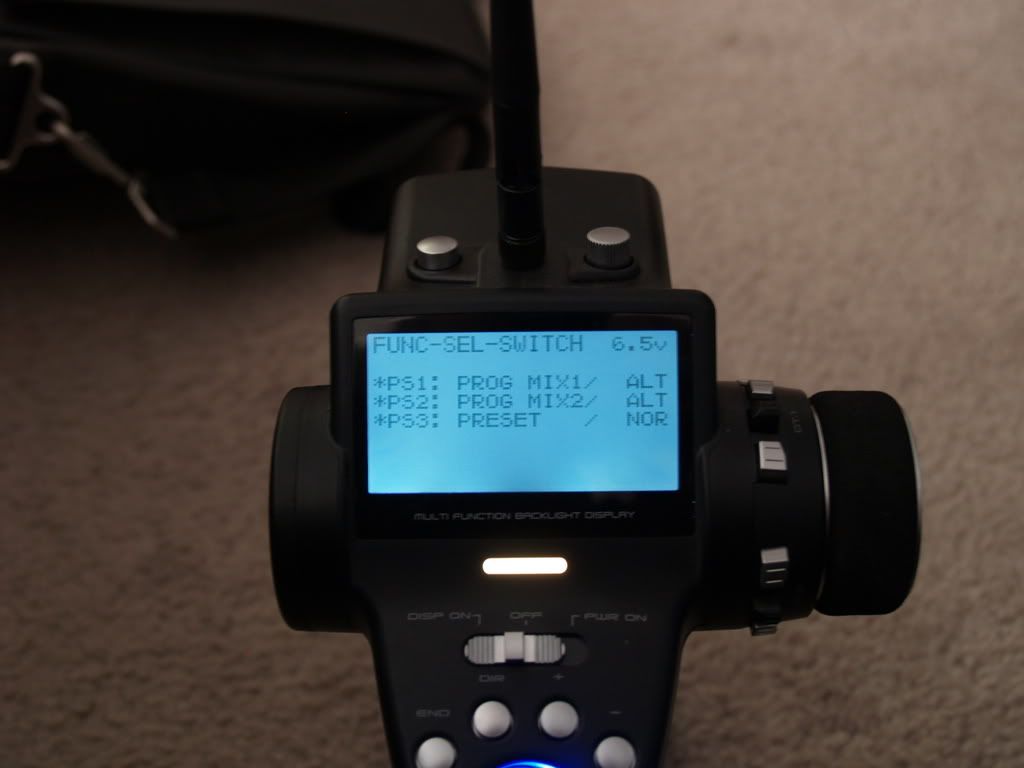 When you first turn the radio on you will need to hit PS1 and PS2 to activate both mixes and give you 4 wheel drive. If I hit the switch again it turns the mixing off, that means that the 3rd channel is not seeing ANY throttle which should give me standard dig with lock (the lock comes from the drag brake settings on the ESC). Now for adjustable mix of the rear esc. Go to the Dial menu and set the the these three lines as such: *DT1: PM2-B: 10 / NOR <-- you can set this to any of the DT buttons that feel comfortable with your style. PLEASE SEE THE VIDEO TO SEE ALL THE CAPABILITIES I also set the vibrate feature to work every time you hit the switches, when you turn a mix on it pulses twice, when you turn a mix off it gives one long pulse. VERY COOl! Last edited by Harley; 05-15-2010 at 03:31 PM. |
|
| |
|
10-01-2008, 12:40 PM
| #12 |
| I wanna be Dave  Join Date: Feb 2006 Location: Campbell, CA 4 hrs 2Rubicon !
Posts: 2,044
|
Thanks for the Sweet instructions I am very interested in Learning more about this Radio When , where is this Crawlpolooza I will Be sold when: I can figure out if Push Sw 2 is a single movement or full porportion servo input Digital Dial what does it do ? Can it be a full porportion servo input ? or they are 2,3 servo positions What are Digital Dial 1 & 2 used for Going to have a 2 Crawlers I want to know if I can do Single ESC, front steer with 3 micro switches for dual dig with free wheel and where on the radio are those switches For my super single ESC, Front steer, rear steer, Dig servo-full porportion(adjustable) Last edited by toy4crawlin; 10-01-2008 at 12:43 PM. |
|
| |
|
10-01-2008, 01:29 PM
| #13 | |||||
| 20K Club Join Date: Jul 2004 Location: Sending illegals home one Hayabusa at a time.
Posts: 22,981
| Quote:
Quote:
Quote:
Quote:
Quote:
| |||||
|
| |
|
10-03-2008, 11:13 AM
| #14 |
| I wanna be Dave Join Date: Feb 2006 Location: Campbell, CA 4 hrs 2Rubicon !
Posts: 2,044
|
that would be very helpful , thank you I am doing some reading, but it still gets a little confusing, I could learn in a minute if I had it in my hands |
|
| |
|
10-03-2008, 12:38 PM
| #15 |
| Im Brandon   Join Date: Feb 2005 Location: Colfax, CA
Posts: 8,156
|
Nice job Josh, I like the 100% rear and 50% front setting. Have you been able to have a switch setup to enable 100% rear and nothing to the front?
|
|
| |
|
10-03-2008, 12:48 PM
| #16 | |
| 20K Club Join Date: Jul 2004 Location: Sending illegals home one Hayabusa at a time.
Posts: 22,981
| Quote:
Good thinking, Futaba could sure use another team mate like you | |
|
| |
|
10-03-2008, 02:28 PM
| #17 |
| I wanna be Dave Join Date: Feb 2006 Location: Campbell, CA 4 hrs 2Rubicon !
Posts: 2,044
|
4pk sounding good what kind of deal can I get ? maybe I can sell some of my other radios and cars to help fund this. |
|
| |
|
10-03-2008, 02:50 PM
| #18 | |
| 20K Club Join Date: Jul 2004 Location: Sending illegals home one Hayabusa at a time.
Posts: 22,981
| Quote:
| |
|
| |
|
12-12-2008, 07:15 AM
| #19 |
| Newbie Join Date: Sep 2008 Location: China
Posts: 8
|
Will this work with the tamiya 3 speed? also will it work if we had the MFU?
|
|
| |
|
12-12-2008, 07:53 AM
| #20 | |
| 20K Club Join Date: Jul 2004 Location: Sending illegals home one Hayabusa at a time.
Posts: 22,981
| Quote:
I will do step-by-step instructions for this application soon, I just hadn't thought to post them. As for the MFU, I do not believe you will be able to run the MFU to it's full potential. The MFU is designed with very OLD technology in mind. It makes you use radios with analog trim functions and such. I know the Tamiya Fans have really been pushing for them to update this, all you can do is join them in trying to persuade Tamiya. | |
|
| |
 |
 LinkBacks (?)
LinkBack to this Thread: http://www.rccrawler.com/forum/electronics/136728-4pk-setups-tips-tricks-help.html | ||||
| Posted By | For | Type | Date | |
| • Afficher le sujet - Quelqu'un connais bien la radio Futaba 4PK ? | This thread | Refback | 10-05-2011 06:51 AM | |
| • Afficher le sujet - Mon nouveau joujou | This thread | Refback | 10-05-2011 06:04 AM | |
| |


 Linear Mode


